The Event Loop and Callback Hell
Enjoy these notes? Want to Slam Dunk JavaScript?
These are notes based on my Beginner JavaScript Video Course. It's a fun, exercise heavy approach to learning Modern JavaScript from scratch.
Use the code BEGINNERJS for an extra $10 off.
Before we get into promises, we need to talk about how JavaScript is asynchronous and how the event loop works.
You may often hear that almost everything in JavaScript is non-blocking (asynchronous). What does that mean?
For us to understand that, we need to first talk about how JavaScript events work.
JavaScript is a single threaded language, meaning that only one thing can be run at a time. Some other languages are multi-threaded, which means they can run multiple processes at once.
Because JavaScript is single threaded, which means we can only run one thing at a time.
Let's visualize that with some examples.
Open up the event-loop.html file within the exercises/ directory. Add two logs within the script tag and then refresh the page to check them.
console.log('Starting');
console.log('ending');
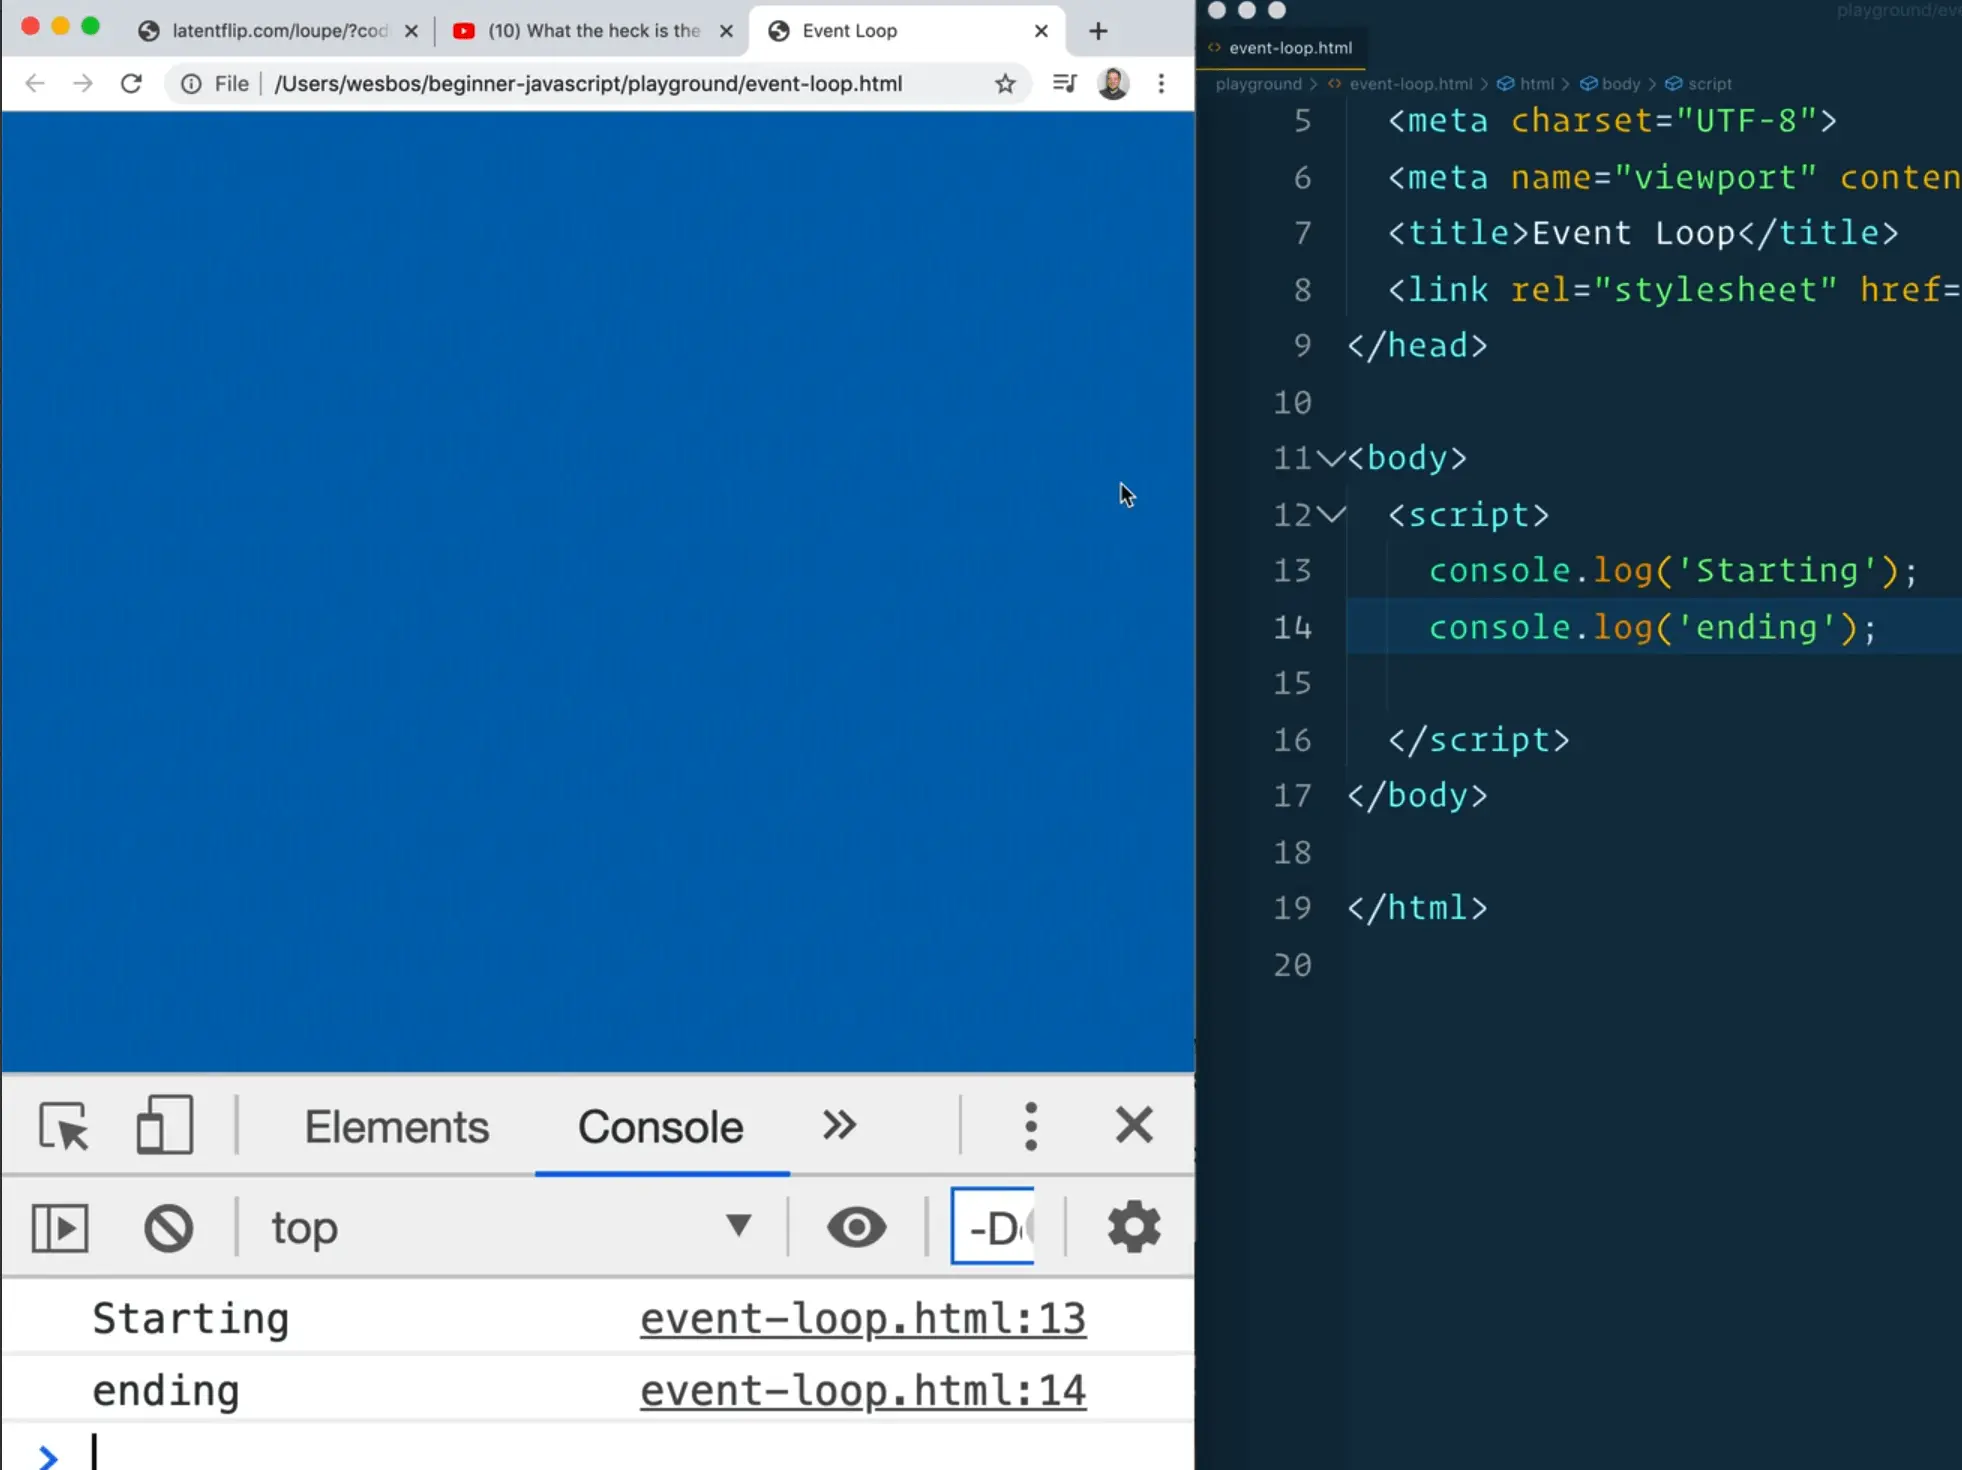
No one is surprised by that.
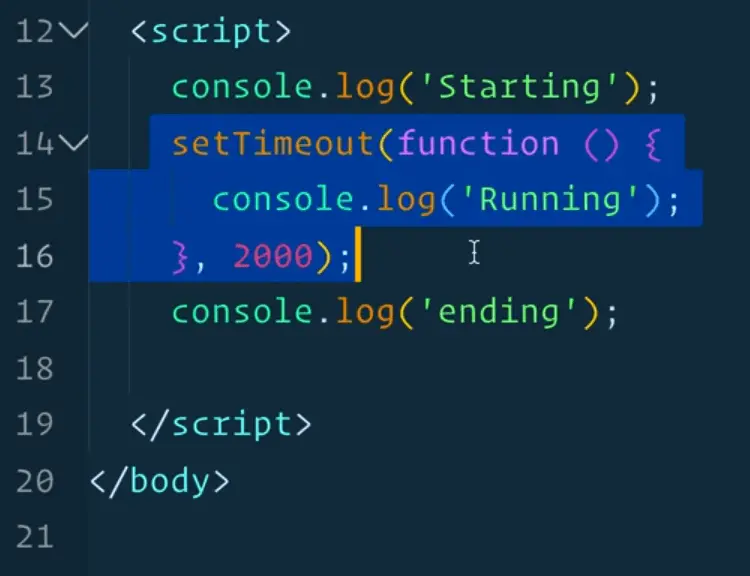
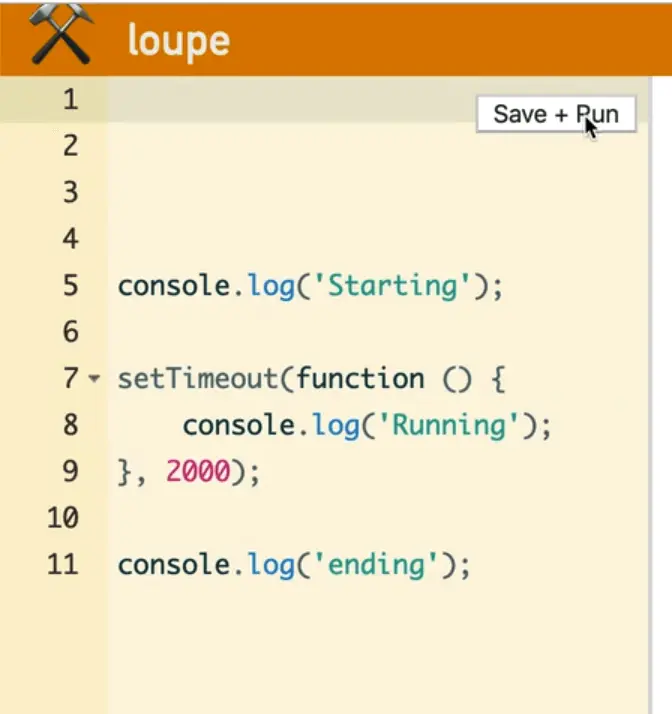
Let's add some code in between the two logs. In this demo we want to wait for two seconds, which we could do with a timeout.
console.log('Starting');

setTimeout(function() {
  console.log('Running');
}, 2000);

console.log('ending');
Now if you refresh the page, what will you see?
You might expect to see starting, running, ending, but instead we get Starting, ending, and then running.

Why is that not in the order that we coded it in? Shouldn't the timeout cause the code to pause for two seconds, log running and then log ending?
It doesn't work that way. The way that JavaScript works is it will parse the first line and log Starting.
Next, it will parse the next few lines which is the setTimeout() function. It will say "okay I won't do anything yet but after two seconds I will come back to this code".
It moves on and logs "ending".
2 seconds later, the callback that the setTimeout function queued up comes back and is executed.
That is what is referred to as the call stack.
The call stack and event loop is a pretty complicated thing to understand.
Instead of Wes trying to explain it, he has some homework for us.
Philip Roberts has an amazing talk where he explains the event loop. You do not have to watch it before continuing with the course but it's probably one of the most popular JavaScript talks ever given and he does an excellent job of explaining the event loop.
https://www.youtube.com/watch?v=8aGhZQkoFbQ
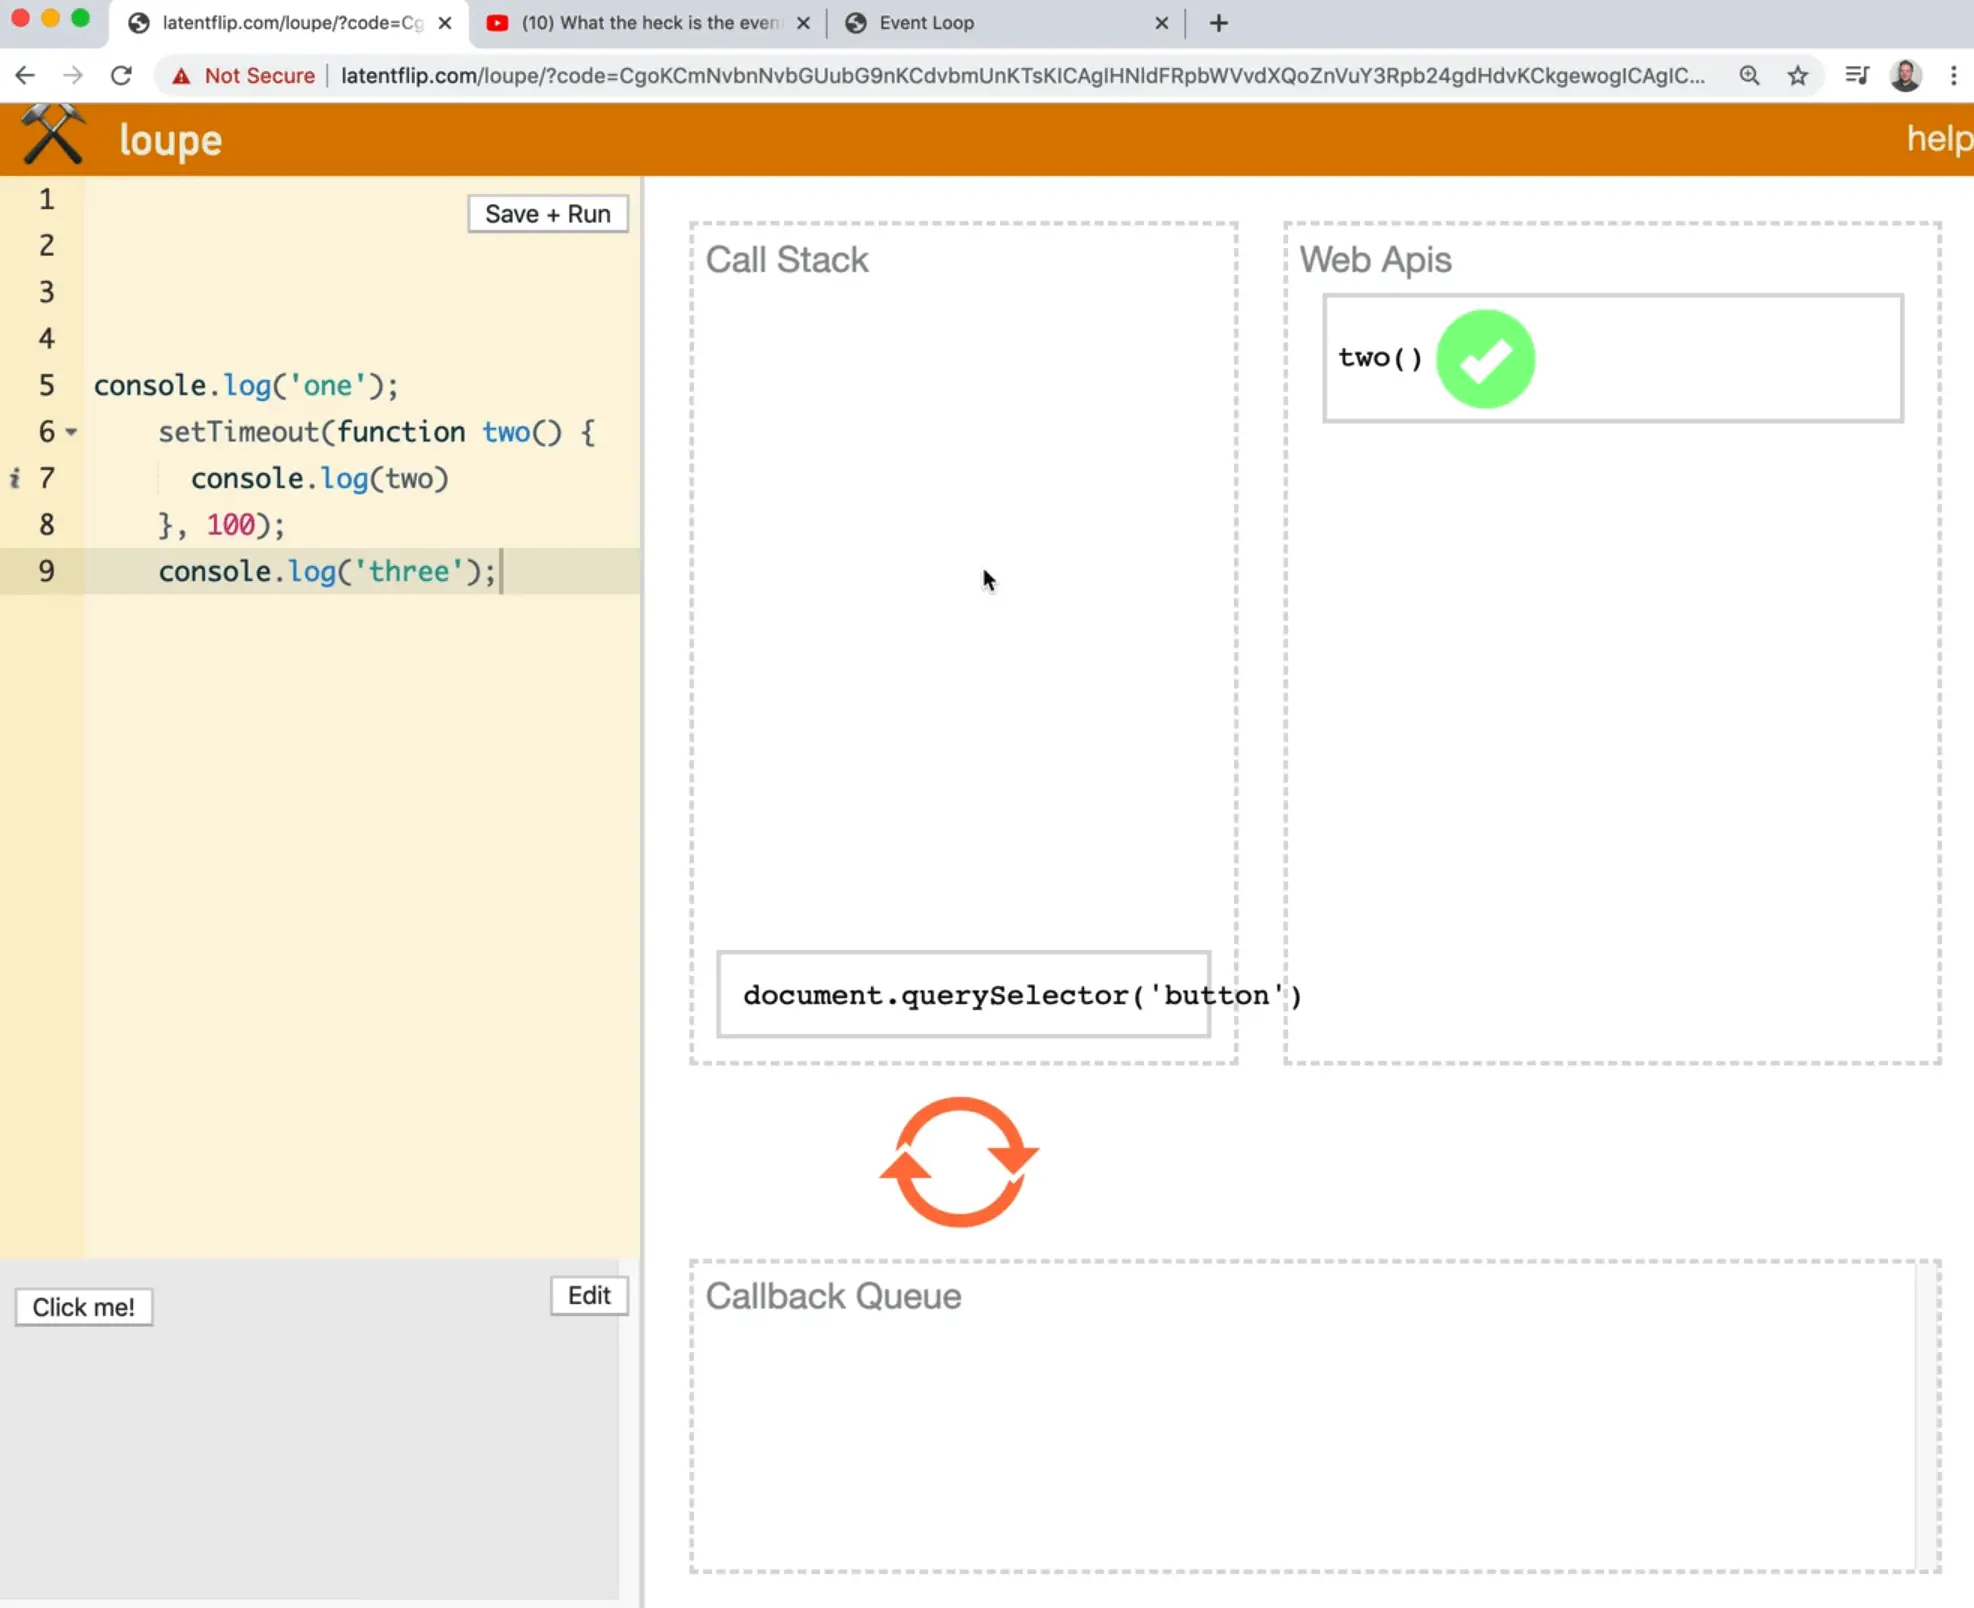
Philip Roberts also built this cool little tool called loupe which will help us visualize the callstack.
We have already looked at the callstack in JavaScript and we have seen when you click something, it gives you a trail of what functions were called up to then.
However we know that the call stack can only ever run one function at a time.
So what happens in a scenario like our example where you have two logs between a setTimeout?
JavaScript is asynchronous.
What that means is that JavaScript won't stop running that code, instead it will put it off in what we call the web API, and when that comes back after two seconds, it is going to stick it in the callback queue.
When the call stack has a free second, when it's not currently running anything, it is going to reach into the callback queue, grab the callback and run it for us.
Let's go ahead and take the code and paste it into the loupe page.
Note: at the time Wes is recording the video, the tool is a bit outdated and does not handle arrow functions, or back ticks so just use regular function declarations.
(Wes is going to modify his timeout to 7 seconds instead of 4 so he can talk to us. Feel free to choose a shorter one for your example)
Once you have done that click save and run.
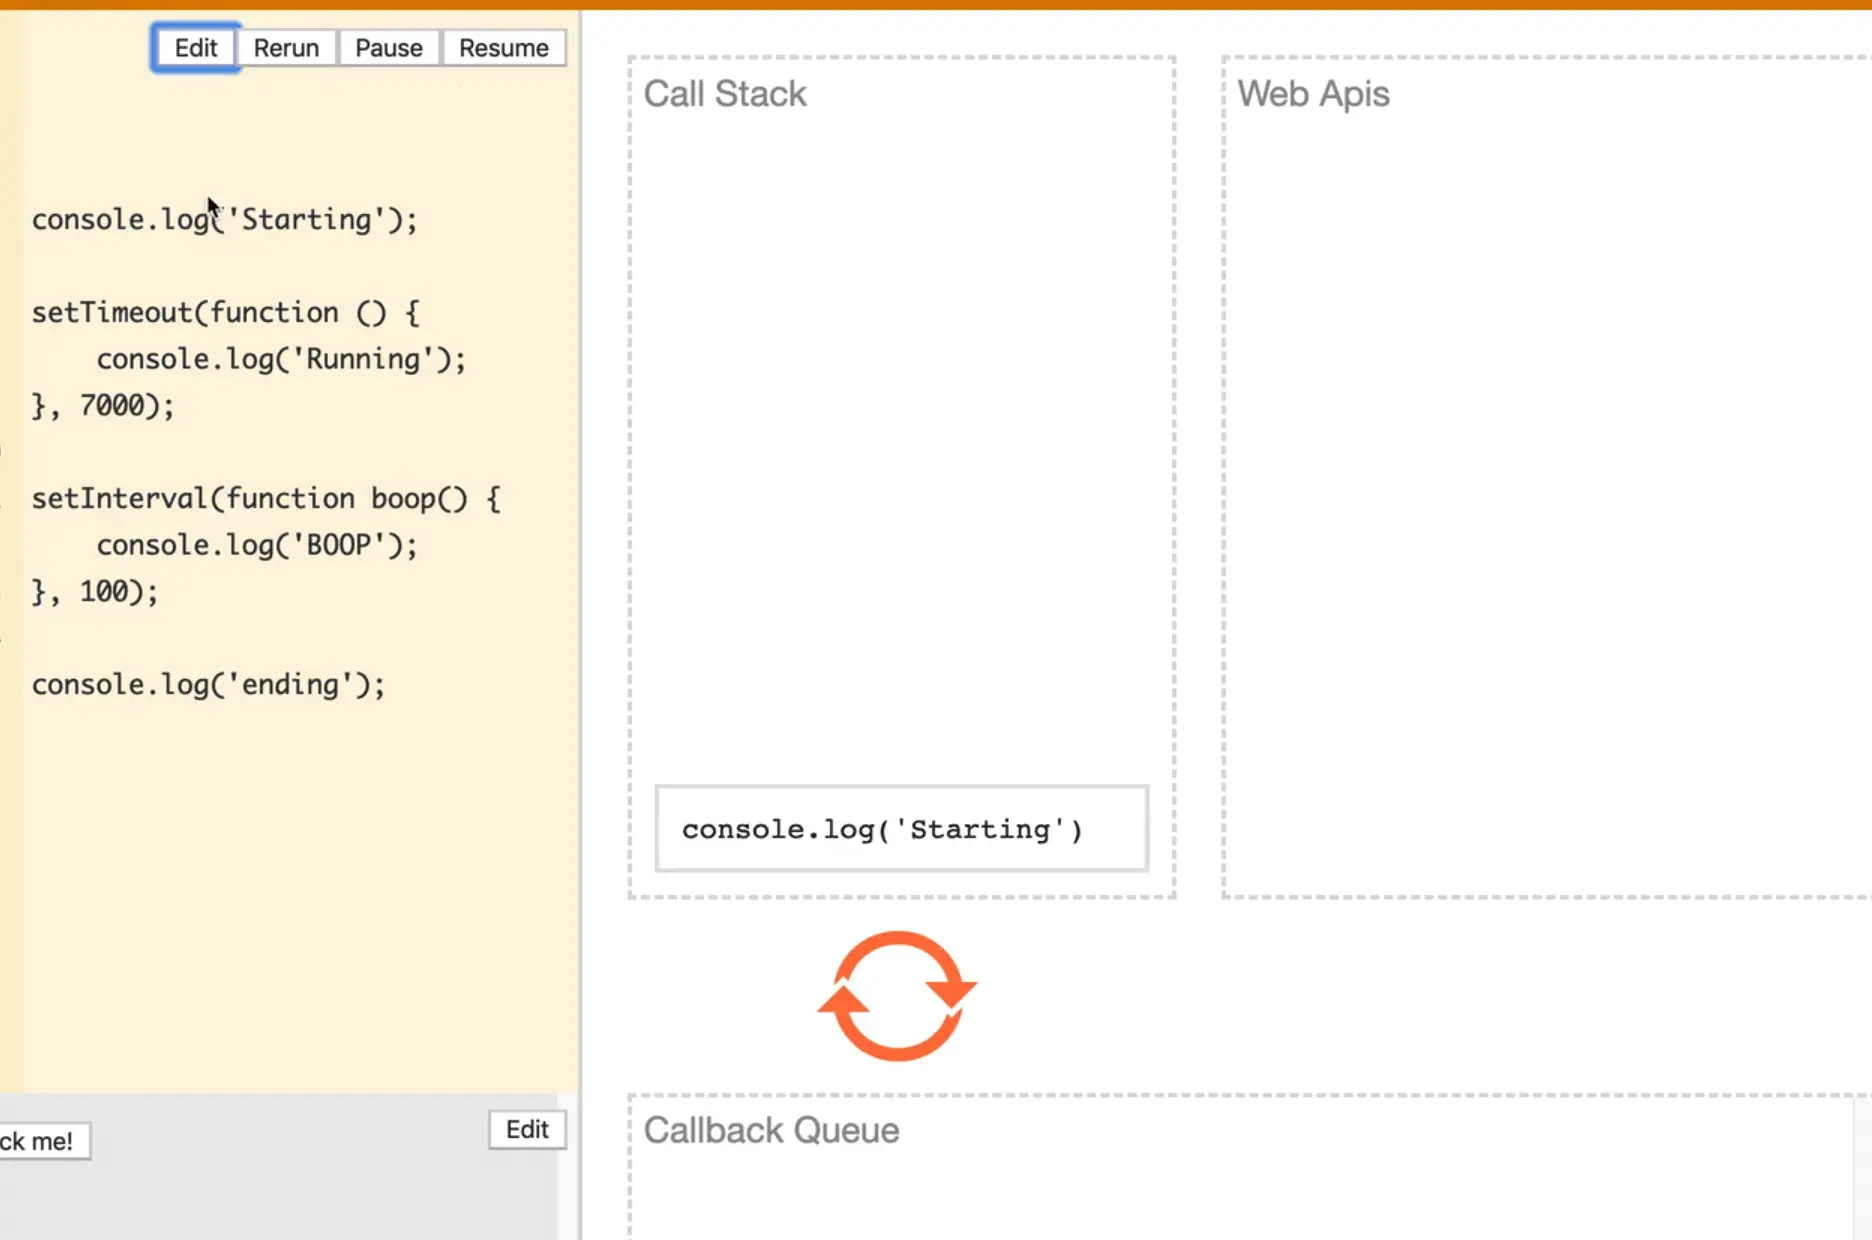
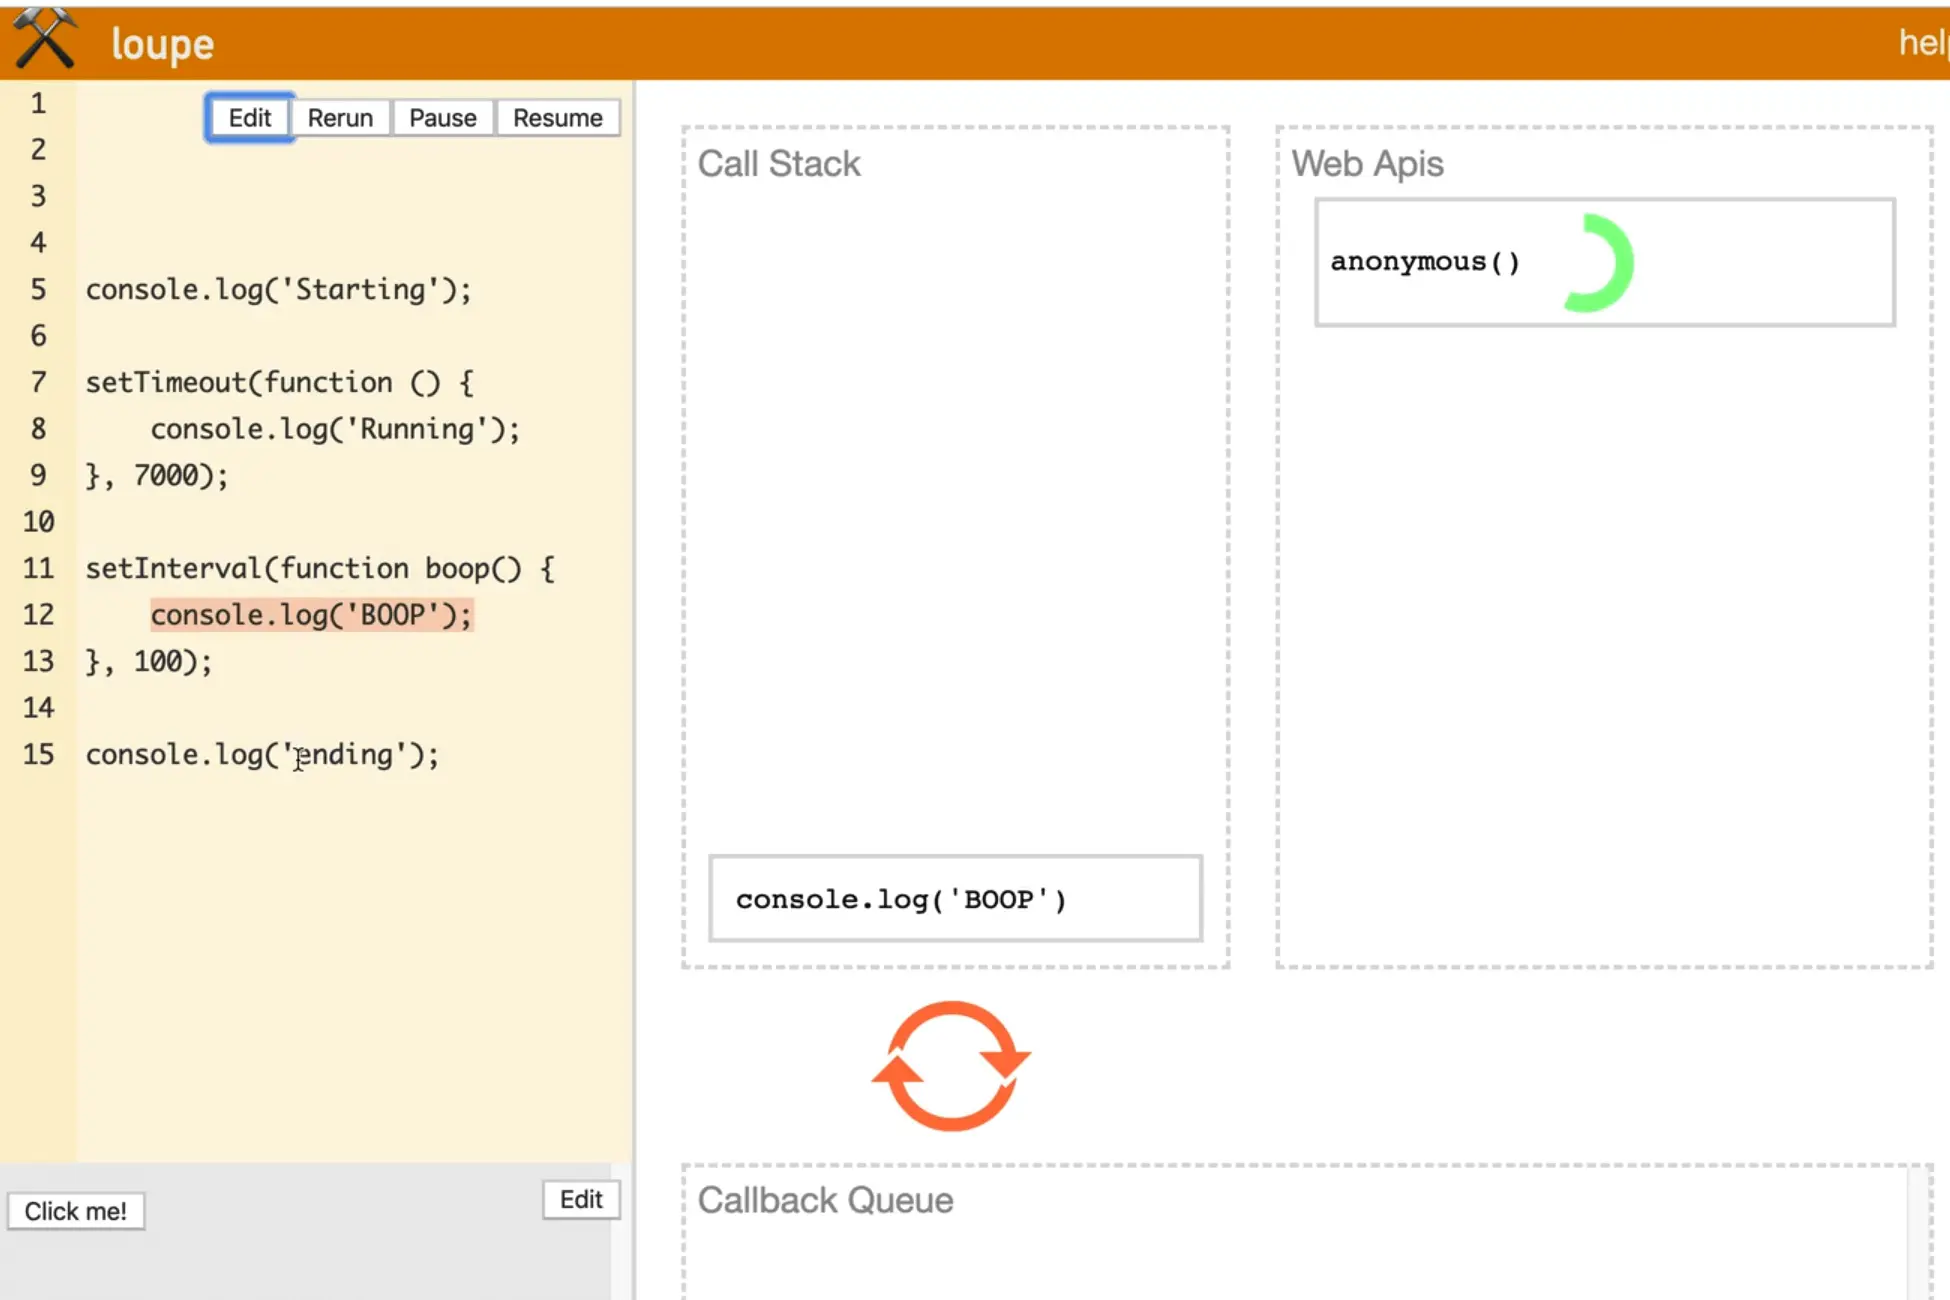
The first thing that it runs our log.

Next it runs our time out function.
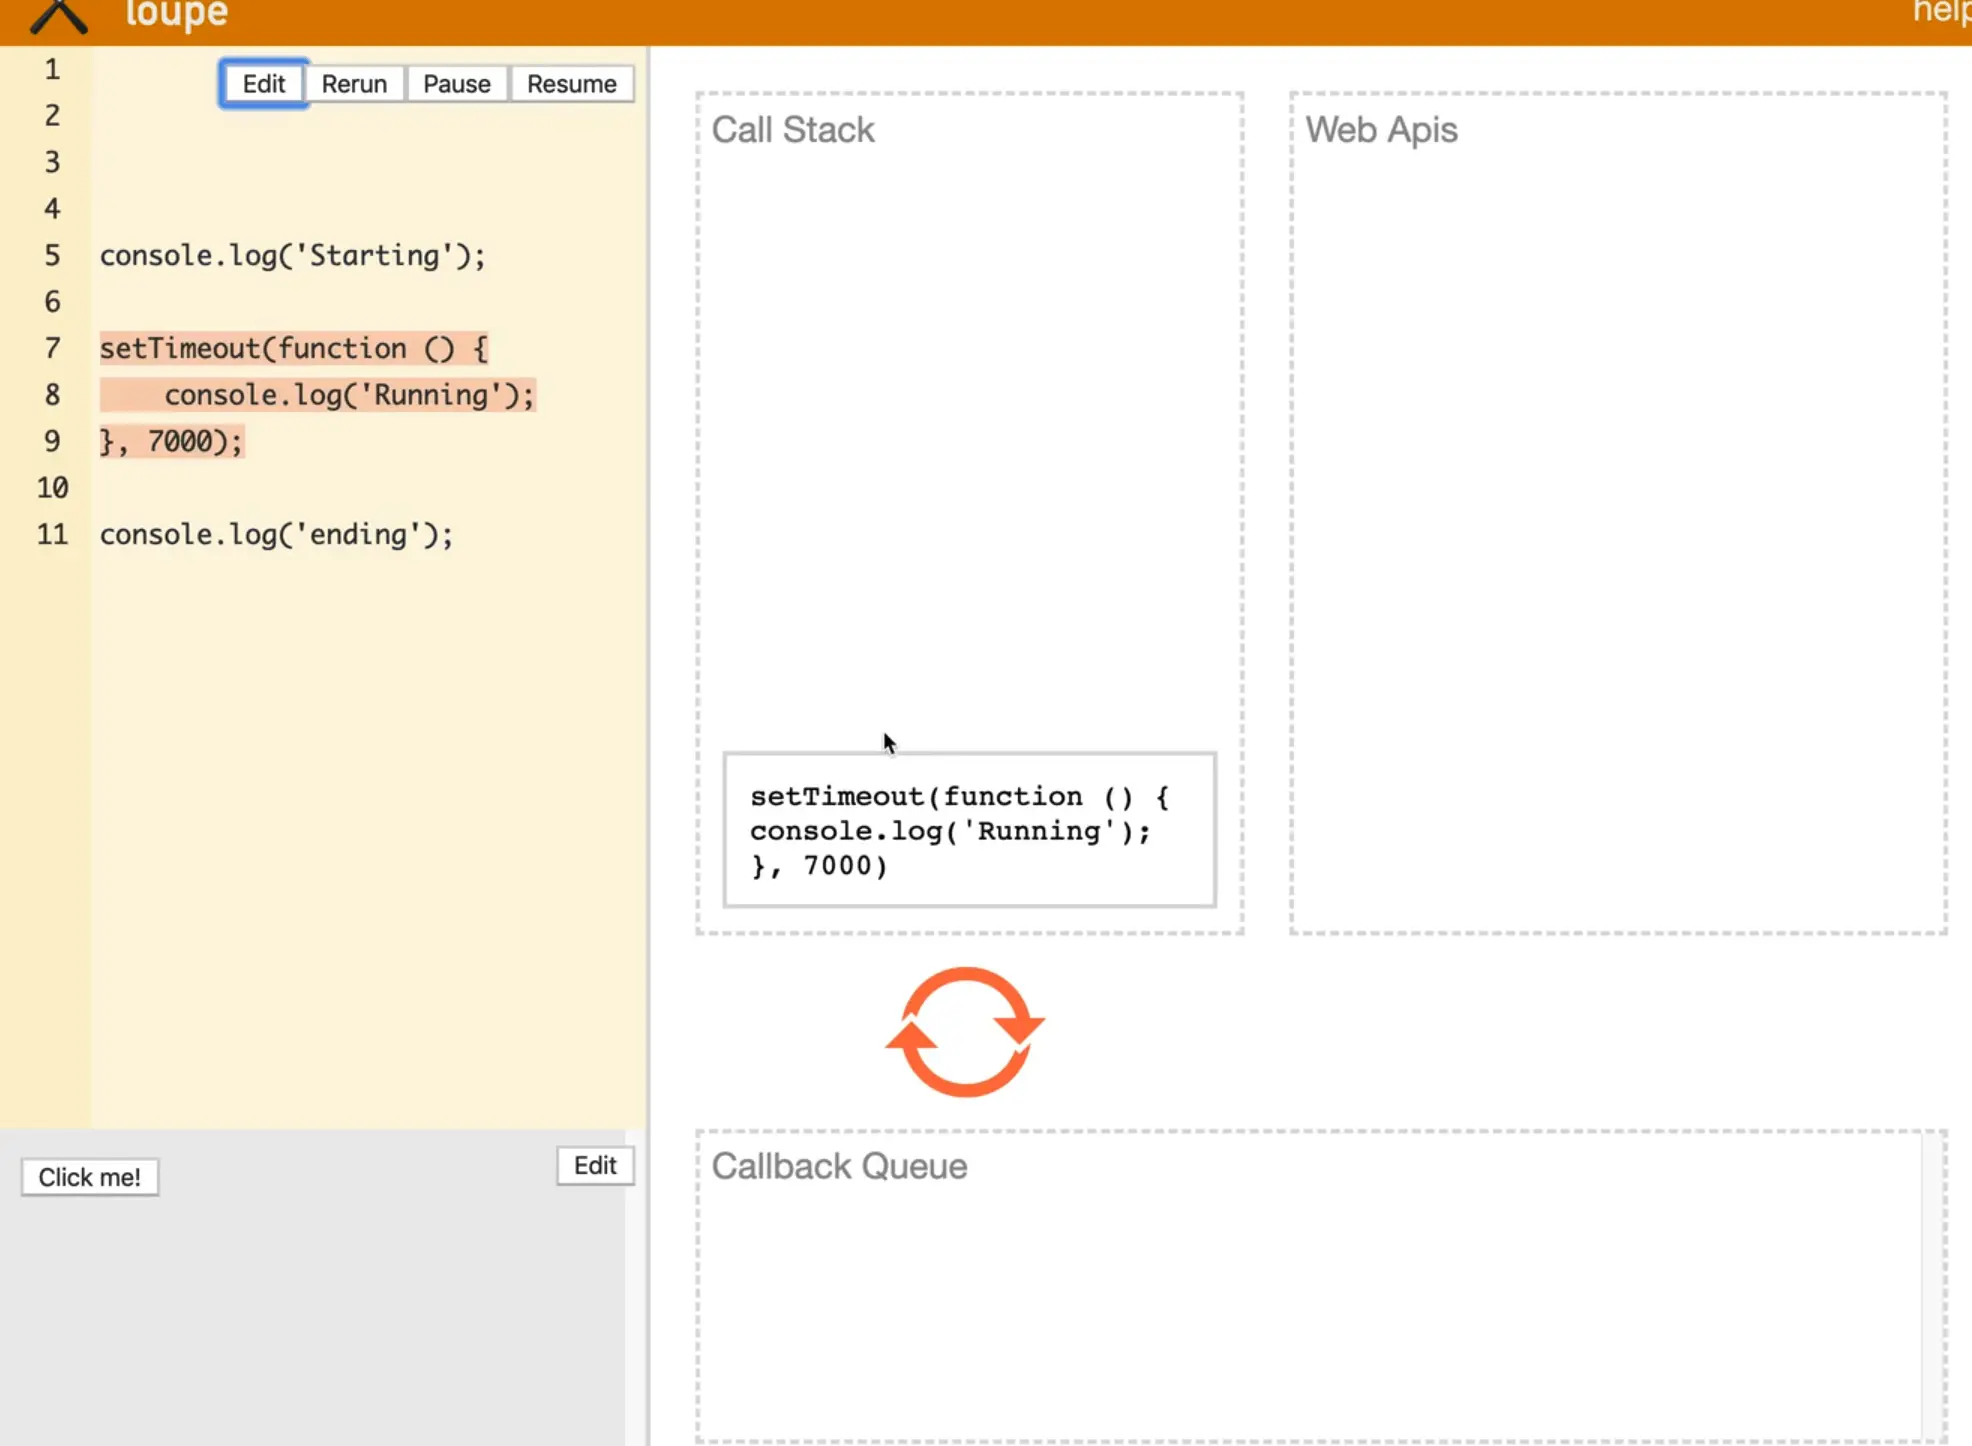
It sees that there is a callback so it puts that in our Web Apis.
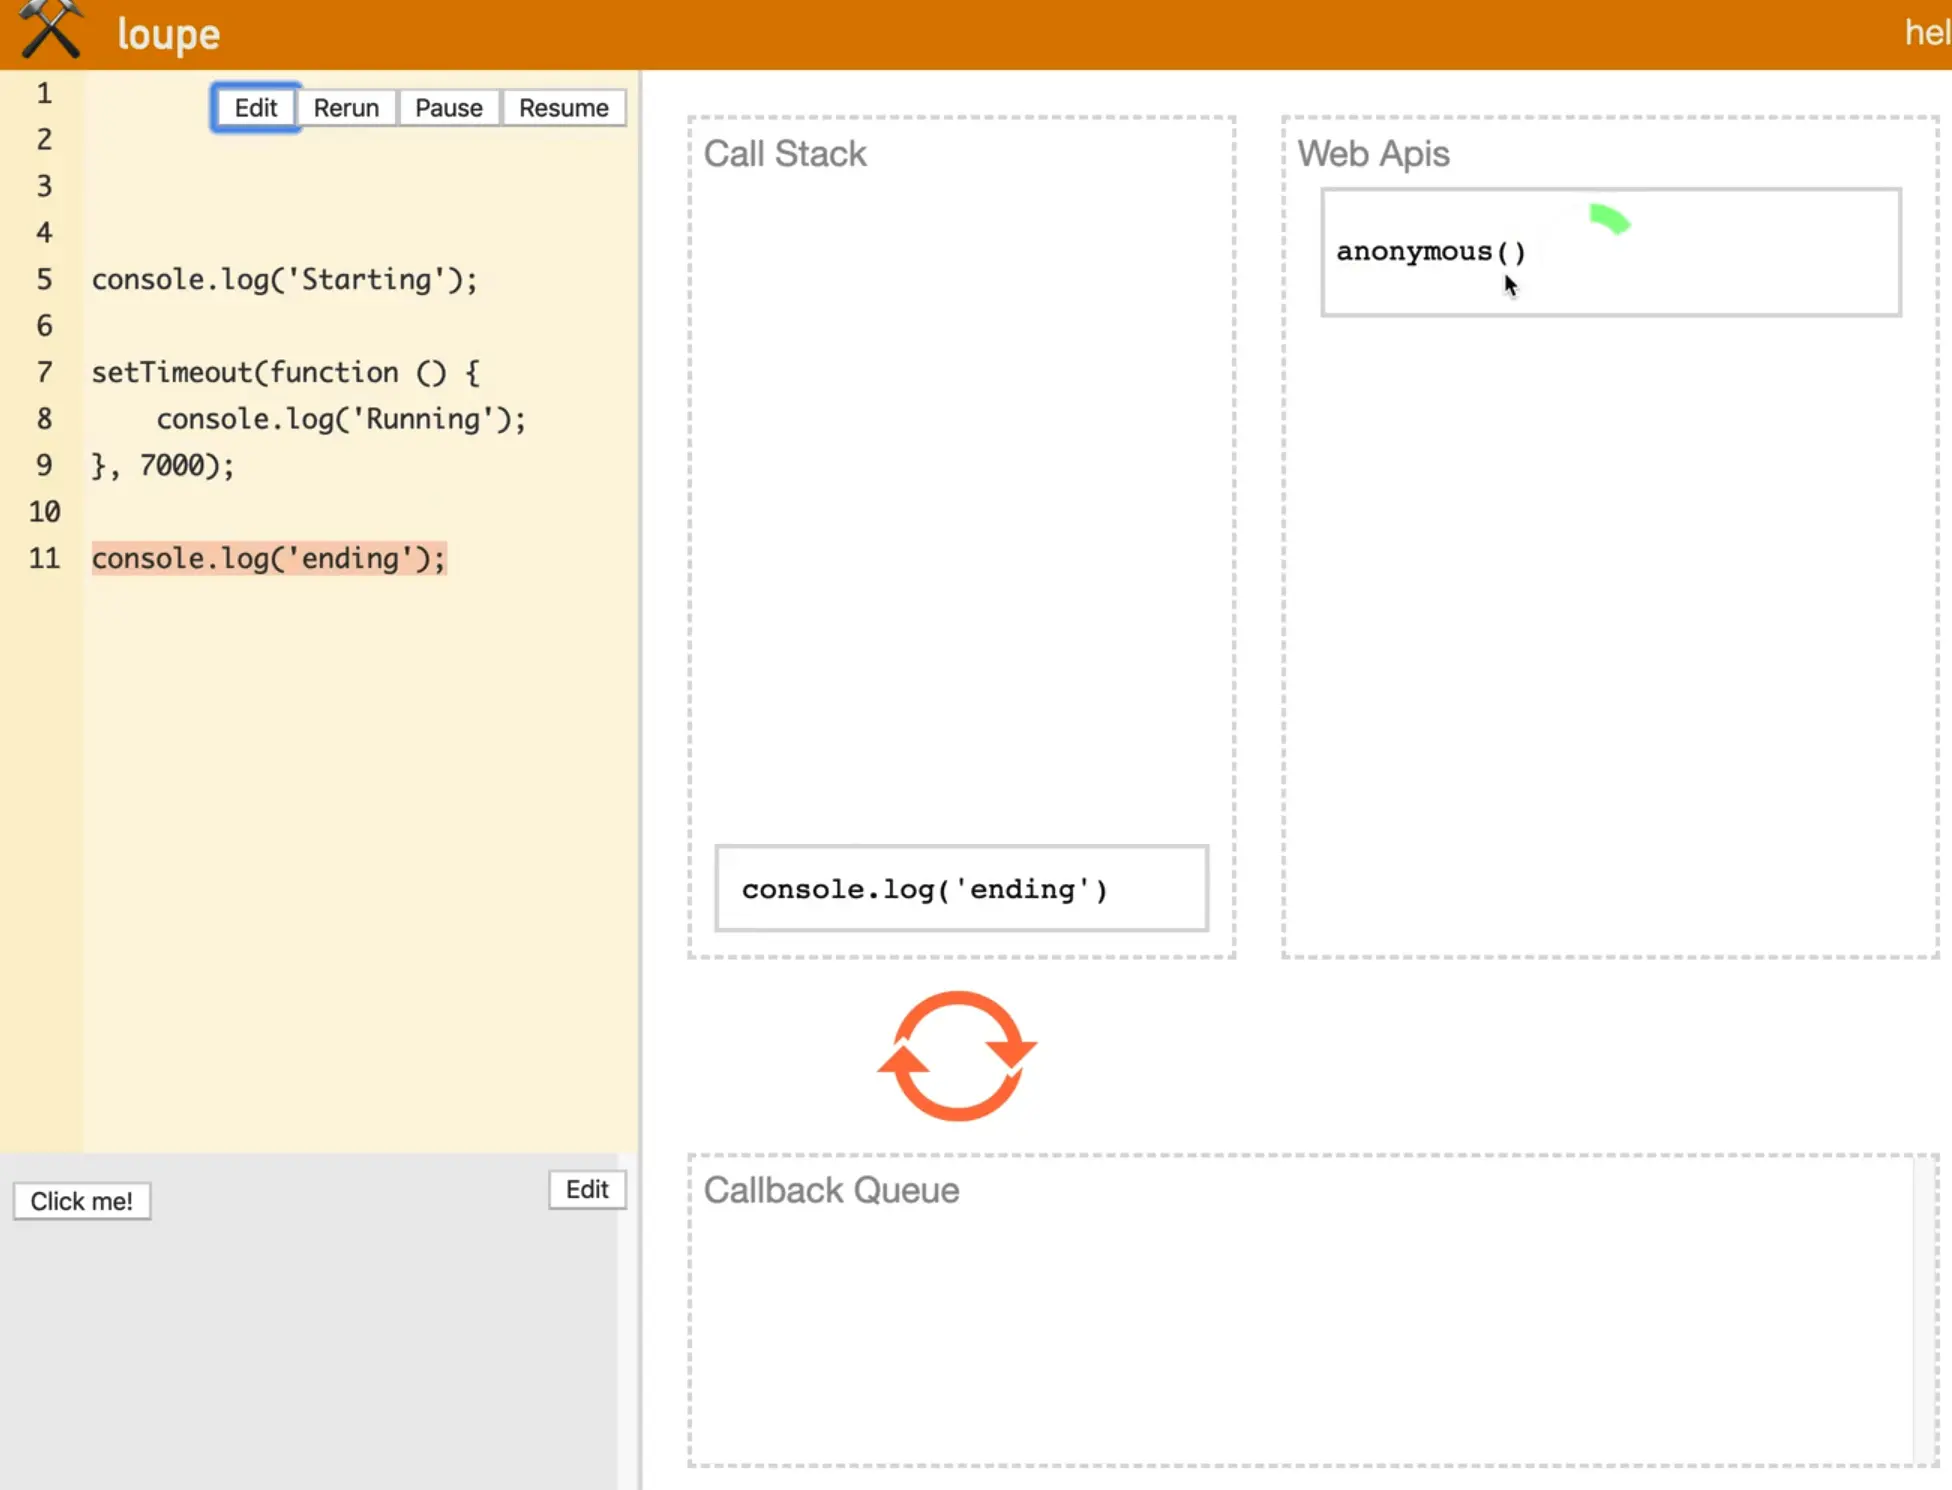
When the callback is done waiting, it will stick it into the callback queue.
If the call stack has nothing else to do at the time, it will reach into the queue and grab the next thing.
So the callstack is what JavaScript itself is doing. The Web Apis are things that are waiting or things that we are listening for like event handlers (if we were listening for a click on a button, that would go in our web apis).
When something happens in the Web Api (like the click of a button or a timer that has finished), it will stick the callback into the callback queue which the call stack will reach into when it has nothing left to do.
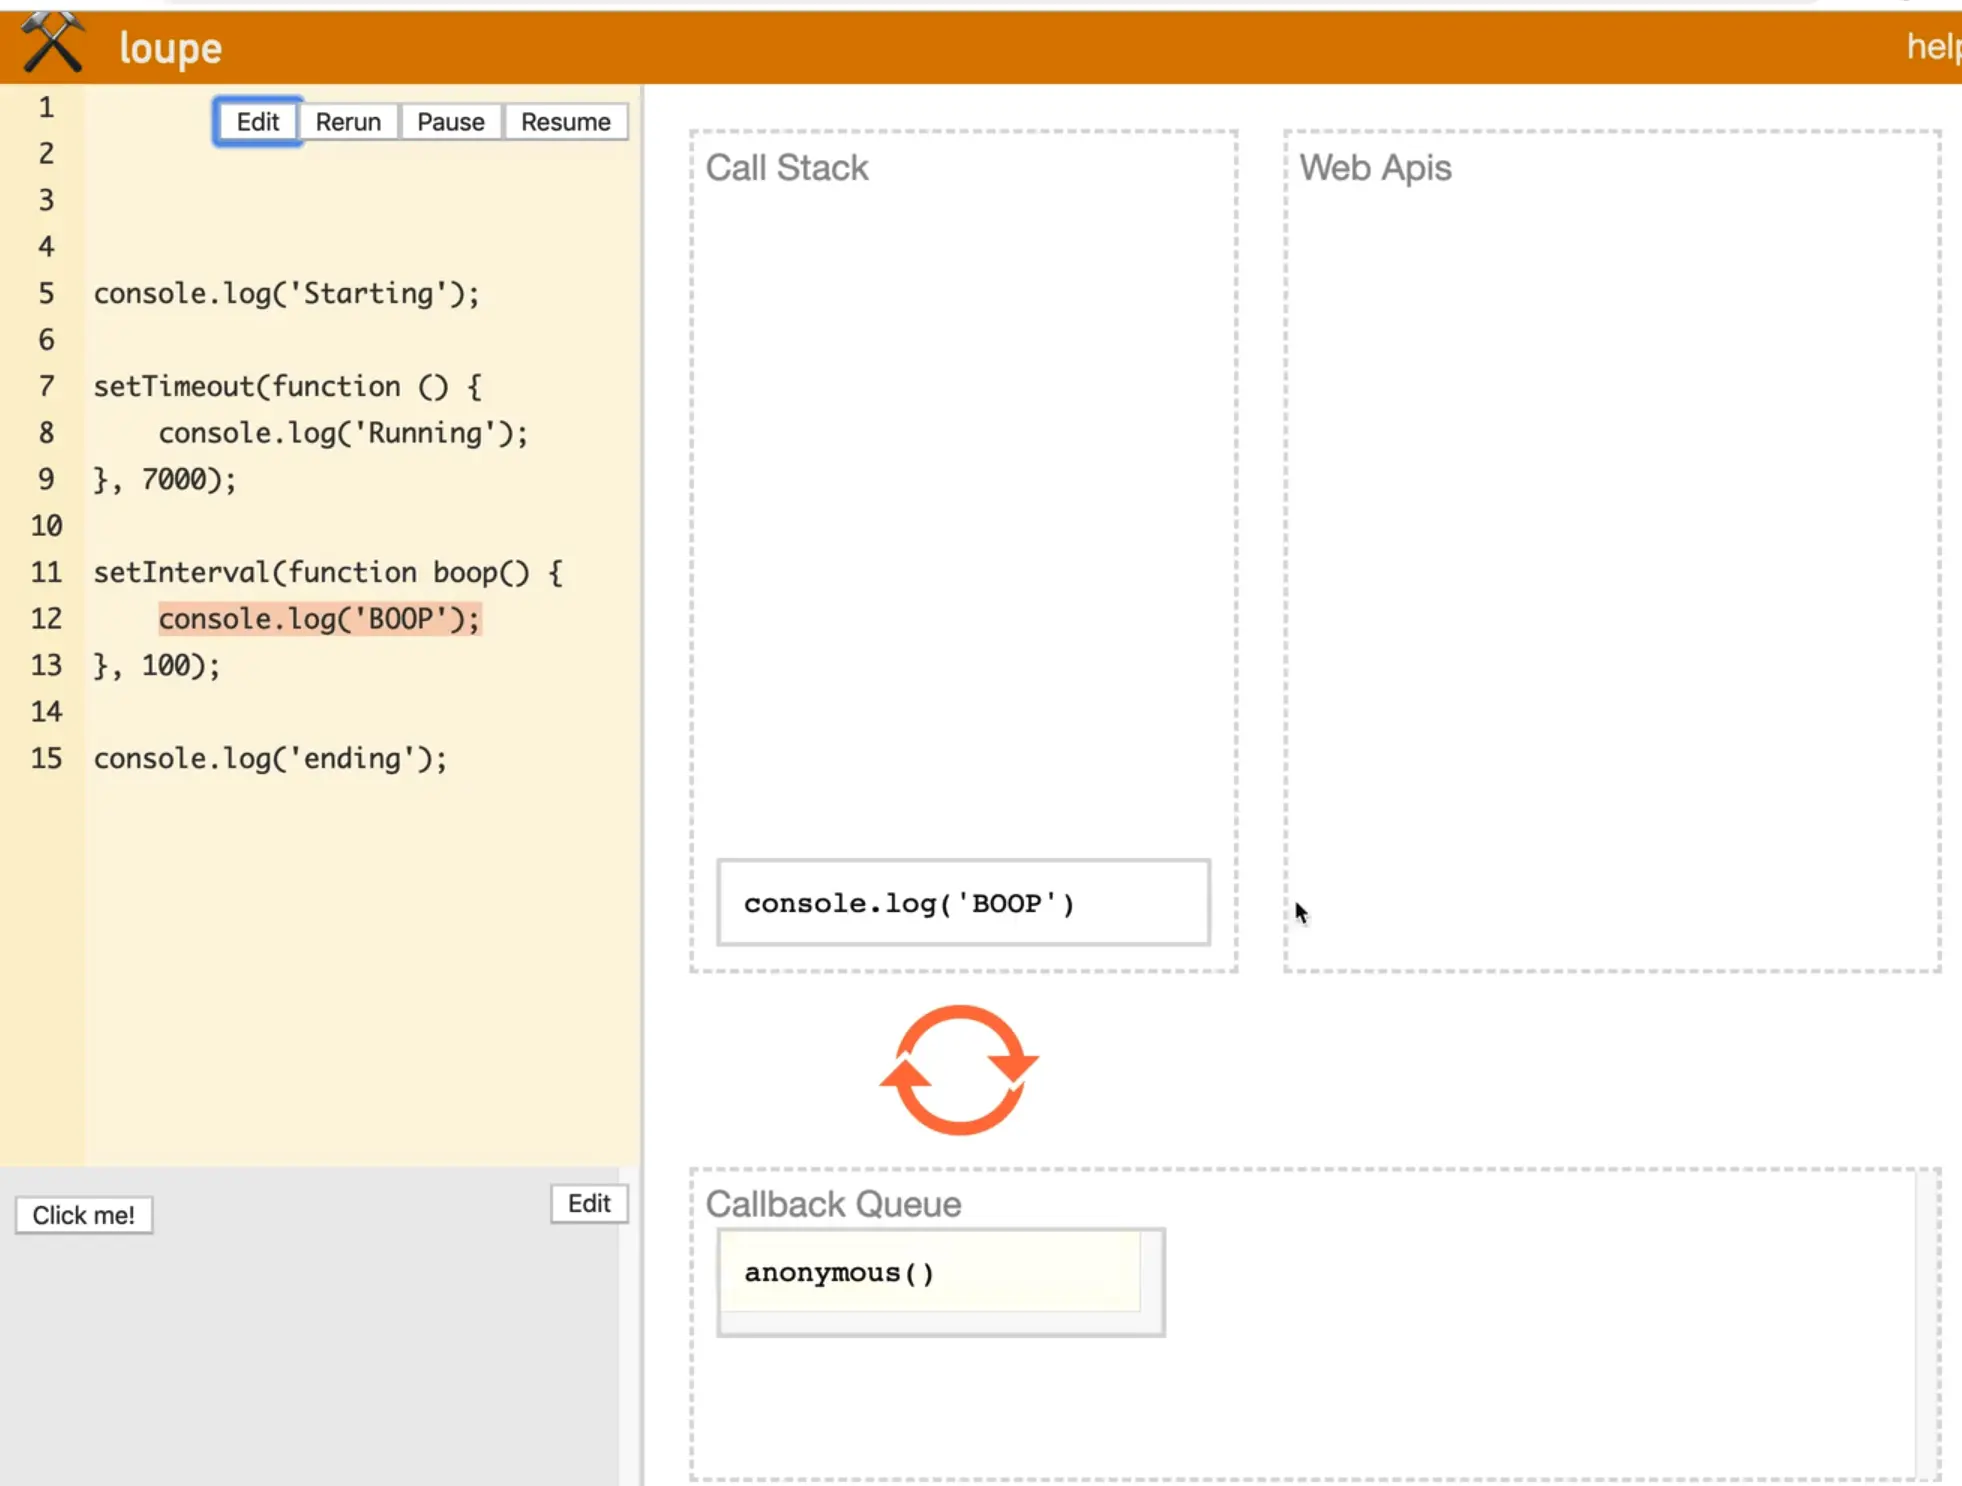
Let's say after the setTimeout we wanted to add an interval that logs BOOP every 100 milliseconds. Name the function boop so we can visualize it more easily.
The first log and setTimeout behave just like they did before. When it gets to setInterval, we already have a callback for setTimeout in the web apis.
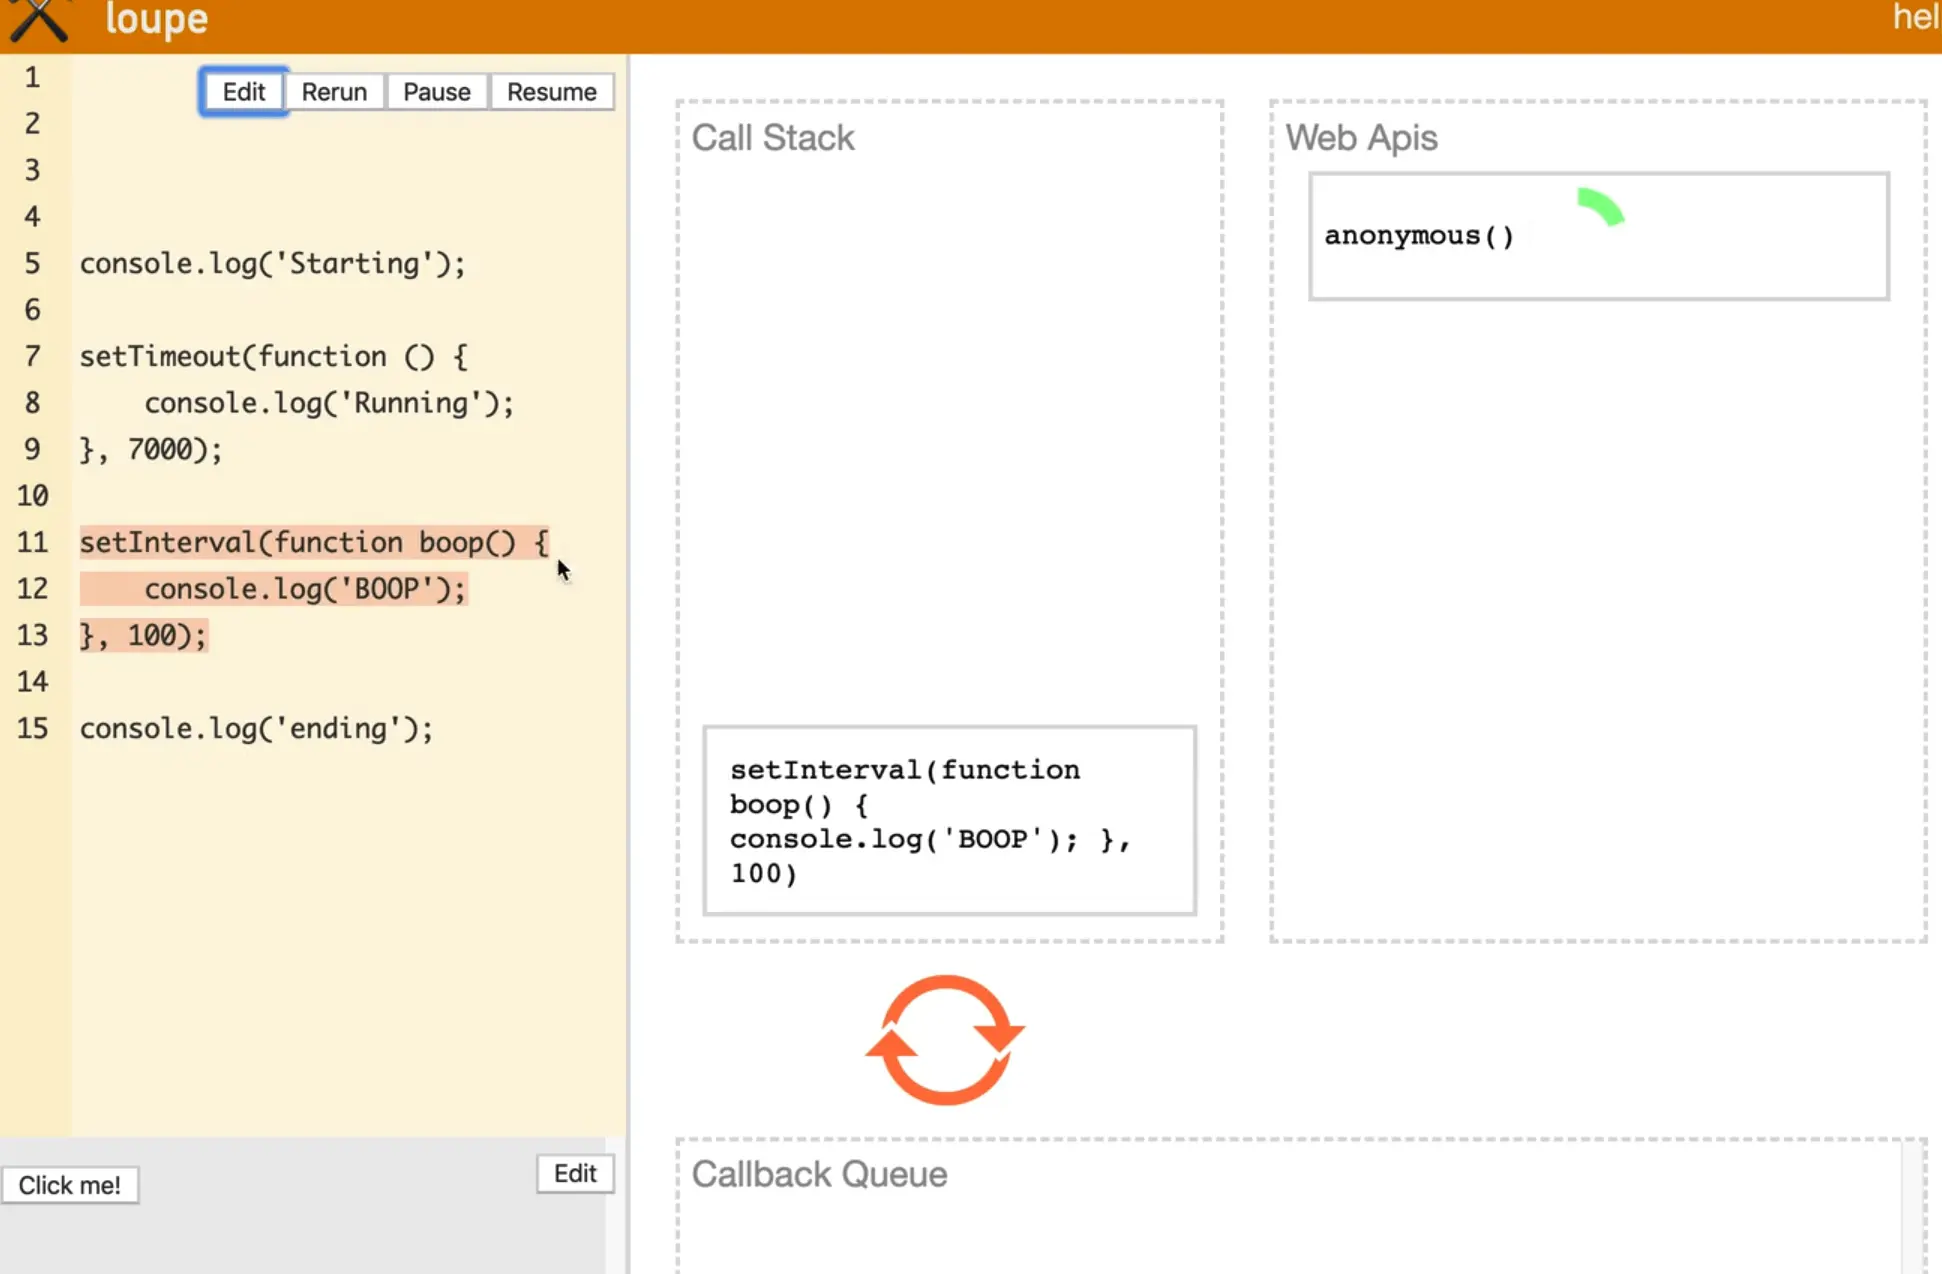
Then it logs "ending".
Next ,setInterval runs.
Now every second you can see that it keeps going back to the boop function.
One thing Wes wants to show us is that even if the setTimeout duration was set to 0, you would still get the logs returned in the order of "Starting, Ending, Running".
setTimeout(function() {
  console.log('Running');
}, 0);

console.log(ending);
If you refresh the page and look at the console, you will see that we still get the following...
Starting ending Running

Even though the timeout happens after 0 seconds, what happens is JavaScript runs the first line, then runs the setTimeout and queues up the callback to happen after 0 seconds, then it runs the next line and even though the timeout is 0 seconds, it still adds it to the web api which in turn adds it to the callback queue. Because the browser was already busy with the log, it runs the callback after.
Let's demo that in loupe.
It logs, runs setTimeout, puts running in the web api which puts it in the callback queue, and then when the "ending" log is finished executing, JavaScript grabs from the callback queue and runs it.
As a beginner and intermediate web developer you don't have to understand all the nitty gritty of the call stack and event loop.
What is really important that you understand is JavaScript is single threaded, meaning that the callstack can only ever run one thing at a time.
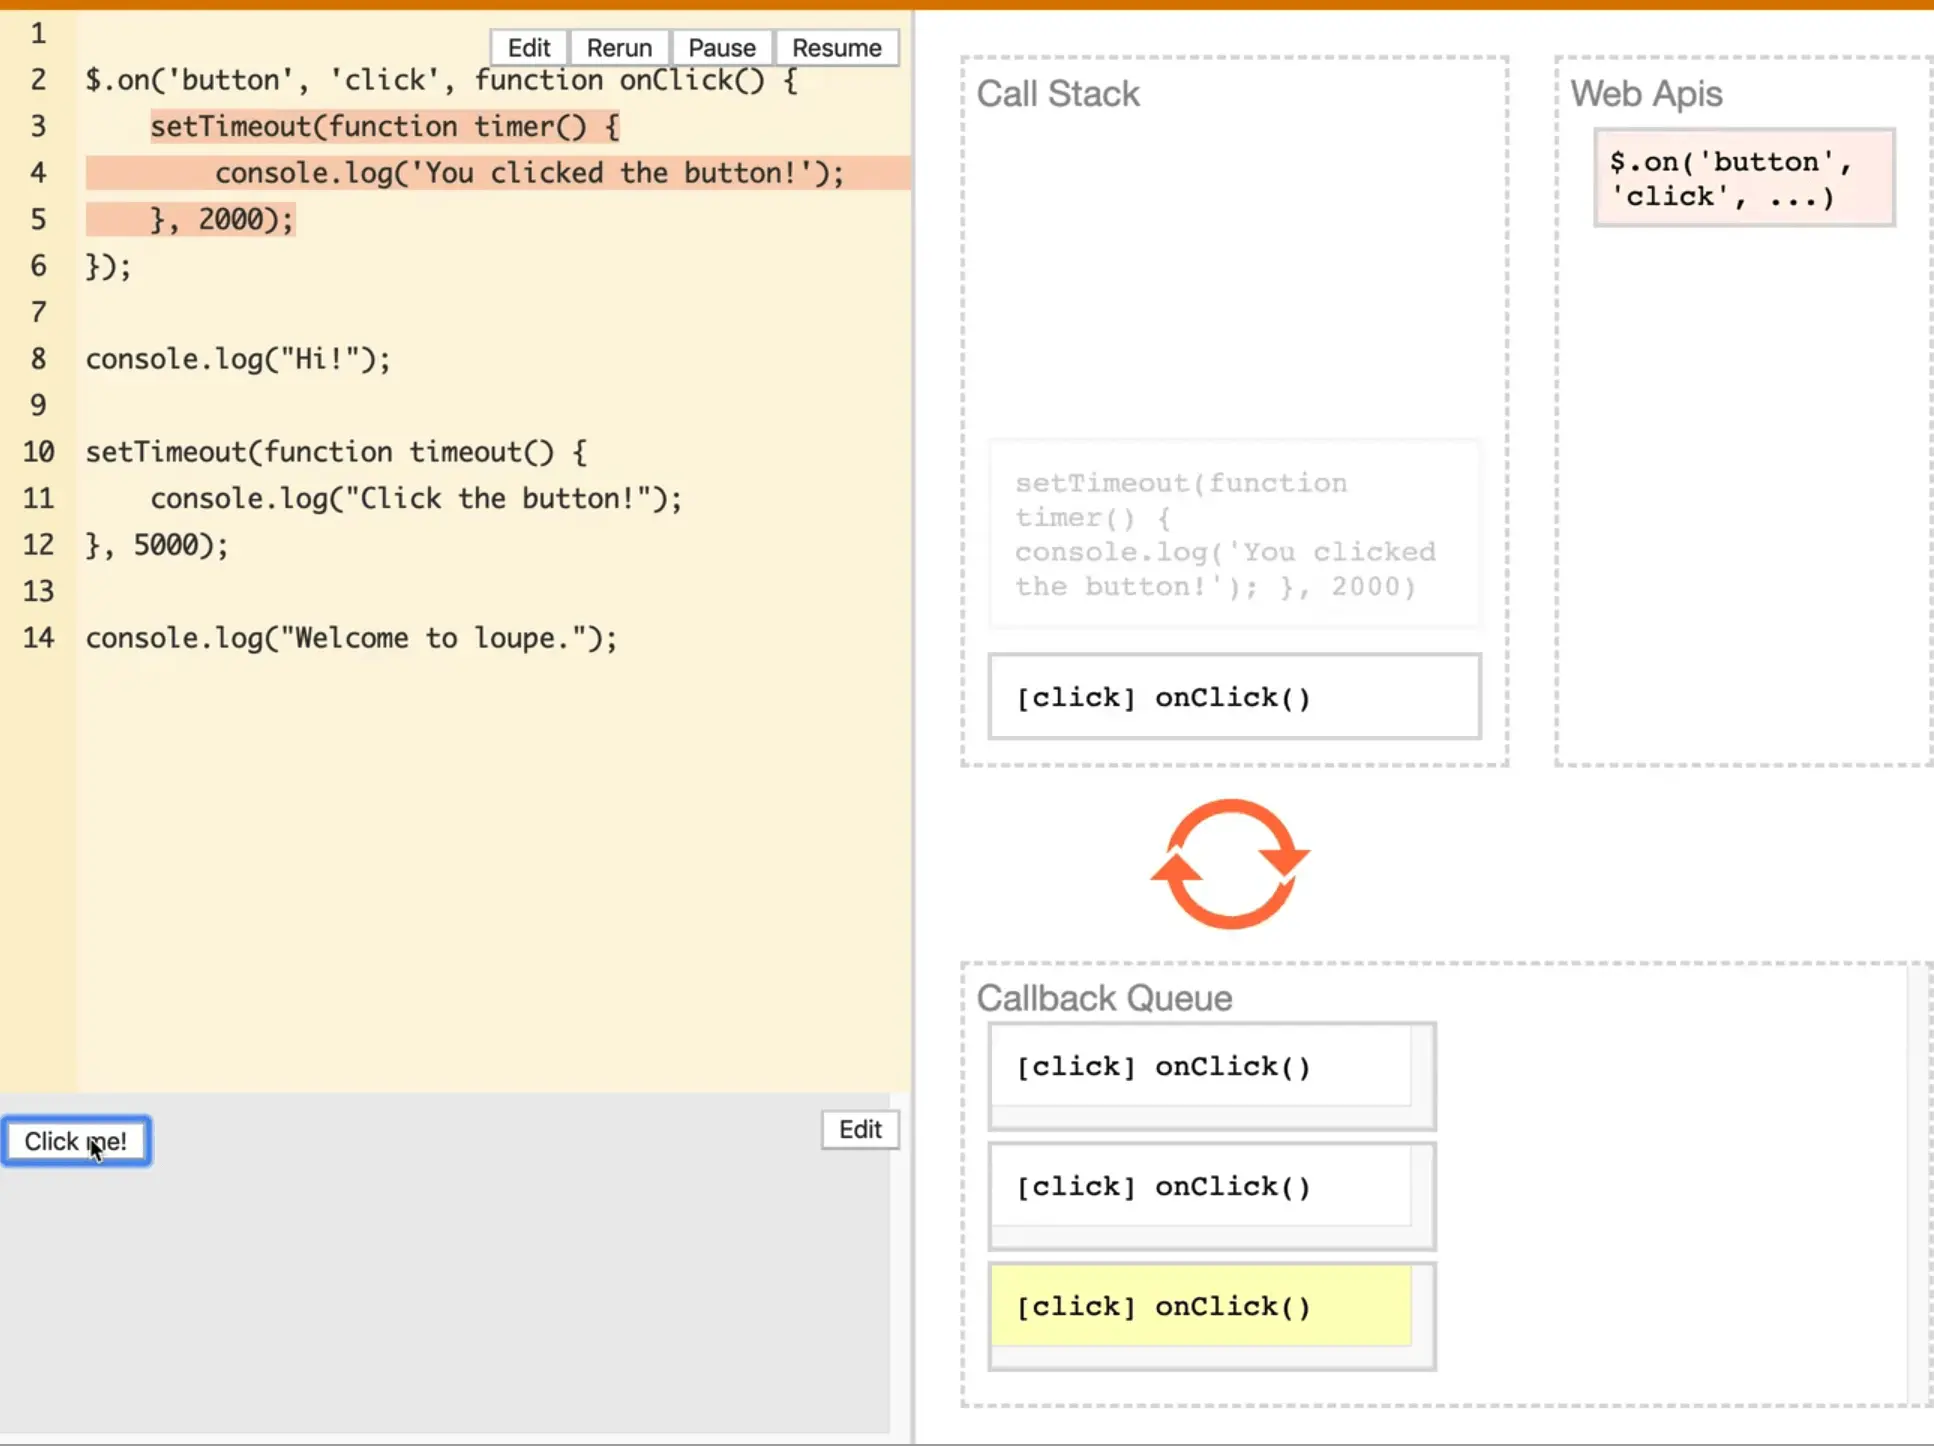
Let's run the default example on loupe that is supplied to demonstrate what happens when multiple things are queued up.
The example is in jQuery but it's the same idea.
When you click a button, we set a timer for 2 seconds that says you clicked me, then it logs "hi" then another timer is set for 5 seconds, and then it logs welcome to loupe.
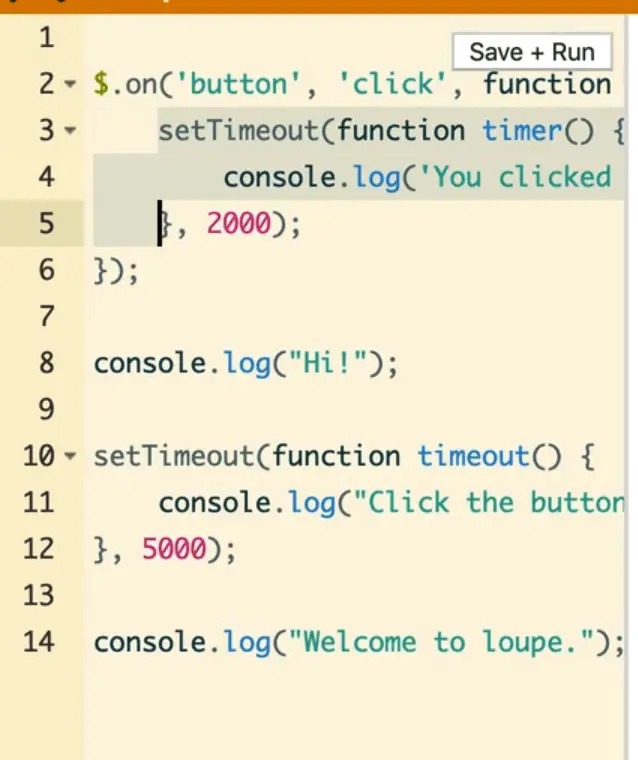
How that works is first the click listener goes on the call stack and gets put into the web apis, then the event listener is added. The hi is run and logged, and after that the timer also gets put in the web apis, and then it logs welcome to loupe. Once the timer is finished, it will get moved to the callback queue.
Now every time we click the button, it sticks an event handler in the queue and you can see the callstack is reaching in and grabbing the next callback to handle itself.
So how do we deal with a scenario in JavaScript where we do actually want to wait for something?
Let's say we wanted to go off to an API and grab some data and then come back to it. We shouldn't have to freeze up the entire browser, or we shouldn't have to stop everything else in the browser while that goes and fetches it. Instead what we want is to send off the fetch request and to go and get the data and then carry on with the rest of our life.
When the data does come back to us, we can deal with it, very similarly to how setTimeout will run the callback after the alloted time.
Callbacks are great, but it is very difficult to orchestrate multiple things at once.
Let's try with an example.
What we want to do is make a div and do a few things to it:
- change the text to GO when clicked
- Make it a circle after 2 seconds
- Make it red after 0.5s
- make it a square after 0.25 seconds
- make it purple after 0.3s
- fade out after 0.3s
That is not an uncommon thing in JavaScript, where you have to perform some things in a series, one after the other.
What we will do is make a div within the body tag and give it a class of go.
<div class="go">Click Me</div>
Comment out all the other code we have in the script tag and let's start with selecting the div and changing the text to go when clicked.
When the div is clicked, we will grab the event and save the div element in a variable el. The reason we are saving that in a variable will make sense in just a second.
go.addEventListener('click', function(e) {
  const el = e.currentTarget;
  console.log(el);
})

As you can see, we have the div.
Let's add some default styling there. Add style tag on the page with some styling.
.go {
  margin: 1rem;
  background: white;
  padding: 5rem;
  width: 25rem;
}
Now when you refresh the page, your button should look like this:

Next we have to make it a circle after two seconds. We can do that by adding a setTimeout.
go.addEventListener('click', function(e) {
  const el = e.currentTarget;
  console.log(el);

  setTimeout(function() {
    el.classList.add('circle');
  }, 2000);
});
Now back in the style tag, let's add a border radius of 50% for the class circle.
.go.circle {
  border-radius: 50%;
}

If you refresh the page you will see that the div style changes to a circle after 2 seconds.
We forgot to change the text when clicked for step one so right before the setTimeout add 👇
el.textContent = 'GO!';
Let's put a height on the go CSS style class as well so that it is square.

We can add a transition on there too.
.go {
  margin: 1rem;
  background: white;
  padding: 5rem;
  width: 25rem;
  height: 25rem;
  transition: all 0.2s;
}
After 0.5 seconds we need to make it red. Let's add another setTimeout to do that.
go.addEventListener('click', function(e) {
  const el = e.currentTarget;
  console.log(el);

  setTimeout(function() {
      el.classList.add('circle');

      setTimeout(function() {
        el.classList.add('red');
      }, 500);

    }, 2000);
});
Let's add the following css styles to the css class red.
.go.red {
  background: red;
}

Now after 0.25 seconds we need to make it a square.
go.addEventListener("click", function(e) {
  const el = e.currentTarget;
  console.log(el);

  // 1. make it a circle after 2 seconds
  setTimeout(function() {
    el.classList.add("circle");

    // 2. make it red after 0.5s
    setTimeout(function() {
      el.classList.add("red");

      // 3. make it square after 0.25
      setTimeout(function() {
        el.classList.remove("circle");
      }, 250);

    }, 500);

  }, 2000);
});
Now we need to make it purple after 0.3 seconds, and finally fade out after another 0.3 seconds.
Add these styles 👇
.go.purple {
  background: purple;
  color: white;
}

.go.fadeOut {
  opacity: 0;
}
go.addEventListener("click", function(e) {
  const el = e.currentTarget;
  console.log(el);

  // 1. make it a circle after 2 seconds
  setTimeout(function() {
    el.classList.add("circle");

    // 2. make it red after 0.5s
    setTimeout(function() {
      el.classList.add("red");

      // 3. make it square after 0.3
      setTimeout(function() {
        el.classList.remove("circle");

        // 4. make it purple after 0.3s
        setTimeout(function() {
          el.classList.remove("red");
          el.classList.add("purple");

          // 5. fade out after 0.3 seconds
          setTimeout(function() {
            el.classList.add('fadeOut');
          }, 300)

        }, 300);

      }, 250);

    }, 500);

  }, 2000);
});
That was a really simple animation, but look if you look at the code the way it is now, that is what is referred to as callback hell.
Callback hell is when you nest things inside of each other because they all depend on the previous callback to being called before it can then go ahead and run, when you need to run things in sequence, one after the other. It is also rendered to as "Christmas Tree" code because of how indented the code is sideways. It's not all that great.
The solution to call-back hell is the "promise" land.
Promises are a sort of "I owe you" for something that will happen in the future. They allow us to write code that is much easier to look at.
We will be looking at that in the next video.
Find an issue with this post? Think you could clarify, update or add something?
All my posts are available to edit on Github. Any fix, little or small, is appreciated!
