Face Detection and Censorship

Enjoy these notes? Want to Slam Dunk JavaScript?
These are notes based on my Beginner JavaScript Video Course. It's a fun, exercise heavy approach to learning Modern JavaScript from scratch.
Use the code BEGINNERJS for an extra $10 off.
This exercise is going to be a bit more fun then our previous lessons.
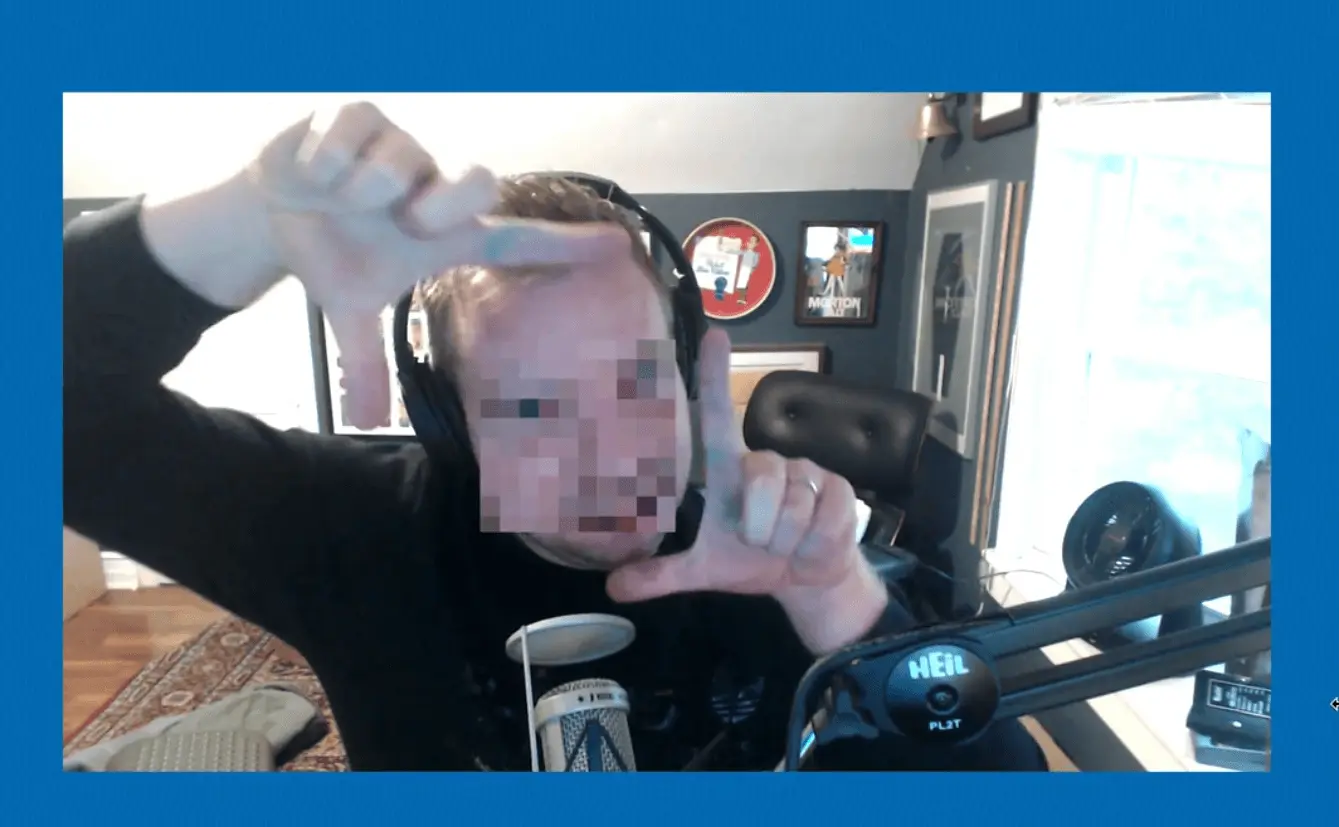
We are going to build a face detection that will detect and blur your face from a video element into a canvas element.
This exercise is stepping a little bit ahead because there are a couple of things we need to learn a more about like promises and async/await, and bundling tools, specifically one called Parcel.
The first thing we need to check is that we are on a browser that supports face detection.
At the time of this recording, there is a proposal for an API, meaning it's not finished yet and might change.
Ideally it will get into all of the browsers but currently it is only in Chrome and Android.
The way you can tell if your browser supports it is you can go to the console on any page and type FaceDetector, or typeof FaceDetector.
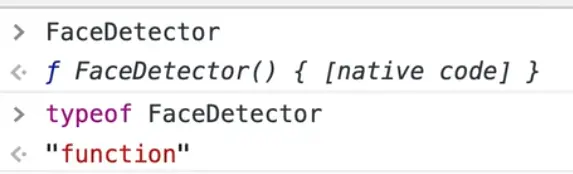
If you get undefined or an error returned, that means your browser does not support it. If you are on Chrome, you likely have to go to the flags page in Chrome and turn it on.
Often new features in the browser are not given to the masses because they are not ready yet. In order for us to play with those features, we need to enable them.
The way you turn flags on in Chrome is you navigate to chrome://flags.
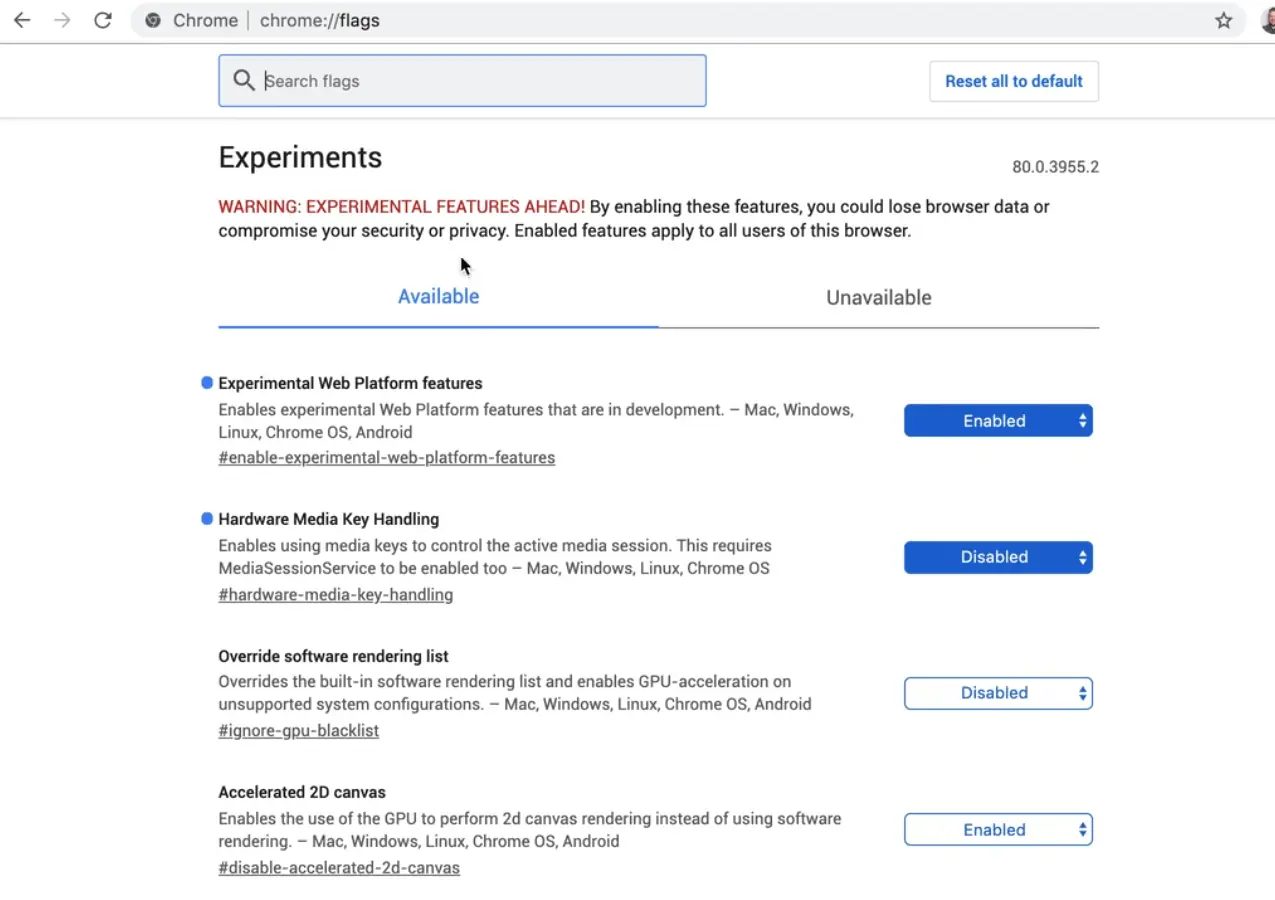
This page contains all kinds of features that are still experimental in Chrome. You want to search for "Experimental Web Platform features" and enable it.
You will probably have to restart your browser, so go ahead quit it, and restart it, and then you should see typeof FaceDetector work.
If you do all that and still cannot get typeof FaceDetector to return "function" it's possible that your computer does not support it.
But from everyone Wes has tested with, it works well.
The second thing is we need to use a server in order to run this. That is because accessing a user's webcam is a security issue (you don't want to give everybody access to your webcam), so in order to do it you must first you have to ask the user first for access to their webcam.
You've probably been to a million websites where they ask for permission to send notifications or they request to know your location. Those are permission-based APIs in the browser, and accessing someone's webcam is no different than that.
That sort of preference and permission, it allowed or not, is tied to the origin.
An origin in JavaScript is just a fancy way of saying a domain name.
So in Wes' case, he is currently allowing the camera on localhost, but you might allow the camera on New York Times or Facebook or all these different websites.
Everytime you visit a new origin, a new domain name, you're going to have to ask the user for access to their webcam and it will pop up.
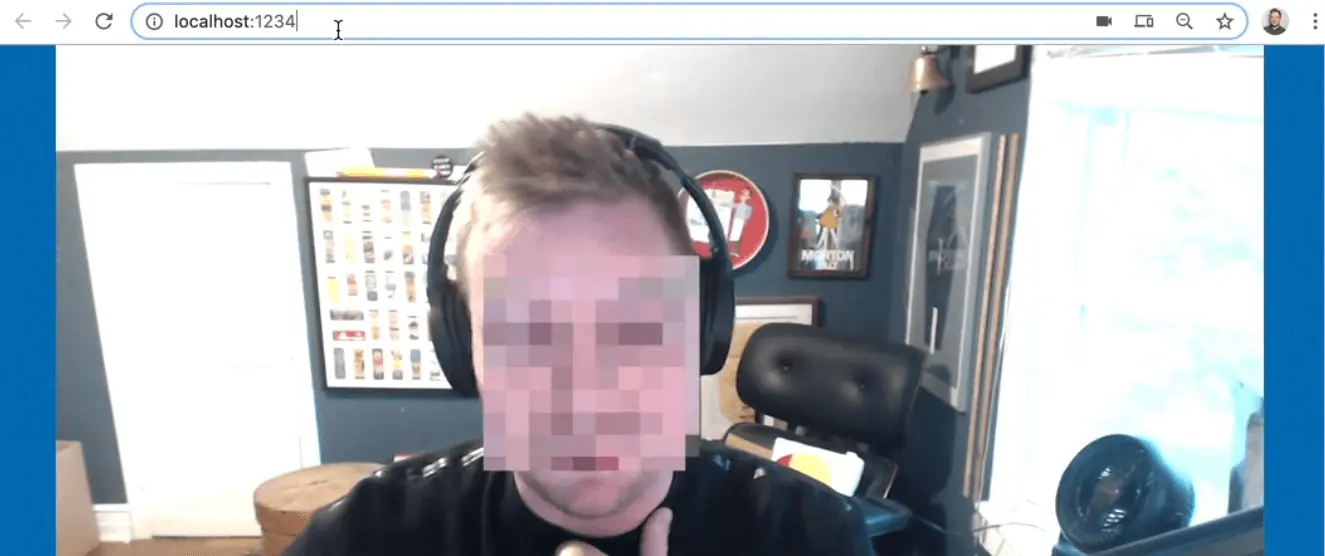
So in order for us to do that, we cannot just open up face.html (from the /53 - Face Detection Censorship folder) in the browser like we have been doing up until now.

The reason for that is the file path that you see in the url browser above is not an origin. If security stuff is tied to an origin, it won't be able to do it from a local file.
You might notice the X next to the camera. If you take a look, you will see that the camera is blocked.
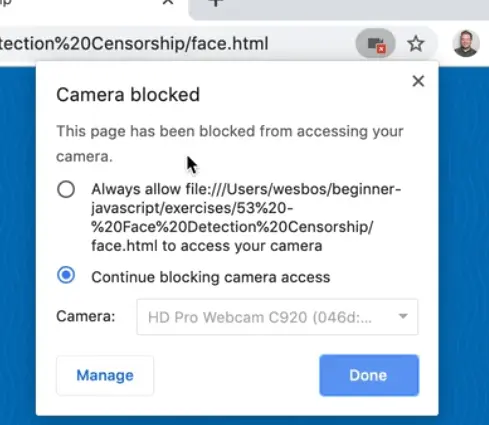
If you try to allow it by clicking "always allow", it still won't work.
So you cannot open the HTML file directly in your browser, it must run through a server. So how do we run a server?
One server that Wes likes is a bundler, called Parcel, which we will learn more about when we get to the modules section.
Parcel will give us a little development server where when we change something on the page, it will automatically refresh the page for us. If we change any of our CSS, it will automatically re-load the CSS on the page without actually having to do a full page refresh.
To get that running, we need to open up a terminal. If you need a refresher, go back to video 2 where Wes goes over the different types of terminals.
Once you have the terminal open, go into the folder that contains the face.html file.
To do that, you need to use the command cd to go into the correct directory.
If you don't know where you are starting in the terminal, you can type pwd and it will tell you where you are on your computer.

What is probably easier than that is if you are using VS Code, you can just right click the folder and select "Open in Terminal".
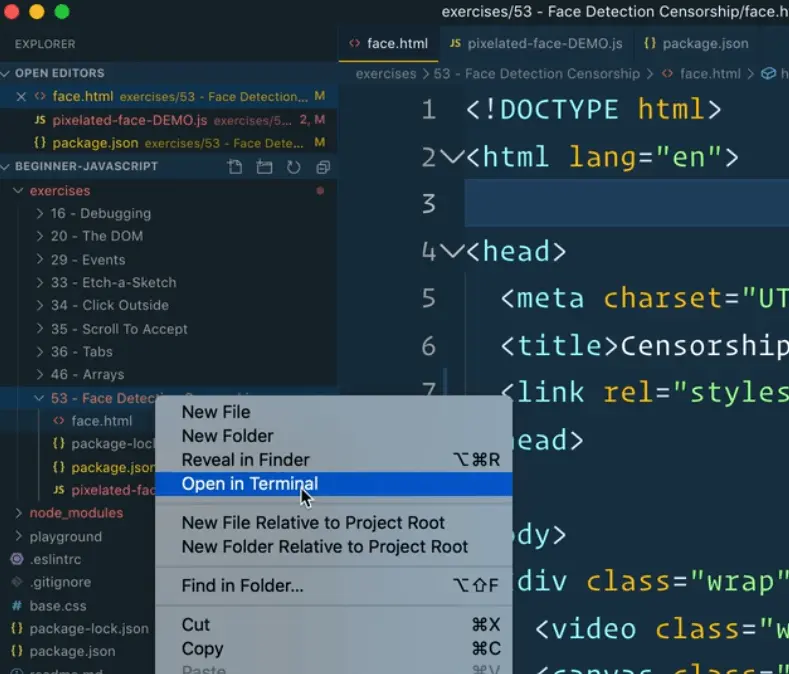
That opens the terminal up in the built in terminal in VS Code.
In the second video, Wes had us install Node.js and NPM. You can check if you have both installed by typing node -v and npm -v in the terminal. That will return to you the version you have installed, as shown below 👇

If you need to check what the latest Node.js version is, you can go to nodejs.org and find the LTS version which stands for long term support -- that is the most stable version.

Once you have confirmed you have both of those and you are in the right directory, go ahead and type npm install.
Wes will cover this all more in the future, but what that does is it will take all our dependencies and install them for us.
In our case we are installing Parcel.
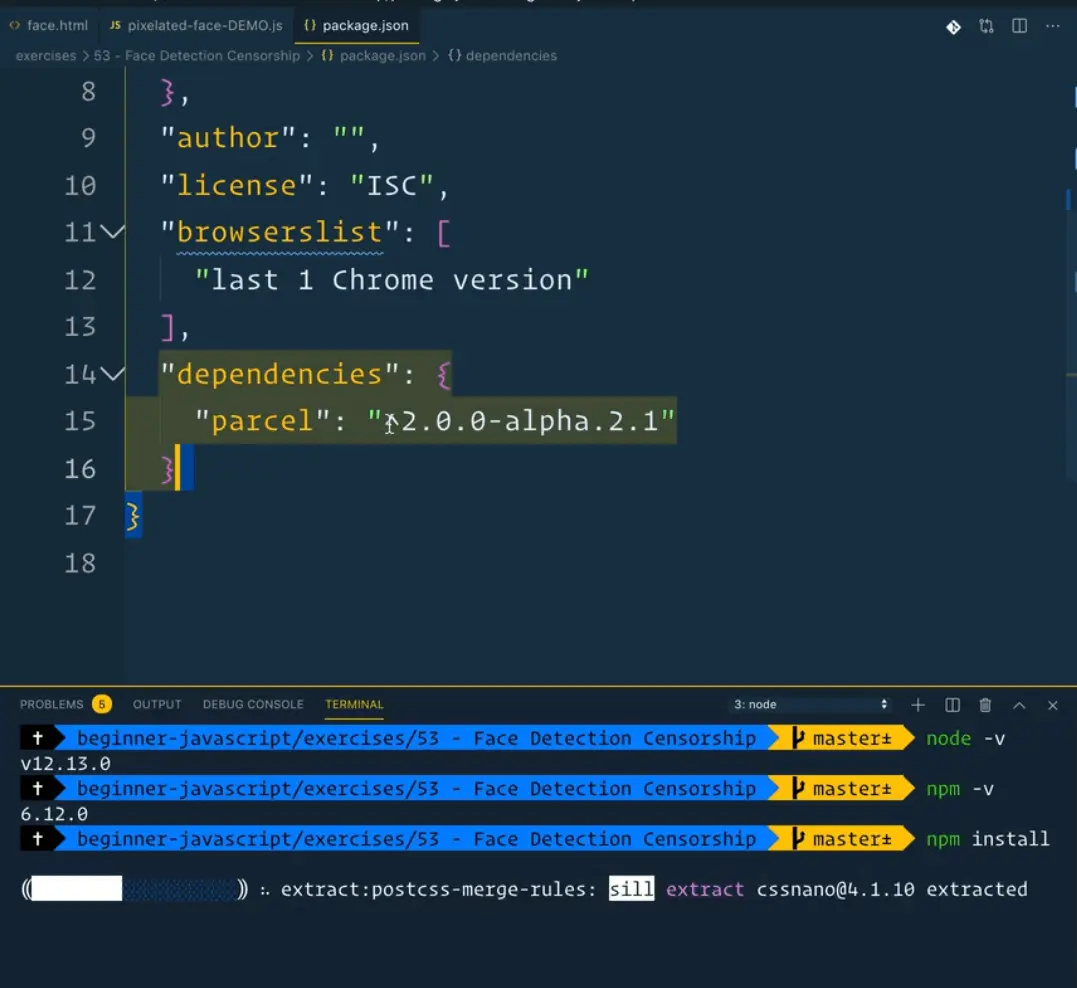
You should completely ignore the versions in this file, because that will likely change in the future and Wes will be keeping the files up to date.
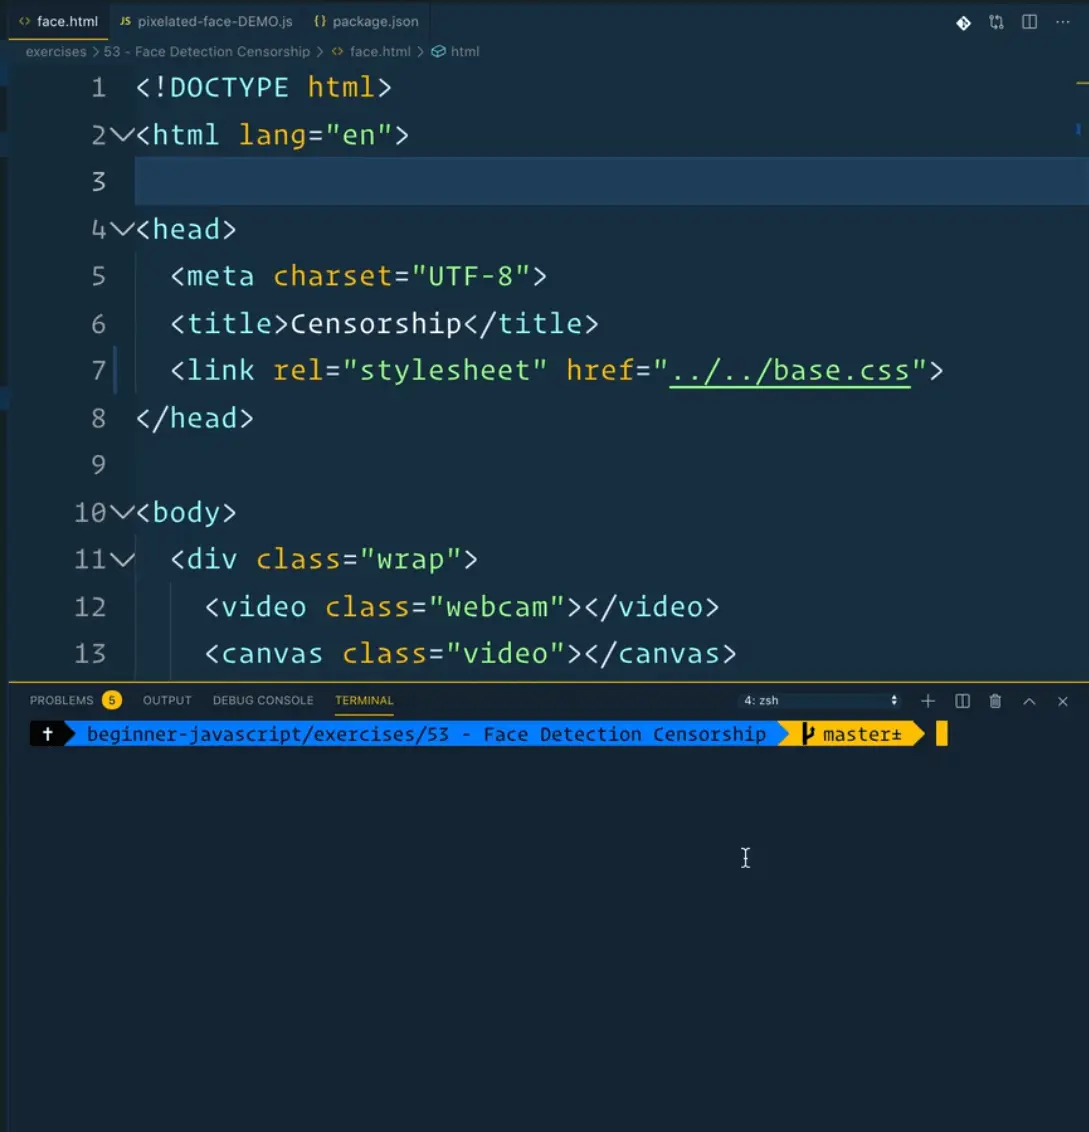
While we wait for that to finish installing, let's take a look at the face.html structure to see what we are working with.
<!DOCTYPE html>
<html lang="en">
<head>
<meta charset="UTF-8">
<title>Censorship</title>
<link rel="stylesheet" href="../../base.css">
</head>
<body>
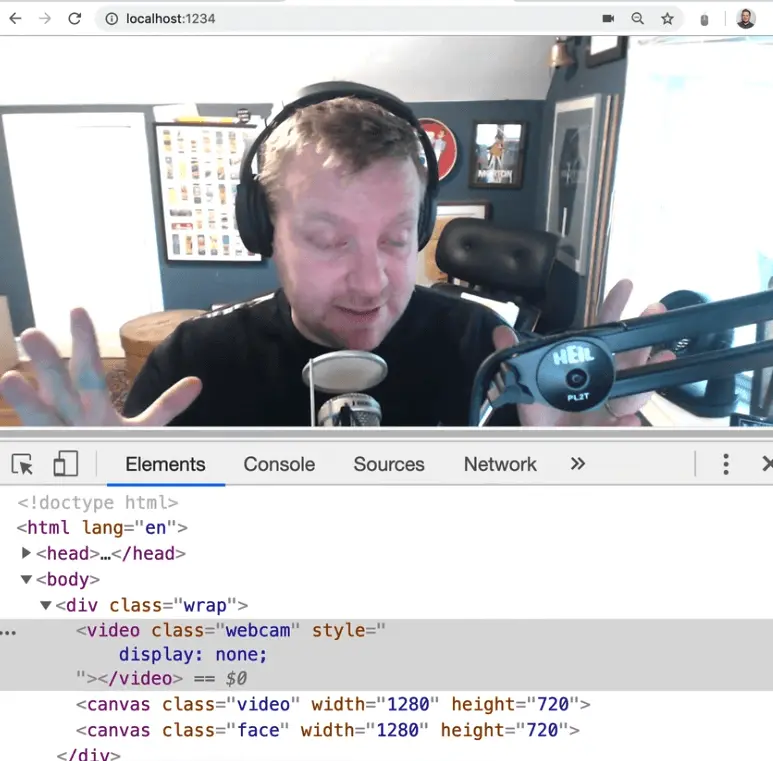
<div class="wrap">
<video class="webcam"></video>
<canvas class="video"></canvas>
<canvas class="face"></canvas>
</div>
<script src="./pixelated-face.js"></script>
<style>
* {
box-sizing: border-box;
}
body {
margin: 0;
}
.wrap {
position: relative;
min-height: 100vh;
display: grid;
justify-content: center;
align-items: center;
}
.wrap > * {
grid-column: 1;
grid-row: 1;
}
.face {
position: absolute;
}
</style>
</body>
</html>
We have our base CSS which is just the blue background.
Then we have our wrapper, which has a video element, a canvas element, and another canvas element.
One canvas is for the video and one is for our face.
Then we are linking up the pixelated-face.js.
(Note: Wes is using a different file than you in the video so he can demonstrate how the finished result works).
After that we have a few styles that just center things on the page, nothing too interesting.
If you look at the terminal, the package should be done installing.
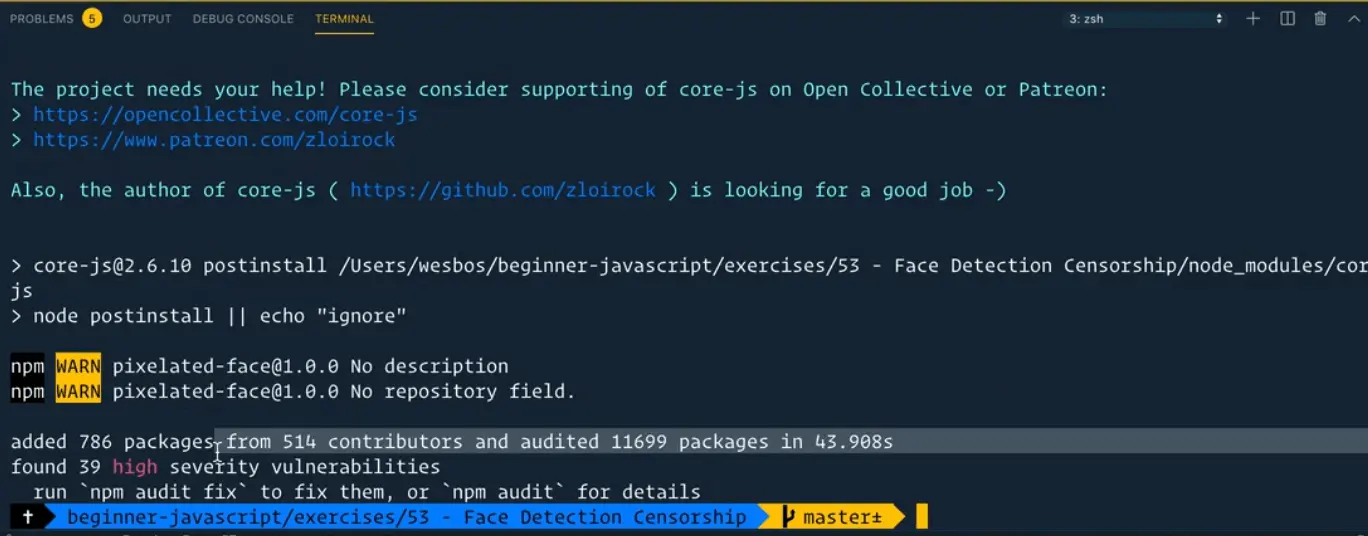
You may notice in the terminal something like "found 39 high severity vulnerabilities". That will pop up when you npm install things. What happens there is that some dependencies have security vulnerabilities that need to be fixed and what happens is the people who create Parcel will fix that eventually. So if you see that, don't freak out. It's totally fine, hopefully NPM will hopefully find a better way to deal with those warnings.
Create a new file pixelated-face.js and inside of it log "it works!".
Go back to the terminal and in the same directory type npm start.
That will run Parcel against the face.html file and it will run the server at some URL.
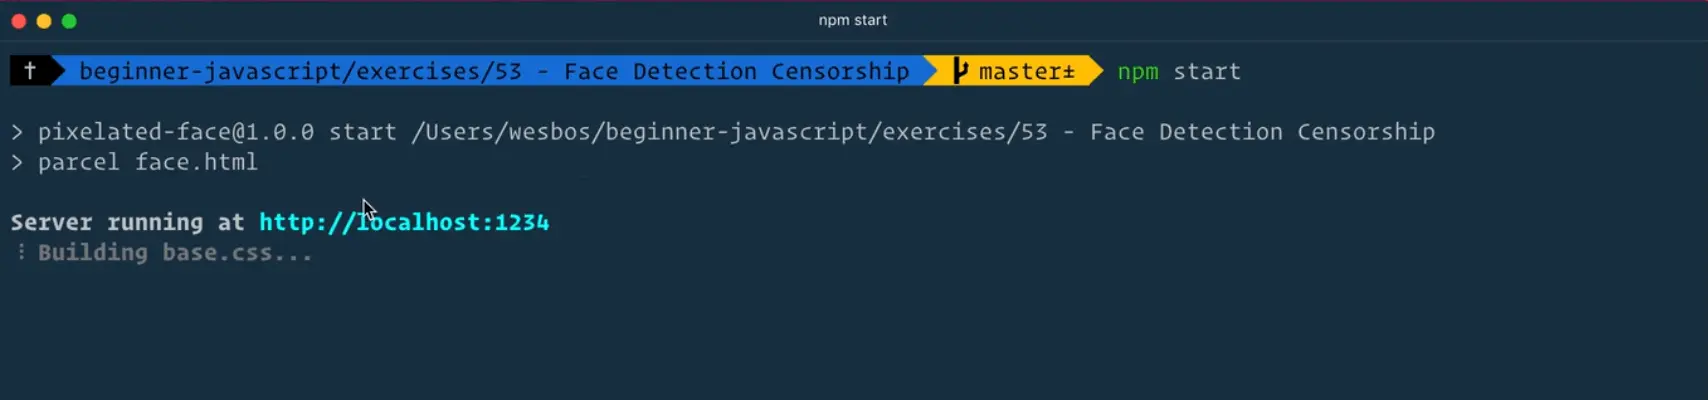
If you go to that URL in the browser and open the console, you should see "it works!".

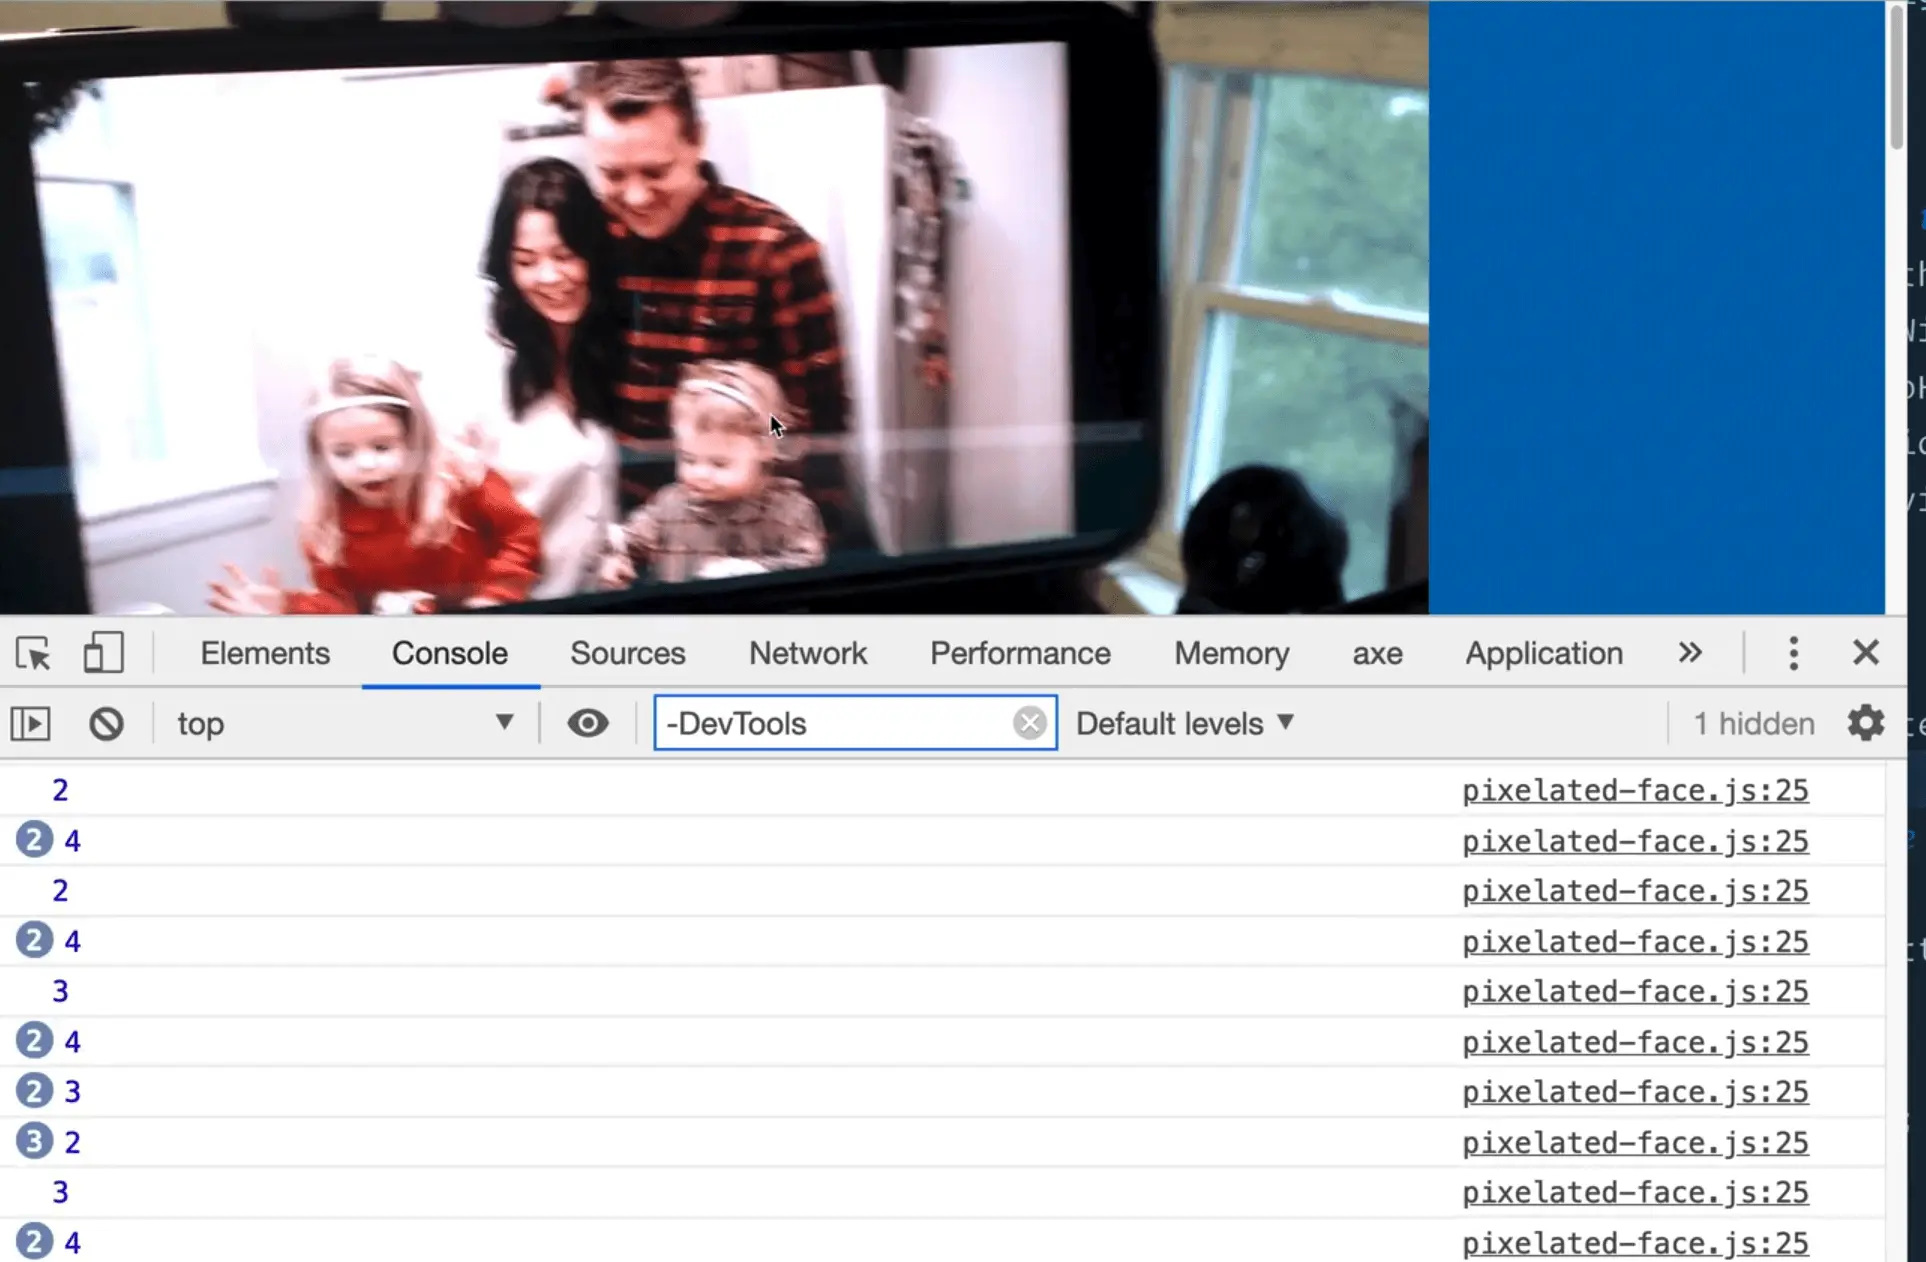
Sometimes you will see weird warnings like the yellow one above, and that is related to a Chrome extension that you have installed, and that is annoying because it gets in the way of writing our actual code.
That can be annoying because there is no way to get rid of them.
One trick Wes has found it typing into the Filter -DevTools as shown below 👇

Now that we have everything up and running, let's dig into some code.
The first thing we want to do is select all the elements that are on our page. We have our video, our canvas, and then another canvas.
We are going to access the user's webcam, dump it into the canvas element with the class of video.
Then we are going to take the frames of that video, put a square around the person's face.
In the canvas element with class of face, we will pixelate the person's face.
The canvas element work could be done on one canvas, but Wes prefers to keep them separate in case he ever wants to only pull one of those images out.
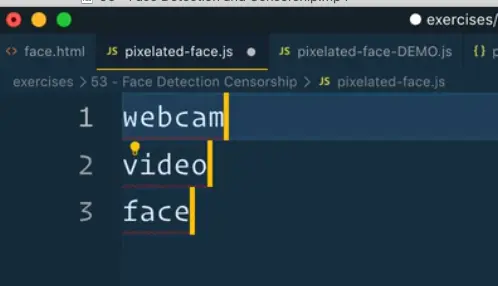
Go ahead and grab those three classes, webcam, video, and face.
Let's page them into our pixelate-face.js file.
Note: in the video, at this section, Wes is able to paste all three classes like this on the page 👇
webcam
video
face
In VS Code, he is able to press the shortcuts CMD + A and then CMD + Shift + L, and that gives him a cursor on every single line.
Add the following code 👇
const video = document.querySelector(".webcam");
const canvas = document.querySelector(".video");
const faceCanvas = document.querySelector(".face");
We need to pull the context out of each canvas element now.
We talked about that in our Etch-a-Sketch exercise but that is where we do the drawing.
Modify the code as shown below 👇
const video = document.querySelector(".webcam");

const canvas = document.querySelector(".video");
const ctx = canvas.getContext("2d");

const faceCanvas = document.querySelector(".face");
const faceCtx = canvas.getContext("2d");
Now make a new face detector, and then let's log everything we have so far.
const faceDetector = new FaceDetector();
console.log(video, canvas, faceCanvas, faceDetector);

Note: you might notice in VS Code that it says "FaceDetector is not defined" if you hover over new FaceDetector().

That is because it is looking for a function called FaceDetector. The way we can solve that is to say const faceDetector = new window.FaceDetector(). That is fine to do (Wes told us not to do it in looping) here because this FaceDetector API does not exist in Node.js land.
The next thing we need to do is write a function that populates the user's video.
To do that, grab the stream from the user's webcam.
function populateVideo() {
  const stream = navigator.mediaDevices.getUserMedia();
}
You need to pass getUserMedia() some options, specifying if you want video or audio (we just want video). You can just pass video:true or you can ask for a specific size from it.
Modify the code as shown below and get rid of the log we added earlier.
function populateVideo() {
  const stream = navigator.mediaDevices.getUserMedia({
    video: { width: 1280, height: 720 },
  });

  console.log(stream);
}
If you refresh the HTML page and try to run populateVideo(), you will see an error as shown below.

Now that we are running things through a bundler, we no longer have the ability to access our functions globally via the console.
If you ever do want to do that, you can do window.populateVideo = populateVideo;.
That will surface it for you, but that is not a great way to do it.
The best way to do it would just be to add a log in your JavaScript file and you can see it.
If you do ever need to access it from the chrome dev tools, you can right click it, and click store as global variable.
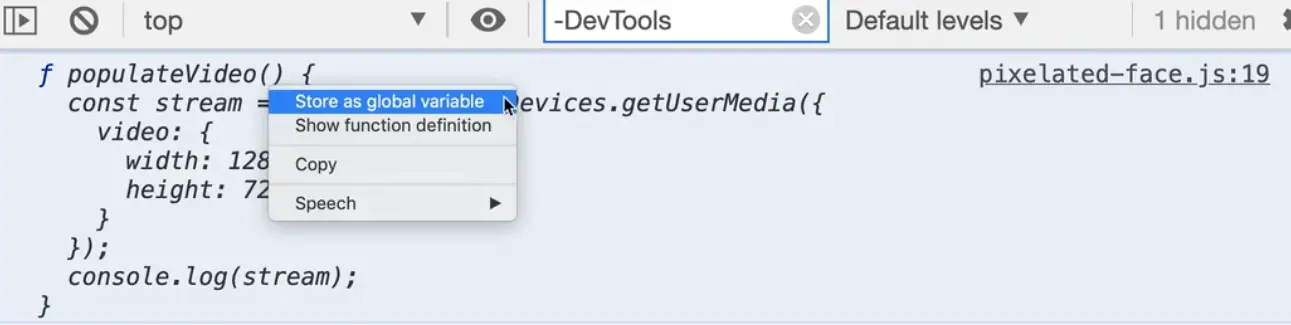
That will store it in a global variable called temp1.
If you try calling temp1(), you will see something returned to us called a promise.

There are a couple things going on here. First, it might show you a little recording icon on the chrome tab (it might not, we will go over that in a sec.).

As mentioned, we are returned a promise when we call temp1() in the console (which is our populateVideo() function stored as a global variabe).
What that means is we have not been returned the actual stream of video, instead it's just something called a promise that it will get the stream of the webcam eventually.
We will get more into promises in future videos, but for now just know that navigator.mediaDevices.getUserMedia() is a special kind of function that returns this thing called a promise.
In order to wait for the stream to come back from the webcam, because that takes some time, we need to first mark the function as async by typing the word async in front of it, and add the keyword await before we call navigator.mediaDevices.getUserMedia().
Add a call to populateVideo() where we used to log it.
async function populateVideo() {
  const stream = await navigator.mediaDevices.getUserMedia({
    video: { width: 1280, height: 720 },
  });

  console.log(stream);
}

populateVideo();
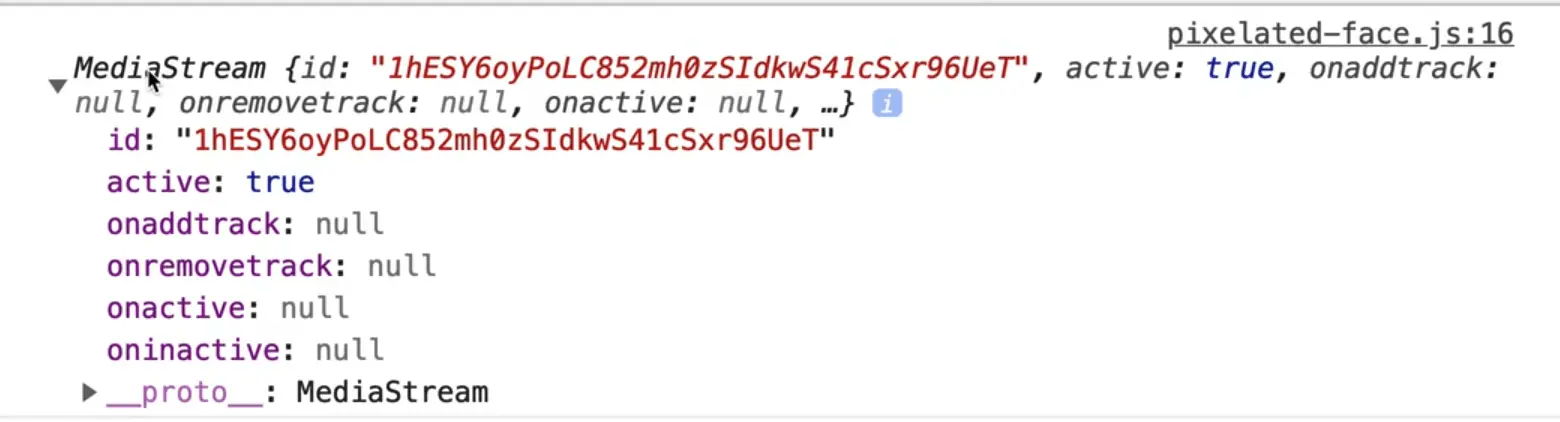
If you refresh the page and look at the console, you may see the following 👇
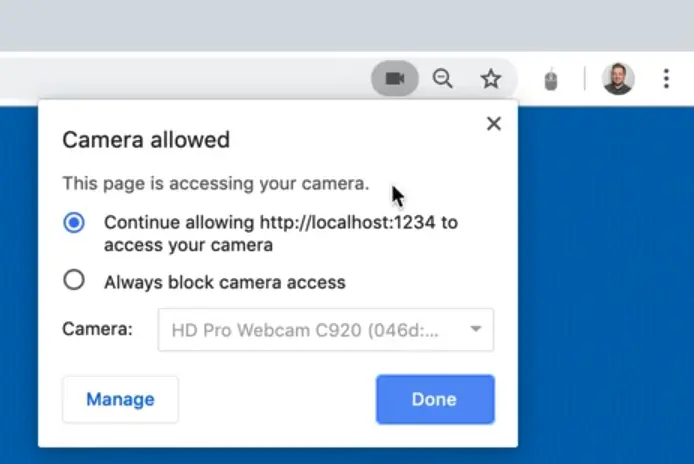
If you do not, you may see a little red X on your video camera icon in the browser tab.
To fix that, you need to click on it and select "continue" or "always allow access".
Click done, then reload the page, and then you should see a media stream in the console.
How is what is returned to us via the MediaStream useful?
We can now put the stream into our video which we have already selected.
You would normally pass the video something like video.srcObject = "dog.mp4"; but instead you will be passing the video the stream then calling play() on it.
Put an await in front of where you call video.play() because sometimes it takes a few seconds to start playing and that will wait for it.
video.srcObject = stream;
await video.play();
If you refresh the page, you should see it worked.
So what did we do there?
We made a function called populateVideo(), where we grabbed the feed off the user's webcam, and then we set the object to be the stream, and then played it.
Another thing we need to do is size the canvases to be the same size as the video.
If you were to log video.videoWidth, video.videoHeight you should get 1280 x 720.
If you change one line of code from navigator.mediaDevices.getUserMedia({ video: { width: 1280, height: 720 } }); to navigator.mediaDevices.getUserMedia({ video: true });, and refreshed the page, you should see the sixes 640 x 480. After you test that, switch it back.
Note: these sizes might not be the same on your computer, depending on your webcam.
So you need to size the canvases to match the video, which you can do like so:
canvas.width = video.videoWidth;
canvas.height = video.videoHeight;

faceCanvas.width = video.videoWidth;
faceCanvas.height = video.videoHeight;
Now we have two canvases that are the same size as the video feed.
The next thing we need to do is work with the FaceDetection API.
We will call it detect and it also needs the async keyword in front of it (we will cover why in future video).
We want to detect faces that are in the shot.
Then we will use the faceDetector variable we created earlier and call .detect() on it.
You pass detect() reference to three things:
- an image
- a video
- or a canvas
In our case, pass it access to the video.
async function detect() {
  const faces = await faceDetector.detect(video);
  console.log(faces);
}
We need to run the detect() function once, but after the video has been populated. If you run detect() when there is no video, it will not find any faces.
The way you can do that is by tagging a .then() onto populateVideo like so 👇
populateVideo().then(detect);
This is promise-based, which we will cover in more detail in future videos.
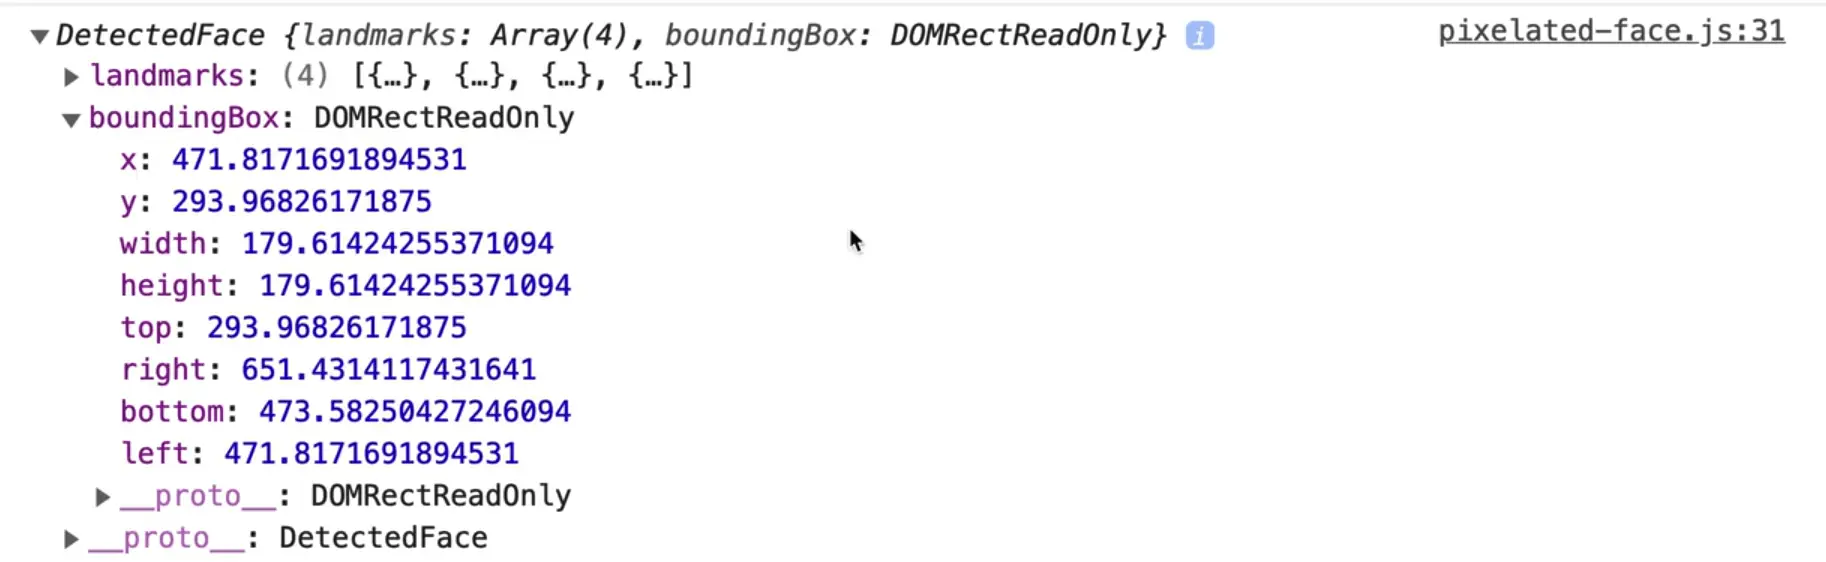
If you refresh the page and open the console now, you should see a face detected. It will tell you exactly where the eyes, the nose, and the mouth are.
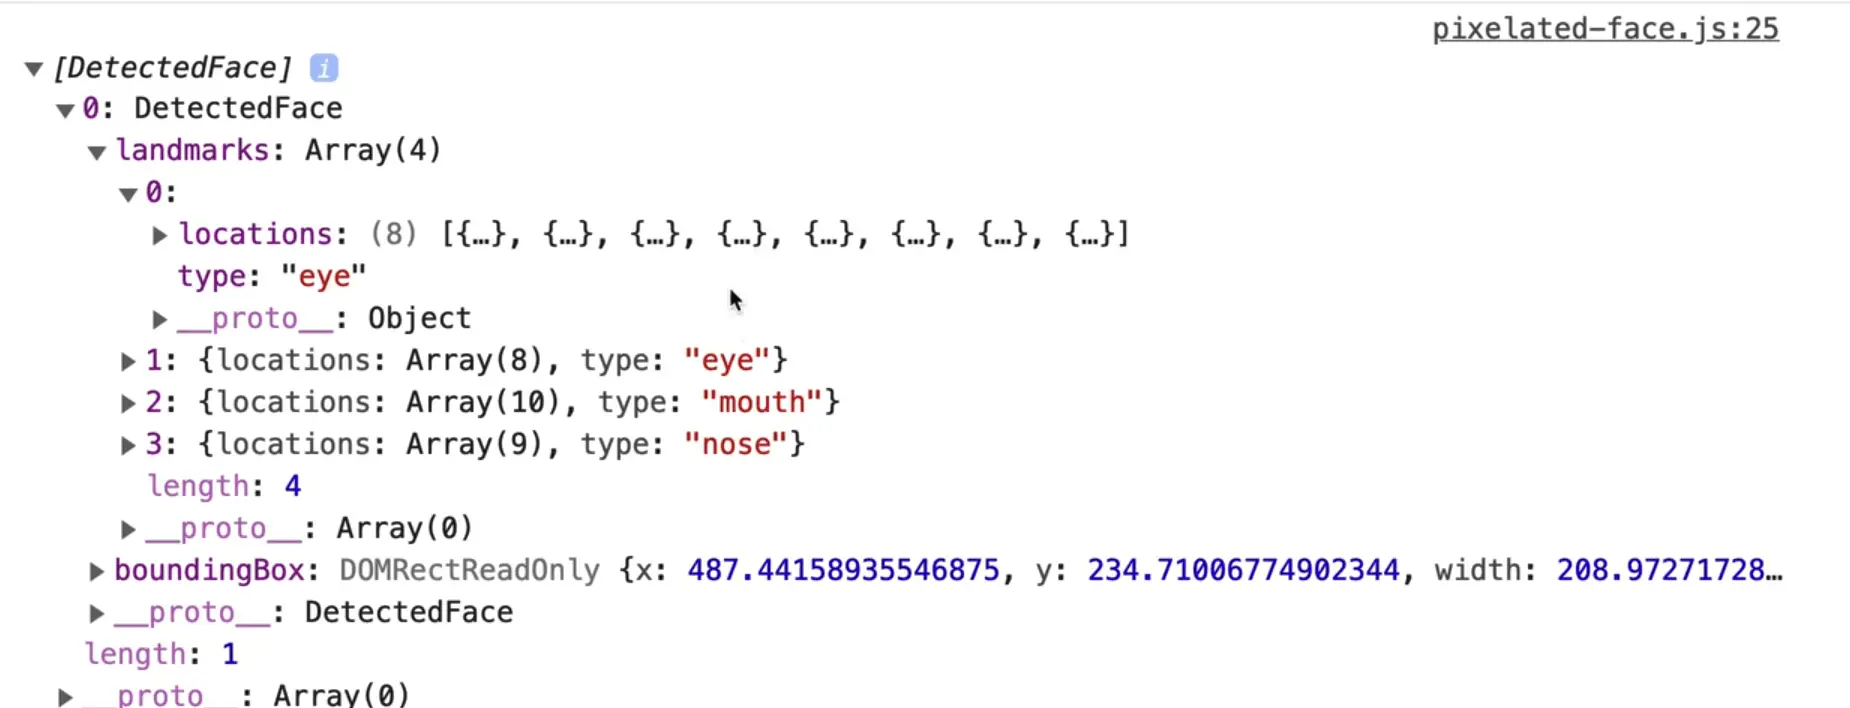
It also gives us the boundingBox which is the square around the user's head.
The way we are calling detect() right now, it will only run once after populateVideo() is done playing. So we need to call detect() over and over again.
You might be thinking we can use an interval for this. That is the way we used to do this stuff, but there is a better way, that allows you to do things as fast as possible, which is to use something called request animation frame.
Request animation frame allows the browser to tell us when we should repaint or redo something.
Instead of us trying to do something every 60 milliseconds, because computers vary in speed, request animation frame will repaint or rerun the stuff on the screen a lot less frequently on a computer that isn't as fast.
Ask the browser when the next animation frame is, and then tell it to run detect, like so 👇
async function detect() {
  const faces = await faceDetector.detect(video);
  console.log(faces);
  // ask the browser when the next animation frame is and tell it to run detect for us
  requestAnimationFrame(detect);
}

populateVideo().then(detect);
If you refresh the page, you should see lots of DetectedFaces logged in the console.
What we did there is instead of calling requestAnimationFrame(detect), we could have just called detect() and that works pretty well, but because of performance reasons, it's better to call requestAnimationFrame().
What we have just done there is a concept called recursion.
Recursion is when a function calls itself. It will run forever, and ever, until something stops it, such as an exit condition. Recursion is when a function calls itself, inside of itself.
detect is being called from detect which allows us to run it infinitely.
Let's take a look at the DetectedFace.

As you can see, it gives us an array with one item. Log faces.length.
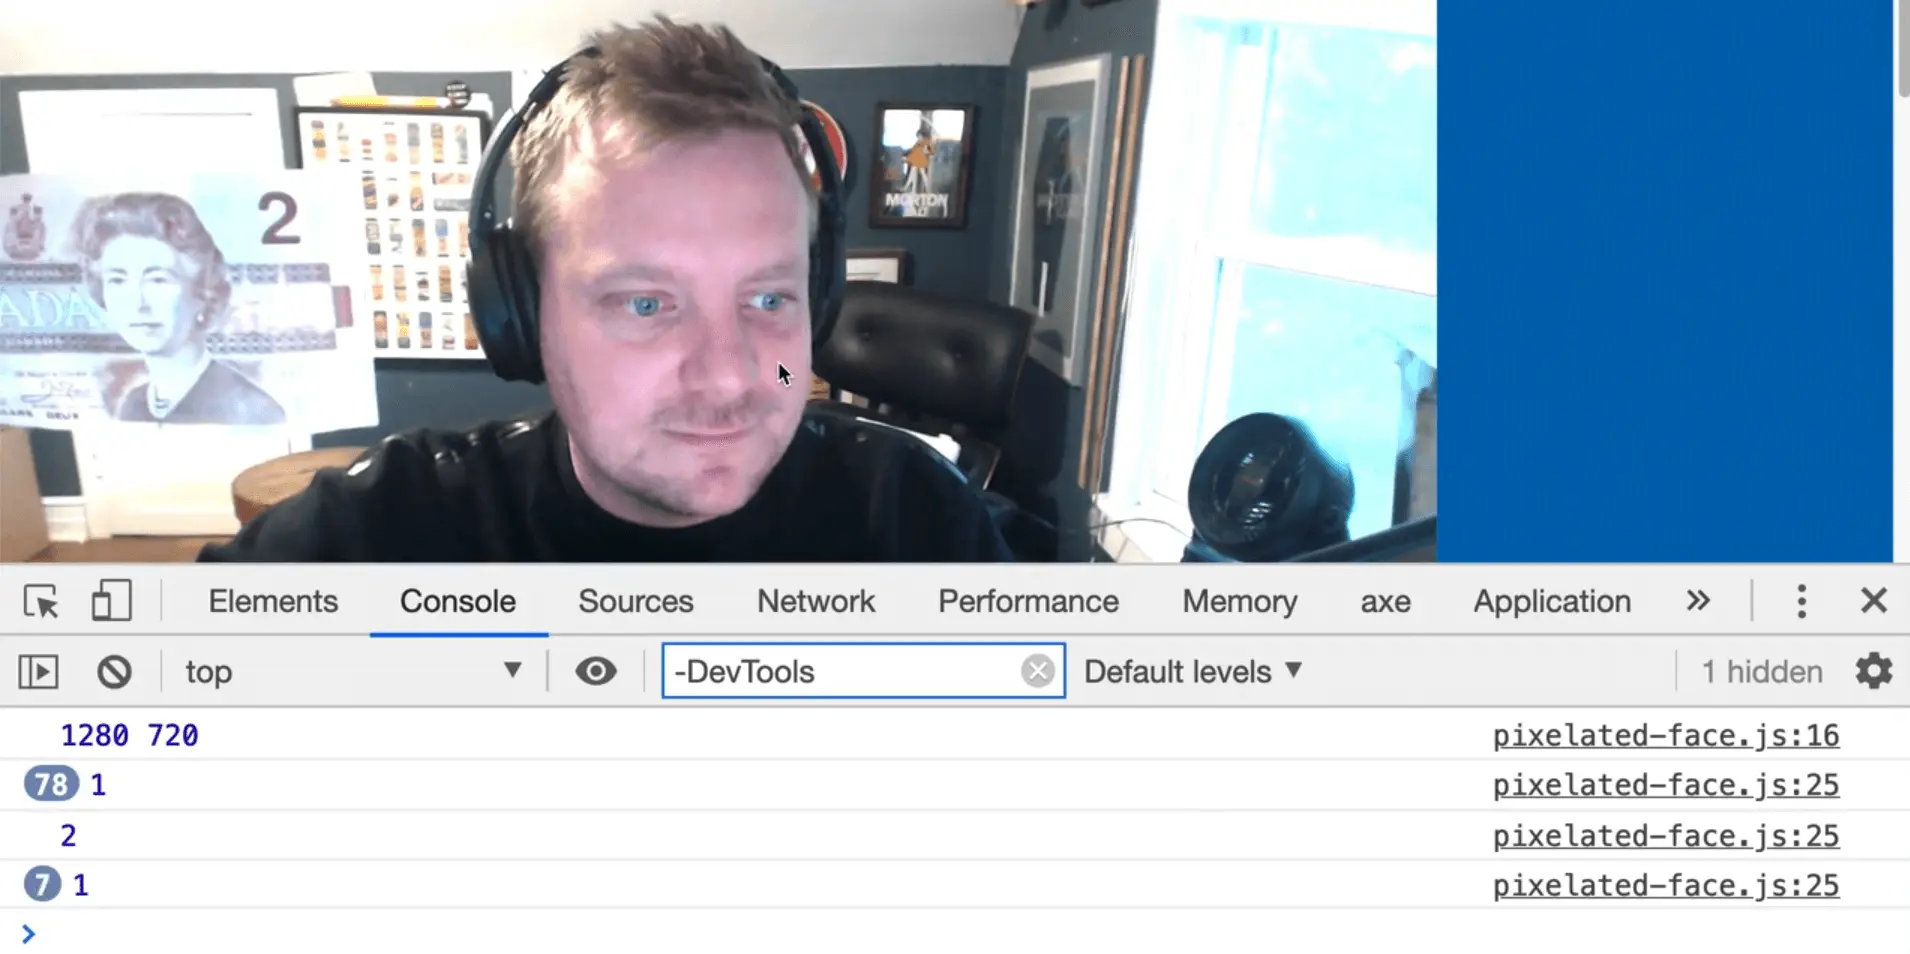
As you can see, it only logs one face until Wes holds up the queens face on a dollar bill to the webcam.
When Wes holds up a picture, Face Detection detects all four faces.
Next up, we need to do 2 things:
- draw triangles around the faces that are found
- censor the face by pixelating the area that is around their face
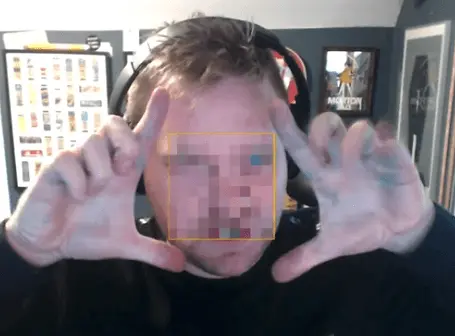
Make a function drawFace which will take in the user's face. The function will need to know how wide and high is the user's face, because the further away the subjects are from the camera will affect that.
We also need the X and Y coordinate from the top. For example over 400 pixels and down 300 pixels is where the head starts.
Start by just logging the faces and calling drawFace(). Loop over all the faces in a .forEach and call drawFace for each.
async function detect() {
  const faces = await faceDetector.detect(video);
  console.log(faces);
  // ask the browser when the next animation frame is and tell it to run detect for us
  faces.forEach(drawFace);
  requestAnimationFrame(detect);
}

function drawFace(face) {
  console.log(face);
}

populateVideo().then(detect);
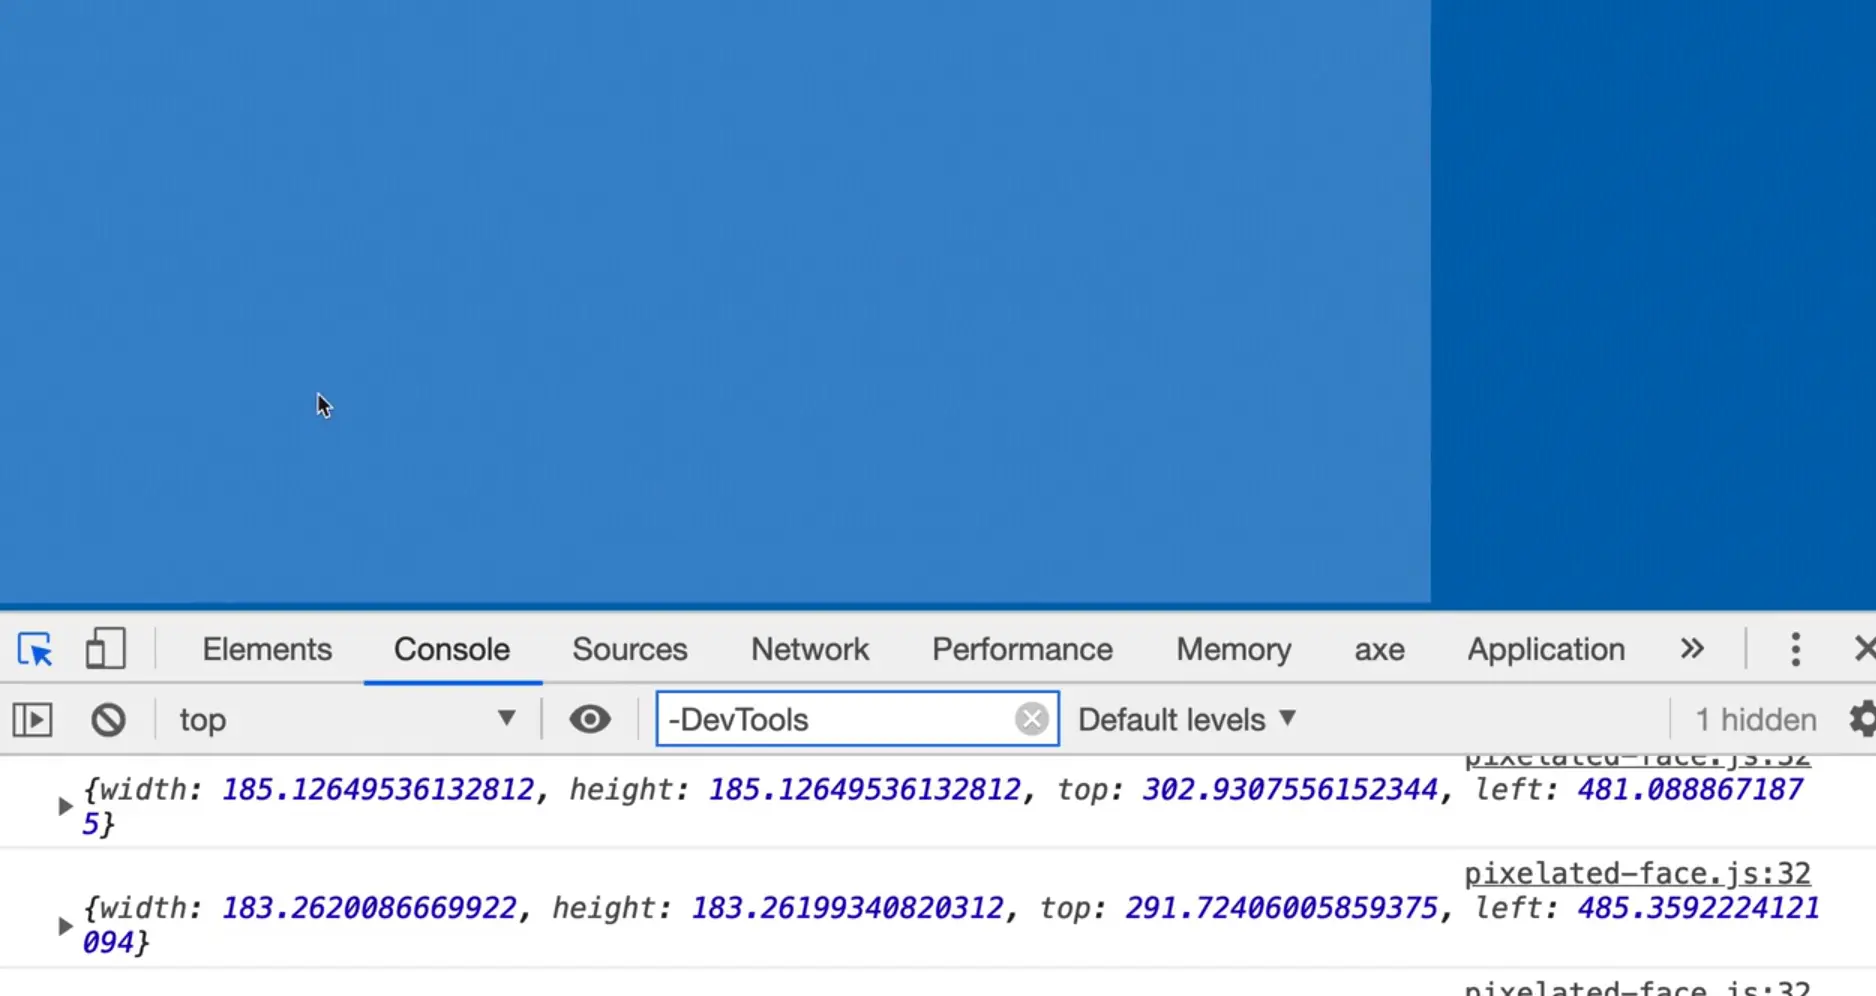
When you refresh the page and look at the console, you should see many faces logged.
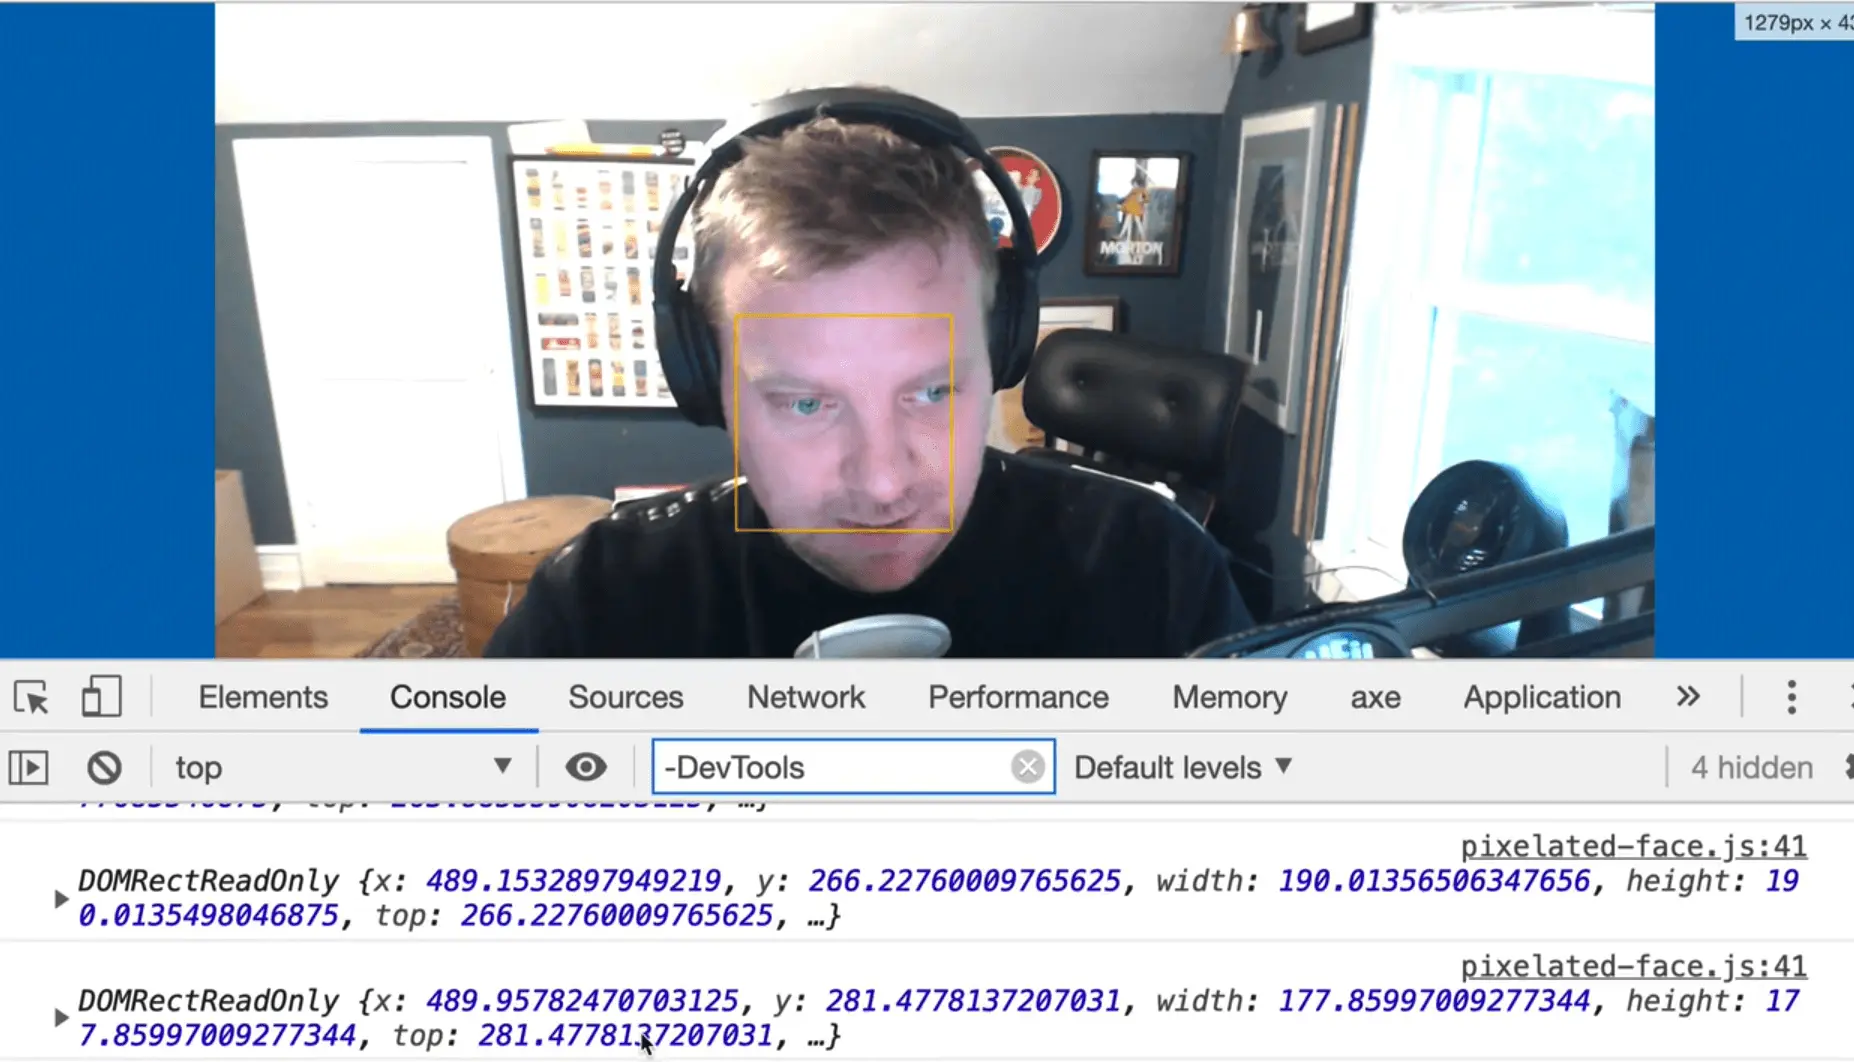
Let's get the bounding box from one of those. We need the top and left, width, and the height.
function drawFace(face) {
  const { width, height, top, left } = face.boundingBox;
  console.log(width, height, top, left);
}
If you refresh the page, you should see lots of logs like the following 👇

One trick you can do is if within the log, you just wrap the items in curly brackets as shown below, it will log the property names and values.
console.log({ width, height, top, left });
The reason that works is because you are essentially making an object.

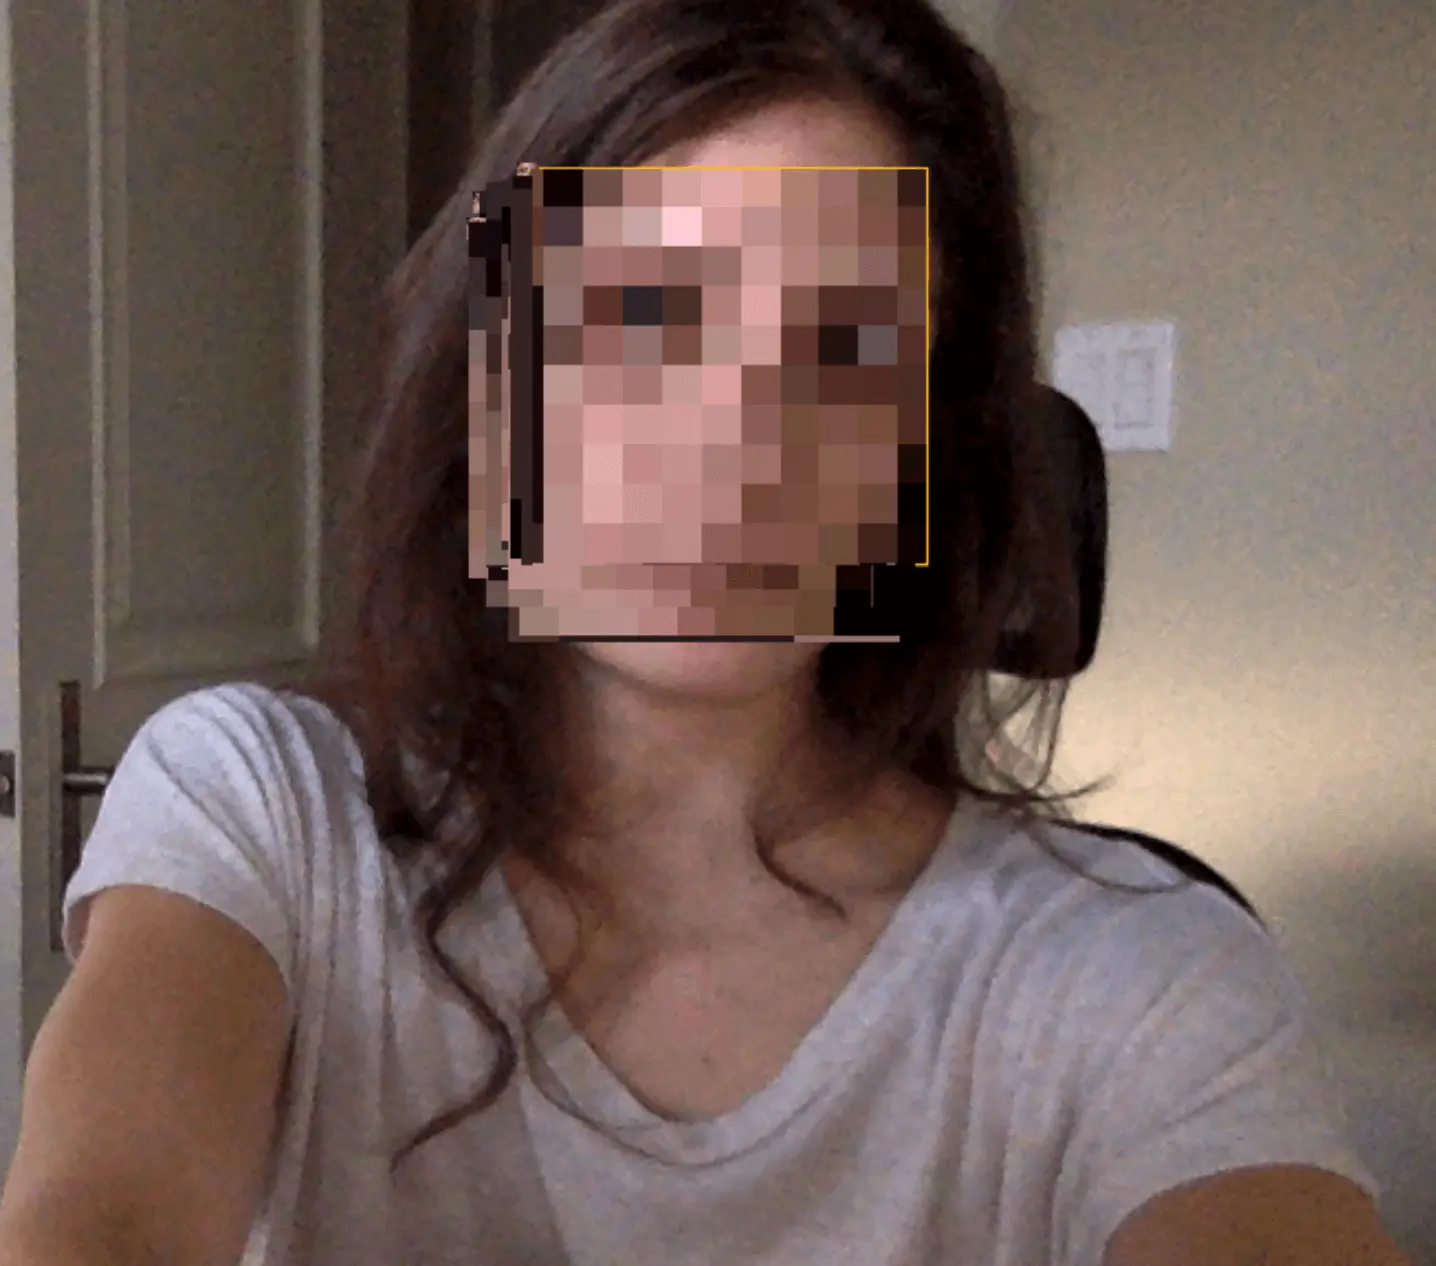
Now we want to draw a box onto our canvas element that is down in the part of the page that is highlighted in the image below.
We are going to overlay it with the video in order to do that.
Let's set a couple of defaults at the top of the page.
const ctx = canvas.getContext("2d");
ctx.strokeStyle = "#ffc600";
ctx.lineWidth = 2;
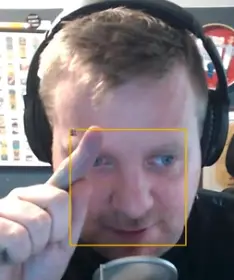
Within drawFace function and call ctx.strokeRect(), which is the API for drawing a rectangle.
function drawFace(face) {
  const { width, height, top, left } = face.boundingBox;
  ctx.strokeRect(left, top, width, height);
}

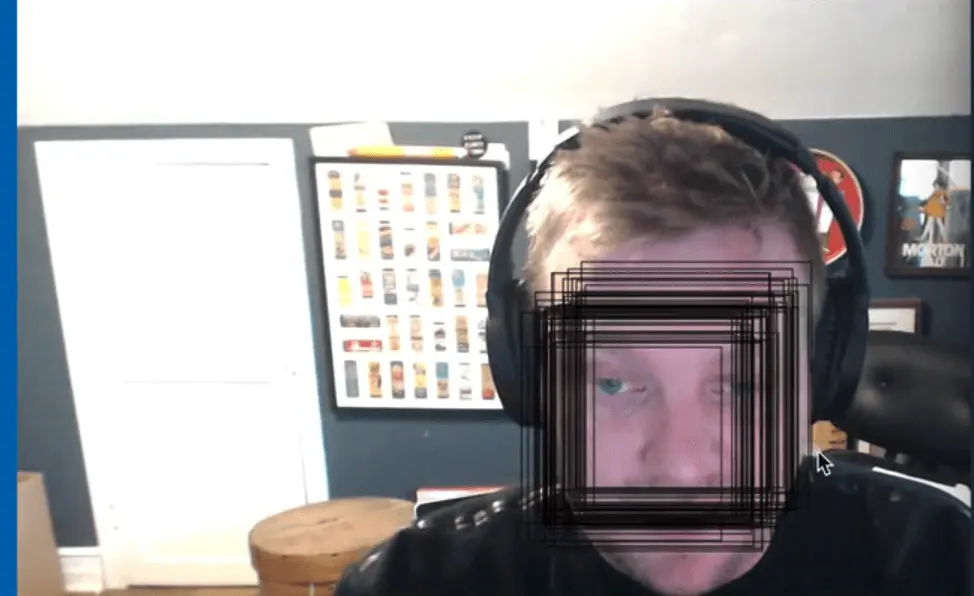
As you can see, it does work. if you move your face around, the boxes should move around as well.
We need to fix a few things though. One of those things is that our rectangles are not overlaid on top.
Note: if the rectangles are overlaid for you, you can ignore these instructions.
Let's take a look at face.html. It seems like it's ignoring the style tag. Try moving the styles to the head, as shown below.
  <style>
    * {
      box-sizing: border-box;
    }

    body {
      margin: 0;
    }

    .wrap {
      position: relative;
      min-height: 100vh;
      display: grid;
      justify-content: center;
      align-items: center;
    }

    .wrap > * {
      grid-column: 1;
      grid-row: 1;
    }

    .face {
      position: absolute;
    }
  </style>
</head>

<body>
If you refresh the page now, it should work. This likely happened because we are using a beta version of Parcel.
The next thing to fix is that the stroke that the rectangle is created in is not yellow. Try moving where you set strokeStyle and lineWidth into the function right before you draw the rectangle like so 👇
function drawFace(face) {
  const { width, height, top, left } = face.boundingBox;
  ctx.strokeStyle = "#ffc600";
  ctx.lineWidth = 2;
  ctx.strokeRect(left, top, width, height);
}
The next thing to fix is that they are not clearing. Fix that by calling ctx.clearRect before we draw the rect.
ctx.clearRect(0, 0, canvas.width, canvas.height)
That clears the amount, the width and the height, based on starting at the top left hand corner, every time it runs, it clears the canvas for us.
It is working pretty well. It is a bit jumpy right now, it used to be a lot better, they're still working on it. The eyes, nose, and mouth values were working very well for Wes for a while, but currently they're really weird.
The next thing we want to do is pixelate the user's face on top of it. Lets go ahead and do that.
Create a function called censor which will take in a face. In our case, we don't care about anything but the bounding box, so instead of doing something like below 👇
function censor(face) {
  const faceDetails = face.boundingBox;
}
Destructure the bounding box properties directly like so 👇
function censor({ boundingBox }) {

}
Now we just have a variable called boundingBox, which we could have rename to a variable called face like so 👇
function censor({ boundingBox: face }) {
 console.log(face);
}
As you can see, we have bounding box.
Now the question is how do you censor something?
There are a couple of different ways you can do it.
The best way Wes has found is to take a snapshot of the user's face, scale it down very very small, and then paint it to the canvas. And then immediately after that, pull it off the canvas, stretch it back up and put it back in.
So essentially you make it really small and then save it and lose all the pixel quality, and then you take it out, stretch it back up again, and that's how you get the pixelation look.
Let's first write out comments for what we plan to do.
function censor({ boundingBox: face }) {
  // draw the small face
  // take that face back out and draw it back normal size
}
Now the way we are going to do this is we are going to take our second canvas context, faceCtx and call drawImage() on it.
drawImage takes in a lot of arguments, let's look it up on MDN.
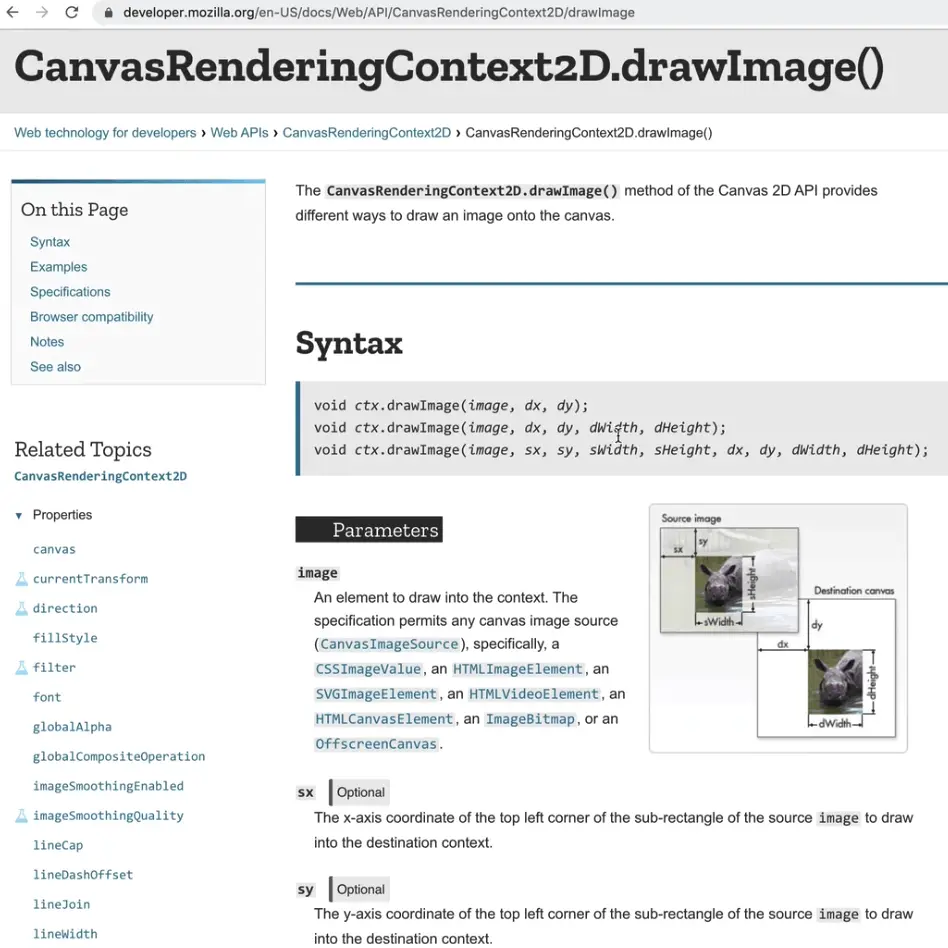
(t takes a few set of options. You can either pass in 3 (image, dx, dy), 5(image, dx, dy, dWidth, dHeight), or it takes 9 (image, sx, sy, sWidth, sHeight, dx, dy, dWidth, dHeight).
We will be using all 9, and Wes will do his best to explain what each parameter is.
Let's get started.
The first argument drawImage takes is the image you want to draw to it, so we will pass in our video, faceCtx.drawImage(video);
Then it wants the x and the y coordinates of where it should start drawing the image so we will pass 0,0, like so faceCtx.drawImage(video, 0, 0);. Save the file.
If you just look at the HTML page, it might look like nothing has changed but if you inspect it, you will see that what we are actually seeing is the canvas, not the video.
If we add a display:none CSS style to the video, you will notice that you can still see yourself. The video is being painted onto the canvas.
Now this isn't exactly what we want to do. We want to take the square that is painting on Wes' face and throw it on there.
Comment out the faceCtx.drawImage() line of code for a second to make sure you have the square painting. If you do, that is good.
Now let's go through every single of the 9 arguments, one by one.
5 are source args, which means they are about how we pull data out of this video, and then 4 arguments about how we want to paint it into.
We only want the inside of the square to be painted onto it.
The first argument is where does the source come from, which in this case is our video tag.
The next two are face.x and face.y, which are where do we start the source pull from? We are trying to pull the square out so we want to start at the top left corner of the square.
If we have where we start from, we need to know how wide and how high it needs to go, so we pass face.width and face.height. That is all the pulling out arguments.
function censor({ boundingBox: face }) {
  // draw the small face
  faceCtx.drawImage(
    // 5 source args
    video, // where does the source come from?
    face.x, // where do we start the source pull from?
    face.y,
    face.width,
    face.height,
    // 4 draw args
  )
}
Now the next four arguments are related to drawing it into the face canvas that we have. We have to ask "where do we start drawing it at?"
The answer is face.x and face.y.
The next arguments are how wide and how high should I paint it to?
You might think, okay we can just use face.width and face.height. However if you try that, you will see a really weird effect where your face is almost delayed.
What is actually happening there is that it's just painting Wes' face to the square, and then everything you see outside of the square is the video element, and then everything inside the square is the canvas.
There is a bit of a delay there.
So the way it will work is we are going to take 10 pixels by 10 pixels and then peel it back up once we have done it. Instead of passing face.width and face.height, we will pass 10,10.
// 4 draw args
face.x, // where should we start drawing the x and y?
face.y,
10,
10
You can see in the very top corner there is a tiny little Wes.
Make a variable size instead of hard coding the values 10,10, so we can quickly reference that whenever we need it.
Add the following towards the top of the file: const SIZE = 10;.
Why did we do it in all caps? it's a common practice in the graphics canvas world, any variables that are constant throughout the application, they do them in all caps.
faceCtx.drawImage(
  // 5 source args
  video, // where does the source come from?
  face.x, // where do we start the source pull from?
  face.y,
  face.width,
  face.height,
  // 4 draw args
  face.x, // where should we start drawing the x and y?
  face.y,
  SIZE,
  SIZE
);
Now we need to draw the small image back on but scaled up. Remember -- the whole reason we draw it small was so we can pull it back out, stretch it back up, and then paint it overtop. Saving it small lets us get that pixelated look that we are going for here.
To do that we will use drawImage.
The source is the faceCanvas itself, and we want to start from the top left corner so we pass face.x and face.y.
For how wide and how high we want to go, it's no longer the width of the face, it's the width of the tiny one, so we can pass SIZE for both width and height.
Next we have our drawing arguments.
Where should we start drawing the x and the y?
face.x and face.y.
And then for how wide and high should we do it, we want face.width and face.height.
// draw the small face back on, but scaled up
faceCtx.drawImage(
  faceCanvas, // source
  face.x, // where do we start the source pull from?
  face.y,
  SIZE,
  SIZE,
  //drawing args
  face.x,
  face.y,
  face.width,
  face.height
);
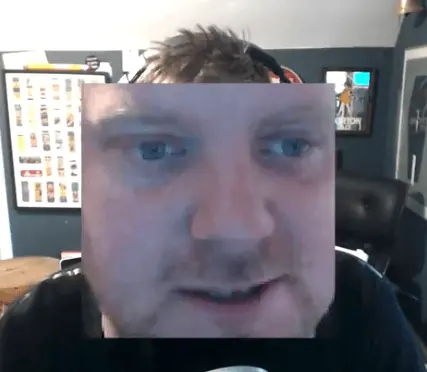
If you refresh the page, you might notice it's not working.
Wes spent 20 minutes debugging this to figure out why is it not painting his face once it is scaled up? Wes' debugging mindset went through and said it looks like it's not actually drawing anything there because if you comment that entire small face drawImage, it works the exact same.
If you give it a separate src, like the video to pull from instead of faceCanvas, you will see it works.
// draw the small face back on, but scaled up
faceCtx.drawImage(
  video, // source
  face.x, // where do we start the source pull from?
  face.y,
  SIZE,
  SIZE,
  // drawing args
  face.x,
  face.y,
  face.width,
  face.height
);
So why is it not painting to the faceCanvas?
Wes switched the source back and then went to the element and set display:none on the canvas element with class of face, and nothing changed.
So that's when Wes thought maybe we are drawing to the wrong canvas. But then he thought we have two canvases.
The first canvas is the regular canvas with ctx.
The second canvas is the canvas with the faceCtx.
So what is wrong with the variables?!
It was right here...
const faceCanvas = document.querySelector(".face");
const faceCtx = canvas.getContext("2d");
We grabbed the faceCanvas element correctly, but then we assigned faceCtx the wrong canvas! We used canvas instead of faceCanvas.
const canvas = document.querySelector(".video");
const ctx = canvas.getContext("2d");
const faceCanvas = document.querySelector(".face");
const faceCtx = canvas.getContext("2d");
Modify the code above as shown below 👇
const canvas = document.querySelector(".video");
const ctx = canvas.getContext("2d");
const faceCanvas = document.querySelector(".face");
const faceCtx = faceCanvas.getContext("2d");
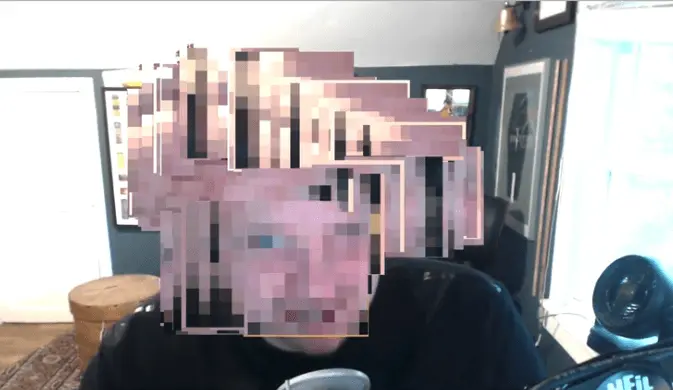
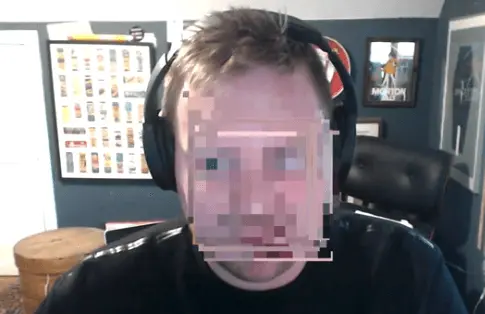
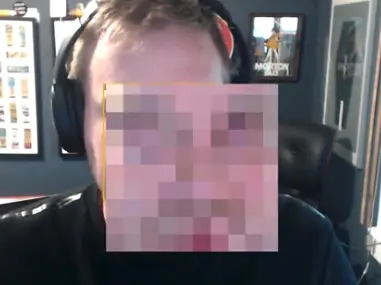
Now it is finally working! It is taking our faces and spreading it all over. There are few things we can do to fix some of that stuff.
Go into the censor function. In the first line of the function add faceCtx.imageSmoothingEnabled = false.
If you don't have that, the image is just kind of blurry so what the browser does is it says "oh this is pixelated!, let me try to smooth it out". But if you turn that off, you get the real pixelated values.
We also want to clear the canvas before we do any of this so add faceCtx.clearRect(0, 0, faceCanvas.width, faceCanvas.height).
Now the canvas should clear when we move.
One other thing is it doesn't do a great job at getting Wes' whole face. What Wes will do is go to the top of the file and create a scale variable like so const SCALE = 1.5;
Go to our second draw and make a few variables that are scaled up.
First we will make a width and height:
const width = face.width * SCALE;
const height = face.height * SCALE;
Then we will go down to the drawImage function and replace the last two values with the width and height variables like so 👇
// draw the small face back on, but scaled up
const width = face.width * SCALE;
const height = face.height * SCALE;

faceCtx.drawImage(
  faceCanvas, // source
  face.x, // where do we start the source pull from?
  face.y,
  SIZE,
  SIZE,
  // drawing args
  face.x,
  face.y,
  width,
  height
);
That makes a bigger scaled up face. Now we need to move the canvas over a bit based on the scale. For that we need a bit of math.
We will take our drawing args from faceCtx.drawImage() and do the following 👇
// Drawing args
face.x - (width - face.width) / 2,
face.y - (height - face.height) / 2,
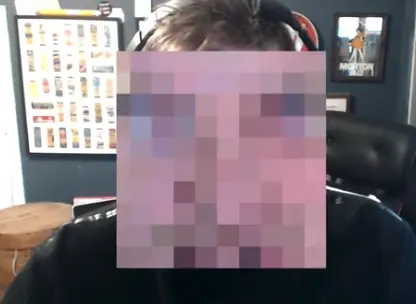
Now you can play around with the size and scale variables. If you change the size to const SIZE = 100;, you will see something like
You can feel free to stop the video here, but if you want to continue, we will create some sliders that will change these SIZE and SCALE values.
Make an options variable that is an object with properties of SIZE and SCALE like so 👇
const options = {
  SIZE: 10,
  SCALE: 1.35
}
Then everywhere in the code we are calling those variables, modify the code so instead of passing just SIZE we pass options.SIZE.
// draw the small face back on, but scaled up
const width = face.width * options.SCALE;
const height = face.height * options.SCALE;
Go back to the face.html and make some controls.
Give ourselves an input of type "range", with a minimum value of 0.3 and a max of 3 and the step will be 0.1. Then we need to add a label.
<div class="controls">
  <label for="SCALE">
    SCALE:
    <input type="range" name="SCALE" min="0.3" max="3" step="0.1" />
  </label>
</div>

Let's make the defaults line up with what we set. Add value="1.35" to the input range.

As you can see now the default value is set on the scale slider.
Duplicate that code and let's do the same for size. Size will start at 10 and go from 1 all the way to 100, and the step will go up by 1.
<label for="SIZE">
  SIZE:
  <input type="range" name="SIZE" min="1" max="100" step="1" value="10" />
</label>
Now we need to add some event listeners.
Select the inputs first by selecting every input within the controls class with a type of "range" 👇
const optionsInputs = document.querySelector('.controls inputs[type="range"]');
console.log(optionsInputs);
If you refresh the page and inspect the console, there is nothing! We did make a mistake, we should have used querySelectorAll. If you modify the code to that, you will see that it still doesn't give us anything.

Oh we have a typo! It should be .controls input[type="range"] not inputs plural. Modify the code accordingly.
Make an event listener for each of those. Add the event listener on the input so it will run whenever the input changes and then call handleOption.
optionsInputs.forEach(input => input.addEventListener('input', handleOption));
Above that, add the handleOption function.
function handleOption(event) {
  console.log(event.currentTarget.value);
}
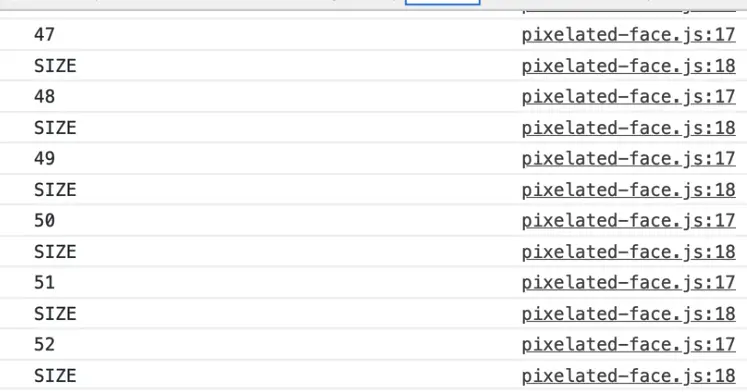
Now when you move the slider, you should see the values changing in the console.
Next we need to pull out the value and name of the input. Log event.currentTarget.name as well.
Destructure the value and name variables.
function handleOption(event) {
  const { value, name } = event.currentTarget;
  options[name] = value;
}
Inputs always come in as strings so tiy need to convert that back to numbers like so 👇
options[name] = parseFloat(value);
Now you can play with the inputs and scale and resize up and down!
That was a long video, but hopefully it was fun for you.
Find an issue with this post? Think you could clarify, update or add something?
All my posts are available to edit on Github. Any fix, little or small, is appreciated!
 👀 spotted in Brooklyn
  Breakfast at wawa on 4th of July
How am I doing?
Breakfast at wawa on 4th of July
How am I doing?  Taking the family to NYC and NJ for the week.
Ready for my first 4th of July tomorrow
Taking the family to NYC and NJ for the week.
Ready for my first 4th of July tomorrow  What if websites were felt? What if UIs were just streamed in as video?
