Event Listener

Enjoy these notes? Want to Slam Dunk JavaScript?
These are notes based on my Beginner JavaScript Video Course. It's a fun, exercise heavy approach to learning Modern JavaScript from scratch.
Use the code BEGINNERJS for an extra $10 off.
In this video we will learn about events, event listeners, how to listen to them and how to do stuff when things happen.
DOM Elements, things that are on the page, they emit events for things like when they are clicked, hovered, dragged, they will fire off events when they are interacted with.
We can use event listeners to listen for when these things happen and react to them.
You can attach event listeners to all elements, as well as the document and the window.
To demonstrate this, let's start by creating a button.
Within the /exercises/29 - Events directory, open the events.html file.
In the body, add a button with a class of "butts", as shown below 👇
<button class="butts">Click Me!</button>
<script src="./events.js"></script>
Create a file events.js (if it's not already there).
If you open the html file, you should see the button and when you click it, nothing should happen.
In order to attach event listeners, you first need to select the element you want to attach it to.
const butts = document.querySelector('.butts');
Next, we will call addEventListener() on the button element.
Event listeners will usually take two arguments:
- what the type of event is that you want to listen to
- a callback function
A callback function is just a regular function, it's just a word we use to describe when we pass a function to a method that will then be called at a later point in time.
Instead of us calling the function, we provide the name, reference to a function to addEventListener and then the browser will take care of calling or running that function for us when it needs to.
The callback function is our way of saying to the browser
"hey, when the
buttsbutton is clicked, can you please do me a favour and call this function?"
One of the more common ways to pass the callback function is as an anonymous function.
For example, 👇
butts.addEventListener('click', function() {

});
In the example above, function() { } is the second argument that we have passed to the event listener. Inside of that function, we can do whatever we want when things get clicked. For now, let's simply log "IT GOT CLICKED!!".
Now, each time you click the button, you will see that message logged in the console.
NOTE: For the click event on a button, you don't have to worry about thinking about keyboard events, if the user hits enter to click the button instead of click it, because it's a standard button, the browser will still trigger the click event.
There are three steps with event listeners:
- Go get something
- Listen for something (such as a click)
- Do something
There is a lot more to event listeners, which we will dive into now.
In our example above, we passed in an anonymous function (it is an anonymous function because there is no name to the function, no way for us to reference that function outside of the listener).
However, we can also create a named function and pass it in a reference. What Wes often likes to do before creating the event listener is to make a function as shown below 👇
function handleClick() {
  console.log('IT GOT CLICKED!!!!!!!!');
}
Note: the naming of the function to use the word handle is not a best practice, but it's often something that Wes does. He will name the callbacks with 'handle', which tells him that it is a specific function that gets passed in to an event handler.
Now we can use the following code 👇
butts.addEventListener('click', handleClick);
This allows us to still call handleClick from elsewhere in our code, as well as from within the console.
You might notice that we are passing the reference the function like so 👇
butts.addEventListeners('click', handleClick);
Rather than doing the following 👇
butts.addEventListeners('click', handleClick());
If you try to run the code with handleClick() instead of handleClick and refresh the page, you will see the message "IT GOT CLICKED" in the console before we ever click the button.
That is because it is running on page load when we pass the function as handleClick() instead of handleClick.
Unless the function were to return another function, which is something that can happen, you don't actually have to call the function yourself.
Why?
Because the browser will run the function for us. We simply pass it a reference so it knows what to run when the time comes.
What benefit is there to having the function that we are passing to the event listener outside of the function?
There are a couple of things.
Let's add another button to the HTML page.
<button class="cool">Click me also!</button>
If we wanted to listen on that button, we could add the following code 👇
coolButton.addEventListener('click', handleClick);
Now it doesn't matter which button you click, both of them are referring to that same function.
If instead of re-using the handleClick function we wanted to create anonymous functions and pass it two both event listeners separately, that would still work,but if you think of scaling that up to a whole bunch of buttons, then you have to make sure you reference every one of the buttons which is not very DRY (don't repeat yourself).
So the first benefit is that it makes the code more DRY.
Removing an Event Listener
The second benefit is if you want to remove an event listener from an element, you must have reference to the function.
removeEventListener() takes 2 arguments:
- the event
- the function
It is not possible to remove the event listener from all the click events for example.
You need to pass in the reference to the function you want to stop listening on.
butts.removeEventListener('click', handleClick);
If you refresh the HTML page, you will see the event listener no longer works.
That is called unbinding.
What does binding mean?
A binding essentially means taking a function and listening for a specific click within an element.
In our examples earlier, the handleClick function was bound to the butts element.
The coolButton element was also bound to the handleClick function and when we took it off, we were unbinding that function from that element.
So if you want to remove the event listener, you must have reference to the original function.
If we had done an anonymous function, we couldn't have removed the click handler.
Even if you were to pass the exact same anonymous function to remove, like below 👇, it still would not work.
butts.addEventListener('click', function() {
  console.log("I am an anon!");
});

butts.removeEventListener("click", function() {
  console.log("I am an anon!");
});
As you can see if you run the code, it does not work. That is because there is no way to reference the actual function we wanted to remove.
If you ever in the future need to remove an event listener, remember not to use an anonymous function.
const hooray = () => console.log("HOORAY!");
coolButton.addEventListener('click', hooray);
Shown above 👆is how you would add an event listener with an arrow function.
The hooray function is technically an anonymous function, but because we have stored it in a variable, it will infer the function from the variable name and we can still reference it because it's stuck in a variable.
Those are the basics of event listeners.
We are going to go into what are the other events that are out there as well and how we can create our own custom events.
It's handy to be able to emit your own events and then listen to them like you're listening to regular clicks.
You can use that ability to emit a buy button or buy event, or you want to emit a success event for example.
Listening to events on multiple elements
Wanting to listen on multiple elements is a very common thing.
Let's say you have 40 buttons on the page and anytime you come across a specific type of button, or a specific type of image, or anything like that, you want to listen for the event for all of the things that are on that page.
In our HTML page, add the following 👇
<button class="buy">Buy Item 1</button>
<button class="buy">Buy Item 2</button>
<button class="buy">Buy Item 3</button>
<button class="buy">Buy Item 4</button>
<button class="buy">Buy Item 5</button>
<button class="buy">Buy Item 6</button>
<button class="buy">Buy Item 7</button>
<button class="buy">Buy Item 8</button>
<button class="buy">Buy Item 9</button>
<button class="buy">Buy Item 10</button>
Note: Wes used an Emmet shortcut to create this text by writing button.buy{Buy Item $}*10 and then hitting tab to expand the HTML.
Now, how can you listen for a click on all of them?
It doesn't make sense to have to select all 10 of them and then have to attach an event listener 10 times.
That is actually what we are doing, but there is a much more efficient way.
First we need to select all the buttons.
const buyButtons = document.querySelectorAll("button.buy");
This gives us a node list of all of the buttons.

You might think, why can't we just go ahead and take our buy buttons and add an event listener of click like so 👇
function buyItem() {
  console.log('BUYING ITEM');
}

buyButtons.addEventListener('click', buyItem);
So we have our elements, we listened for them, and then when that happens, we passed the function to run.
You should see the following error when you reload the HTML page and look at the console. 👇

The error is telling us that the buyButtons does not have the method addEventListener.
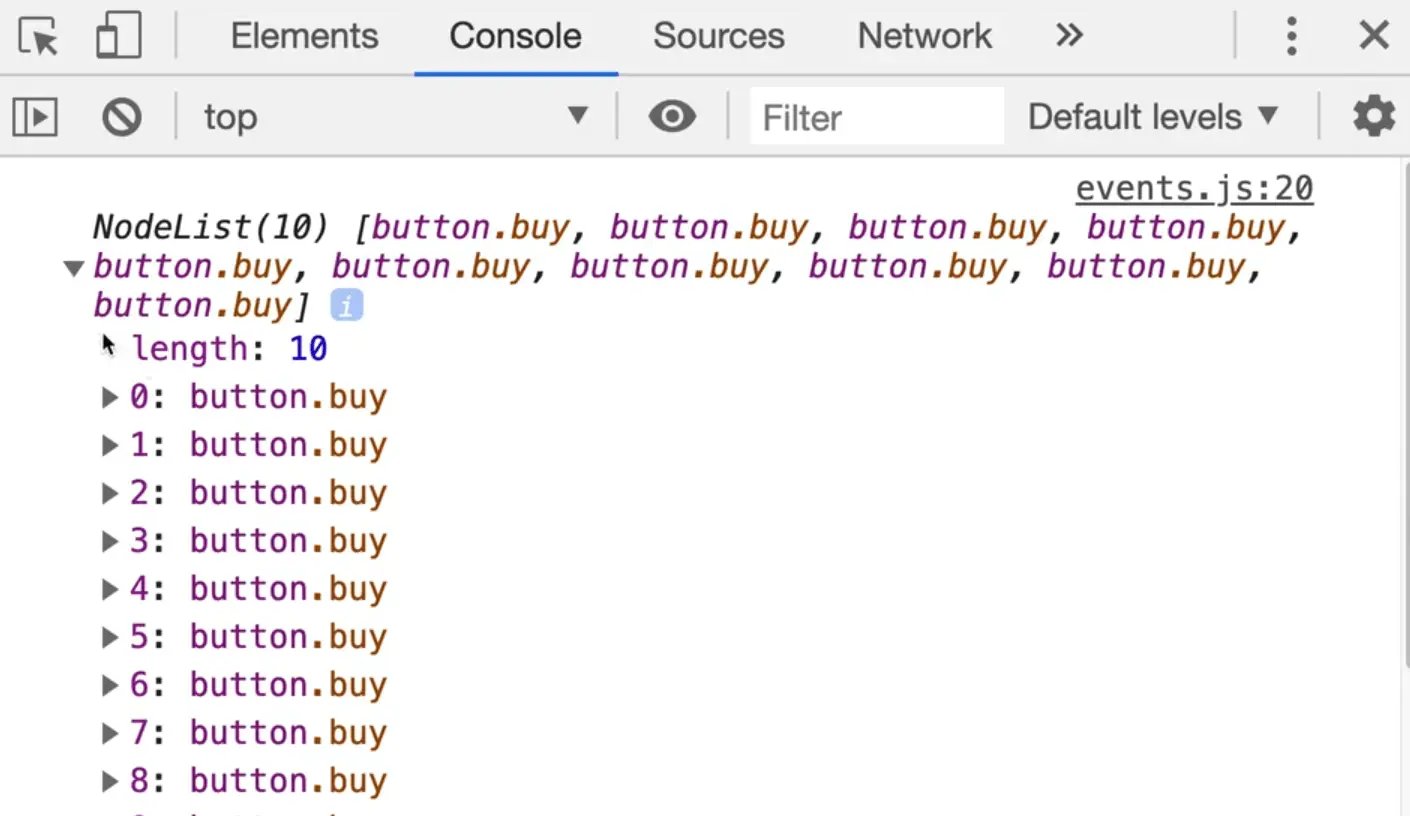
Take a look at the buyButtons by logging them 👇
console.log(buyButtons);
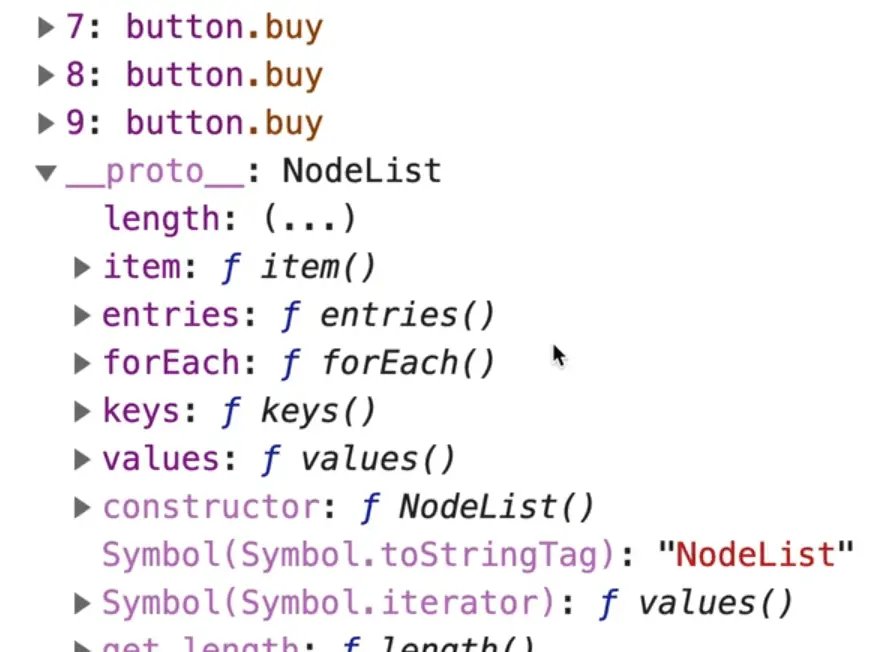
If you ever want to see what all of the different methods are that are available on a variable you can look at the prototype.

You will notice that addEventListener is not there.
console.dir(butts);
If you were to add the code above , and you expand the prototype, you will see addEventListener somewhere in the giant list.
If you want to add the event listener to all the buy buttons, you have to loop over and for each element attach it individually.
We haven't learned about loops just yet, but we should be able to do this.
forEach method
You may have noticed that in the buyButtons prototype, there was a method called forEach. That is going to allow us to loop over each of the items.
Note: Wes often takes all the selectors are the top of the file rather than anywhere in the code. For this example, we are going to keep it within the middle of the file. Both methods work, putting it at the top is just a personal preference of Wes'.
We will take the buyButtons and call the forEach() method on them.
forEach is a method that will run a function for each item in our node list.
We can pass it an anonymous function, which is common when we are looping since we don't have the same limitations as we did in event listeners.
forEach function will give you an argument that is the each of the individual buttons, and we can name it whatever we want.
We will call it buyButton. It is just a parameter (aka a placeholder) and the browser will pass us a variable called buyButton when it runs it for us.
buyButtons.forEach(function(buyButton)) {
  console.log(buyButton);
}
If you run that, you should see all the buy buttons logged in the console.

Anything you put in our forEach loop will happen 10 times, once per button.
Now that we have the individual elements that are on the page, we can use the addEventListener() method to add the event listener to each.
buyButtons.forEach(function(buyButton) {
  console.log('Binding the buy button');
  buyButton.addEventListener("click", buyItem);
});
If you refresh the page, you will see the "Binding the buy button" text was triggered 10 times and if you click each of the buttons, you should see the text BUYING ITEM logged 10 times.

Similarly, if you want to remove the event listener from each of those, you have to loop over each of them as well.
Something to note, which is a big hurdle, is that the parameter buyButton inside of our forEach function can be named anything.
Let's say we have a function called handleBuyButtonClick (NOTE: Wes mentions that this function was named misleadingly... it is not actually a handler, the handler is buyItem).
What we can do is take the code out of the forEach anonymous function and move it to the handleBuyButtonClick function like so 👇
function handleBuyButtonClick(buyButton) {
  console.log('Binding the buy button');
  buyButton.addEventListener("click", buyItem);
}

buyButtons.forEach(handleBuyButtonClick);
We have made handleBuyButtonClick a named function, which takes in a parameter of buyButton which we could have named anything that we want.
It is a parameter or a placeholder that we are not supplying, the browser will run the forEach function and it knows that it will pass as the first argument, the element that got clicked.
If you renamed the parameter to oprah it would still work, like so 👇
function handleBuyButtonClick(oprah) {
  console.log('Binding the buy button');
  oprah.addEventListener("click", buyItem);
}
Other things is that you will often see that people use arrow functions as well for the handlers.
For example 👇
buyButtons.forEach((button) => {
  button.addEventListener('click', () => {
    console.log("You clicked it!")
  })
})
That will work just as well. Arrow functions work fine.
The only downside for using the arrow function for your event listener like we did in the example above is that you cannot unbind it because it's an anonymous function in this case.
Find an issue with this post? Think you could clarify, update or add something?
All my posts are available to edit on Github. Any fix, little or small, is appreciated!


