Etch-a-Sketch
Enjoy these notes? Want to Slam Dunk JavaScript?
These are notes based on my Beginner JavaScript Video Course. It's a fun, exercise heavy approach to learning Modern JavaScript from scratch.
Use the code BEGINNERJS for an extra $10 off.
Now that we have gone over some of the fundamentals of JavaScript, it is important for us to practice what we have learned so we can put our skills into use, and have fun along the way.
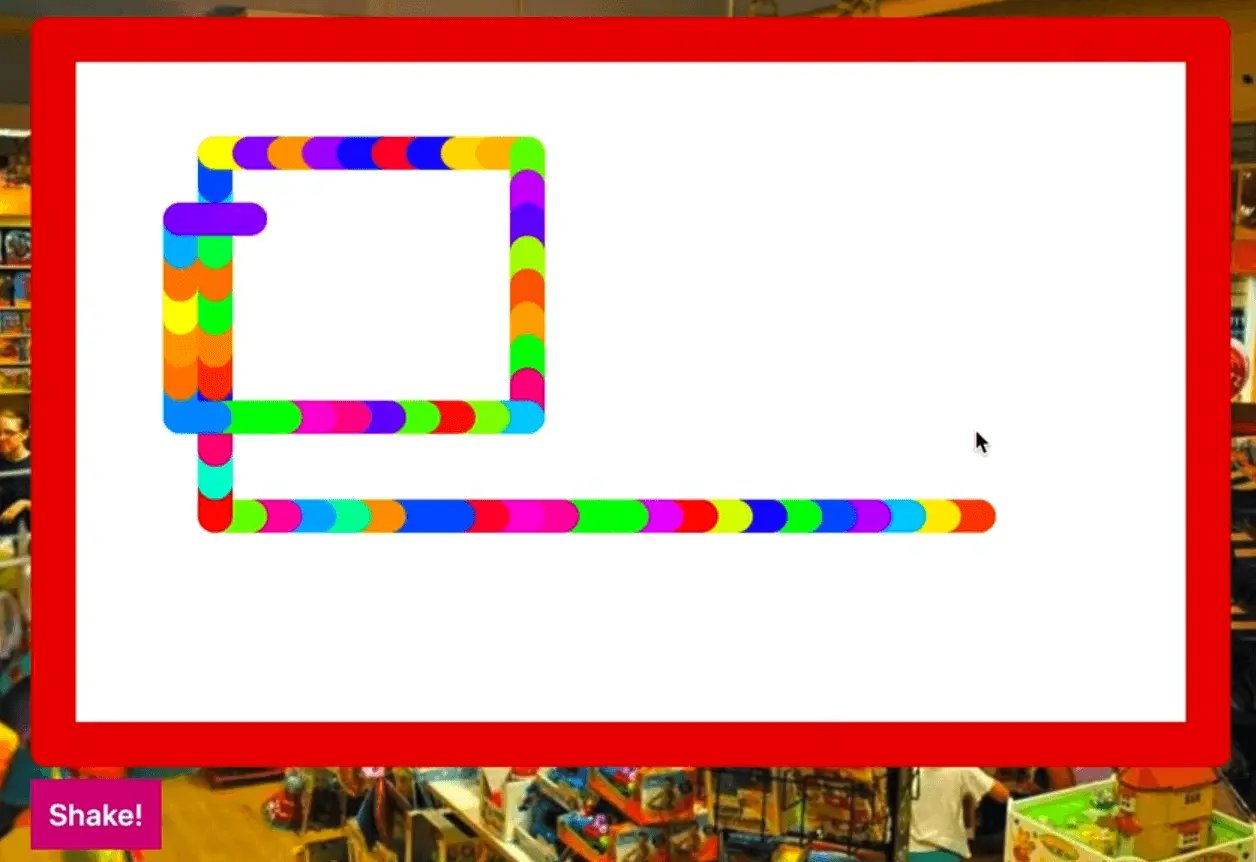
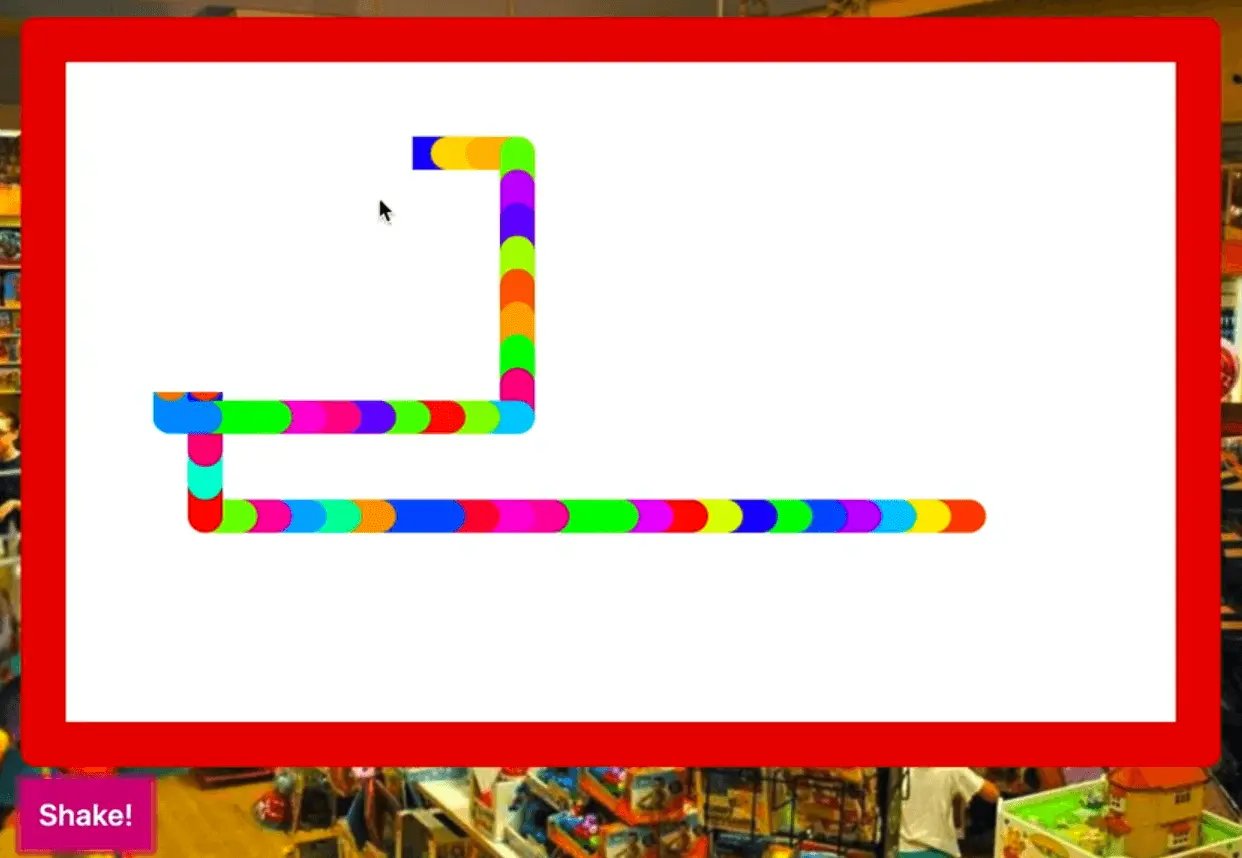
In this video we will build an Etch-a-Sketch that you can control by moving the arrow keys around.
Wes has added some fun things to it, for example the line is a rainbow gradient and then you can shake it an refresh.
Another thing to note is whenever you reload the page, it picks a random spot to begin.

Topics we will be covering in this video include DOM elements and keyboard events.
We will be learning about something called canvas in JavaScript, and we will be touching on switch statements which we have not learned yet.
Inside of the /exercises directory there should be a folder called /33 - Etch-a-sketch containing 2 files:
index.html&etch-a-sketch.js
Open up the index.html file which Wes provided for us.
It should contain the following:
- a div with the class of
canvasWrap - a canvas element (which is an HTML element that is used for drawing on). We have explictly given the canvas element a width and a height.
If you look at the CSS, you will notice that we have halved those width and height values for the canvas.
The reason for that is beause you can think of the HTML width and height values we have set via HTML attributes as the actual width of an image.. those values represent that actual height and width of the canvas element.
However, the values we set in CSS are the size that is should be on in the screen. The reason Wes halved the size via CSS is so that it won't look pixelated.
On most screens, these things are going to be high resolution and when we are dealing with pixel based stuff, you want to be at least double so get crisp stuff on the page.
We also have a button with a class of shake which is wrapped within a div because you could add other buttons like up, right, left, down for people who are on mobile and do not have arrow keys.
We have some animation stuff which we will dive into later.
<body>
  <div class="canvasWrap">
    <canvas width="1600" height="1000" id="etch-a-sketch"></canvas>
    <div class="buttons">
      <button class="shake">Shake!</button>
    </div>

  </div>
  <script src="./etch-a-sketch"></script>
  <style>
      body {
        min-height: 100vh;
        display: grid;
        align-items: center;
        justify-items: center;
        background: white;
        background: url(https://s3.amazonaws.com/media.locally.net/original/HABA_ALT_2017-08-02-13-22-45.jpg);
        background-size: cover;
      }

      canvas {
        border: 30px solid #e80000;
        border-radius: 10px;
        /* Set the width and height to half the actual size so it doesn't look pixelated */
        width: 800px;
        height: 500px;
        background: white;
      }

      canvas.shake {
        animation: shake 0.5s linear 1;
      }

      @keyframes shake {

        10%,
        90% {
          transform: translate3d(-1px, 0, 0);
        }

        20%,
        80% {
          transform: translate3d(2px, 0, 0);
        }

        30%,
        50%,
        70% {
          transform: translate3d(-4px, 0, 0);
        }

        40%,
        60% {
          transform: translate3d(4px, 0, 0);
        }
      }
    </style>
</body>
Open up the JavaScript file etch-a-sketch.js, and open up index.html in the browser.
Add a test console.log statement to make sure the JavaScript file is properly linked.
We are going to start by writing pseudo code for what we need to do within the JavaScript file.
// Select the elements on the page - canvas, shake button

// set up our canvas for drawing

// write a draw function

// write a handler for the keys

// clear or shake function

// listen for arrow keys
If you have never seen canvas before, the way it works is that you go ahead and grab onto the canvas, then you grab onto this thing called "context" which is either 2D or 3D (we will be working with 2D canvas today), and then you have a set of APIs (methods) that are used for drawing on the canvas.
Think of something like Microsoft Paint.
Rectangles, circles, drawing, lines, borders, different fill colors, all of those things are available to us in canvas and they are used for when you want to programmatically draw something to the browser.
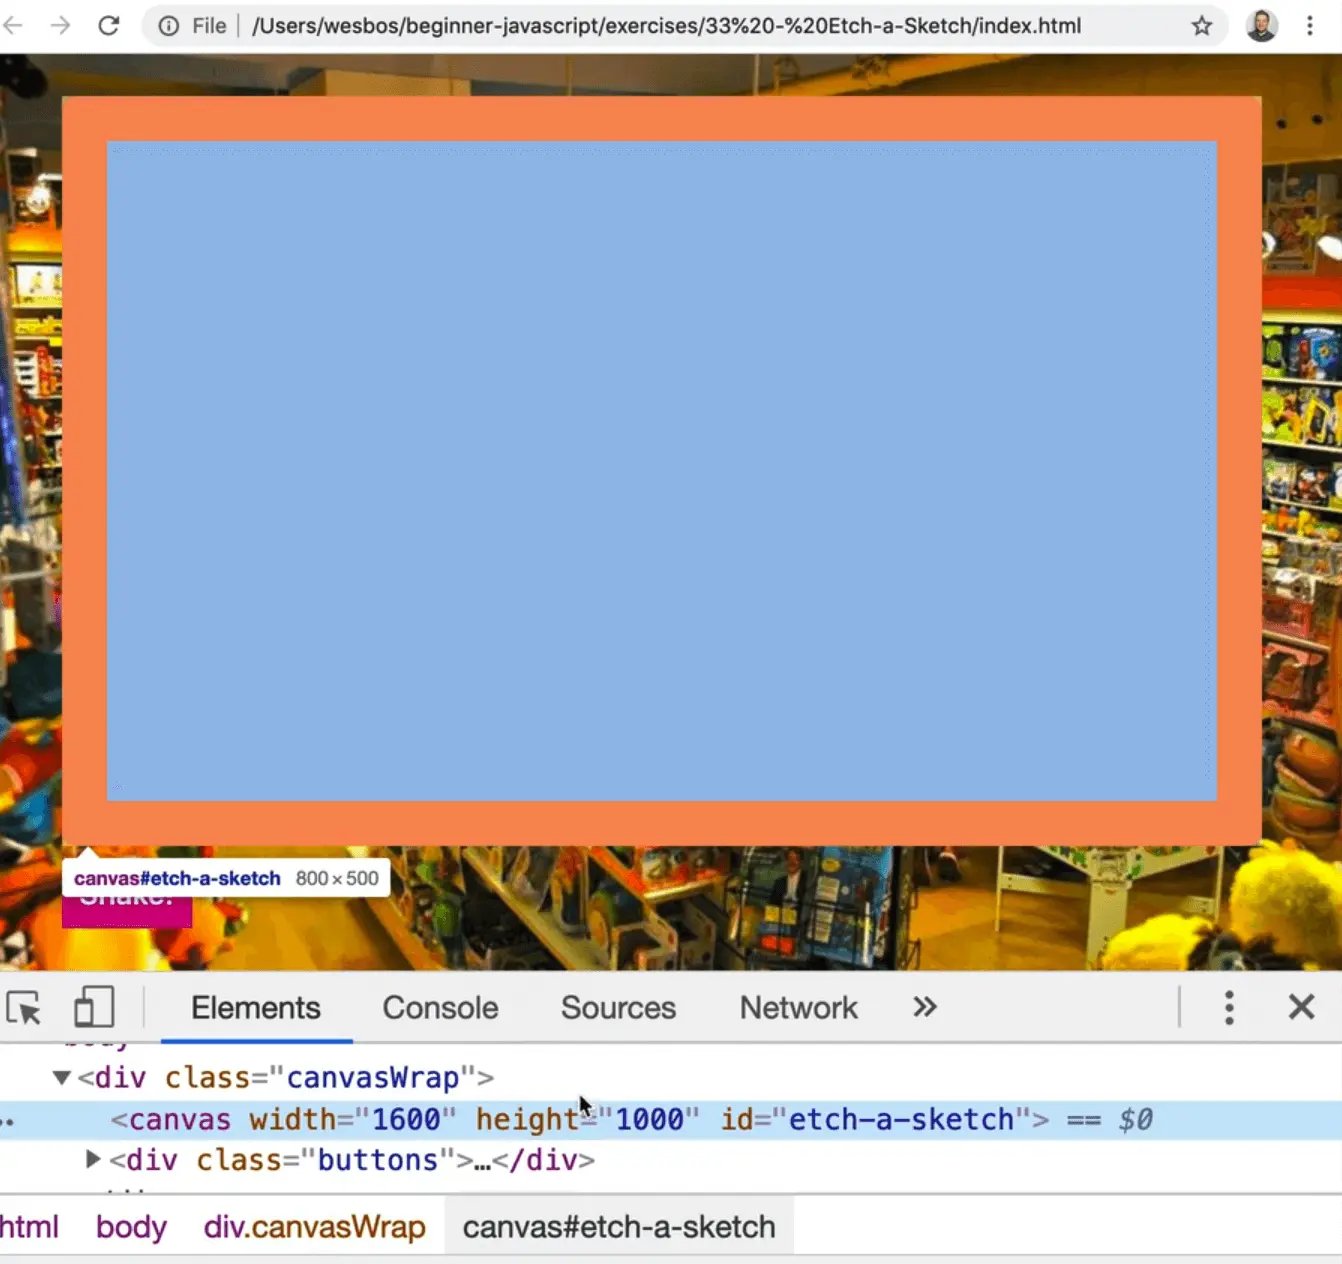
If you inspect the canvas element in dev tools, you will see that it's just a regular old canvas element. 👇
Grab the canvas.
const canvas = document.querySelector('#etch-a-sketch');
Next you need to grab the context.
The canvas is the elements and the place where we do our drawing is called the context, where we will be drawing our circles and everything too.
You get the context like so 👇
const ctx = canvas.getContext('2d');
Note: ctx is a very common variable name for context.
If you google three.js you can see a lot of examples of things people are doing with 3d canvas.
Next, we need the shake button.
The shake button has a class of 1 which we can use to grab it.
const shakebutton = document.querySelector('.shake');
Now we have all of the different elements we want.
Now we need to setup our canvas for drawing.
We will just set a couple of defaults on the canvas.
ctx.lineJoin = 'round';
ctx.lineCap = 'round';
Those two settings ensure that we get a smooth drawing.
By default, you are going to get a squared off edge and that doesn't look as good. You can also set the width of the line to be as wide as you want. By default, it's one pixel.
We want it to be thicker so set the lineWidth to be 10 (you don't have to specify the pixel value).
ctx.lineWidth = 10;
Refresh the HTML page and then open up the console.
Type in ctx so you can have a look at our ctx.
You will see we get this CanvasRenderingContext2D.
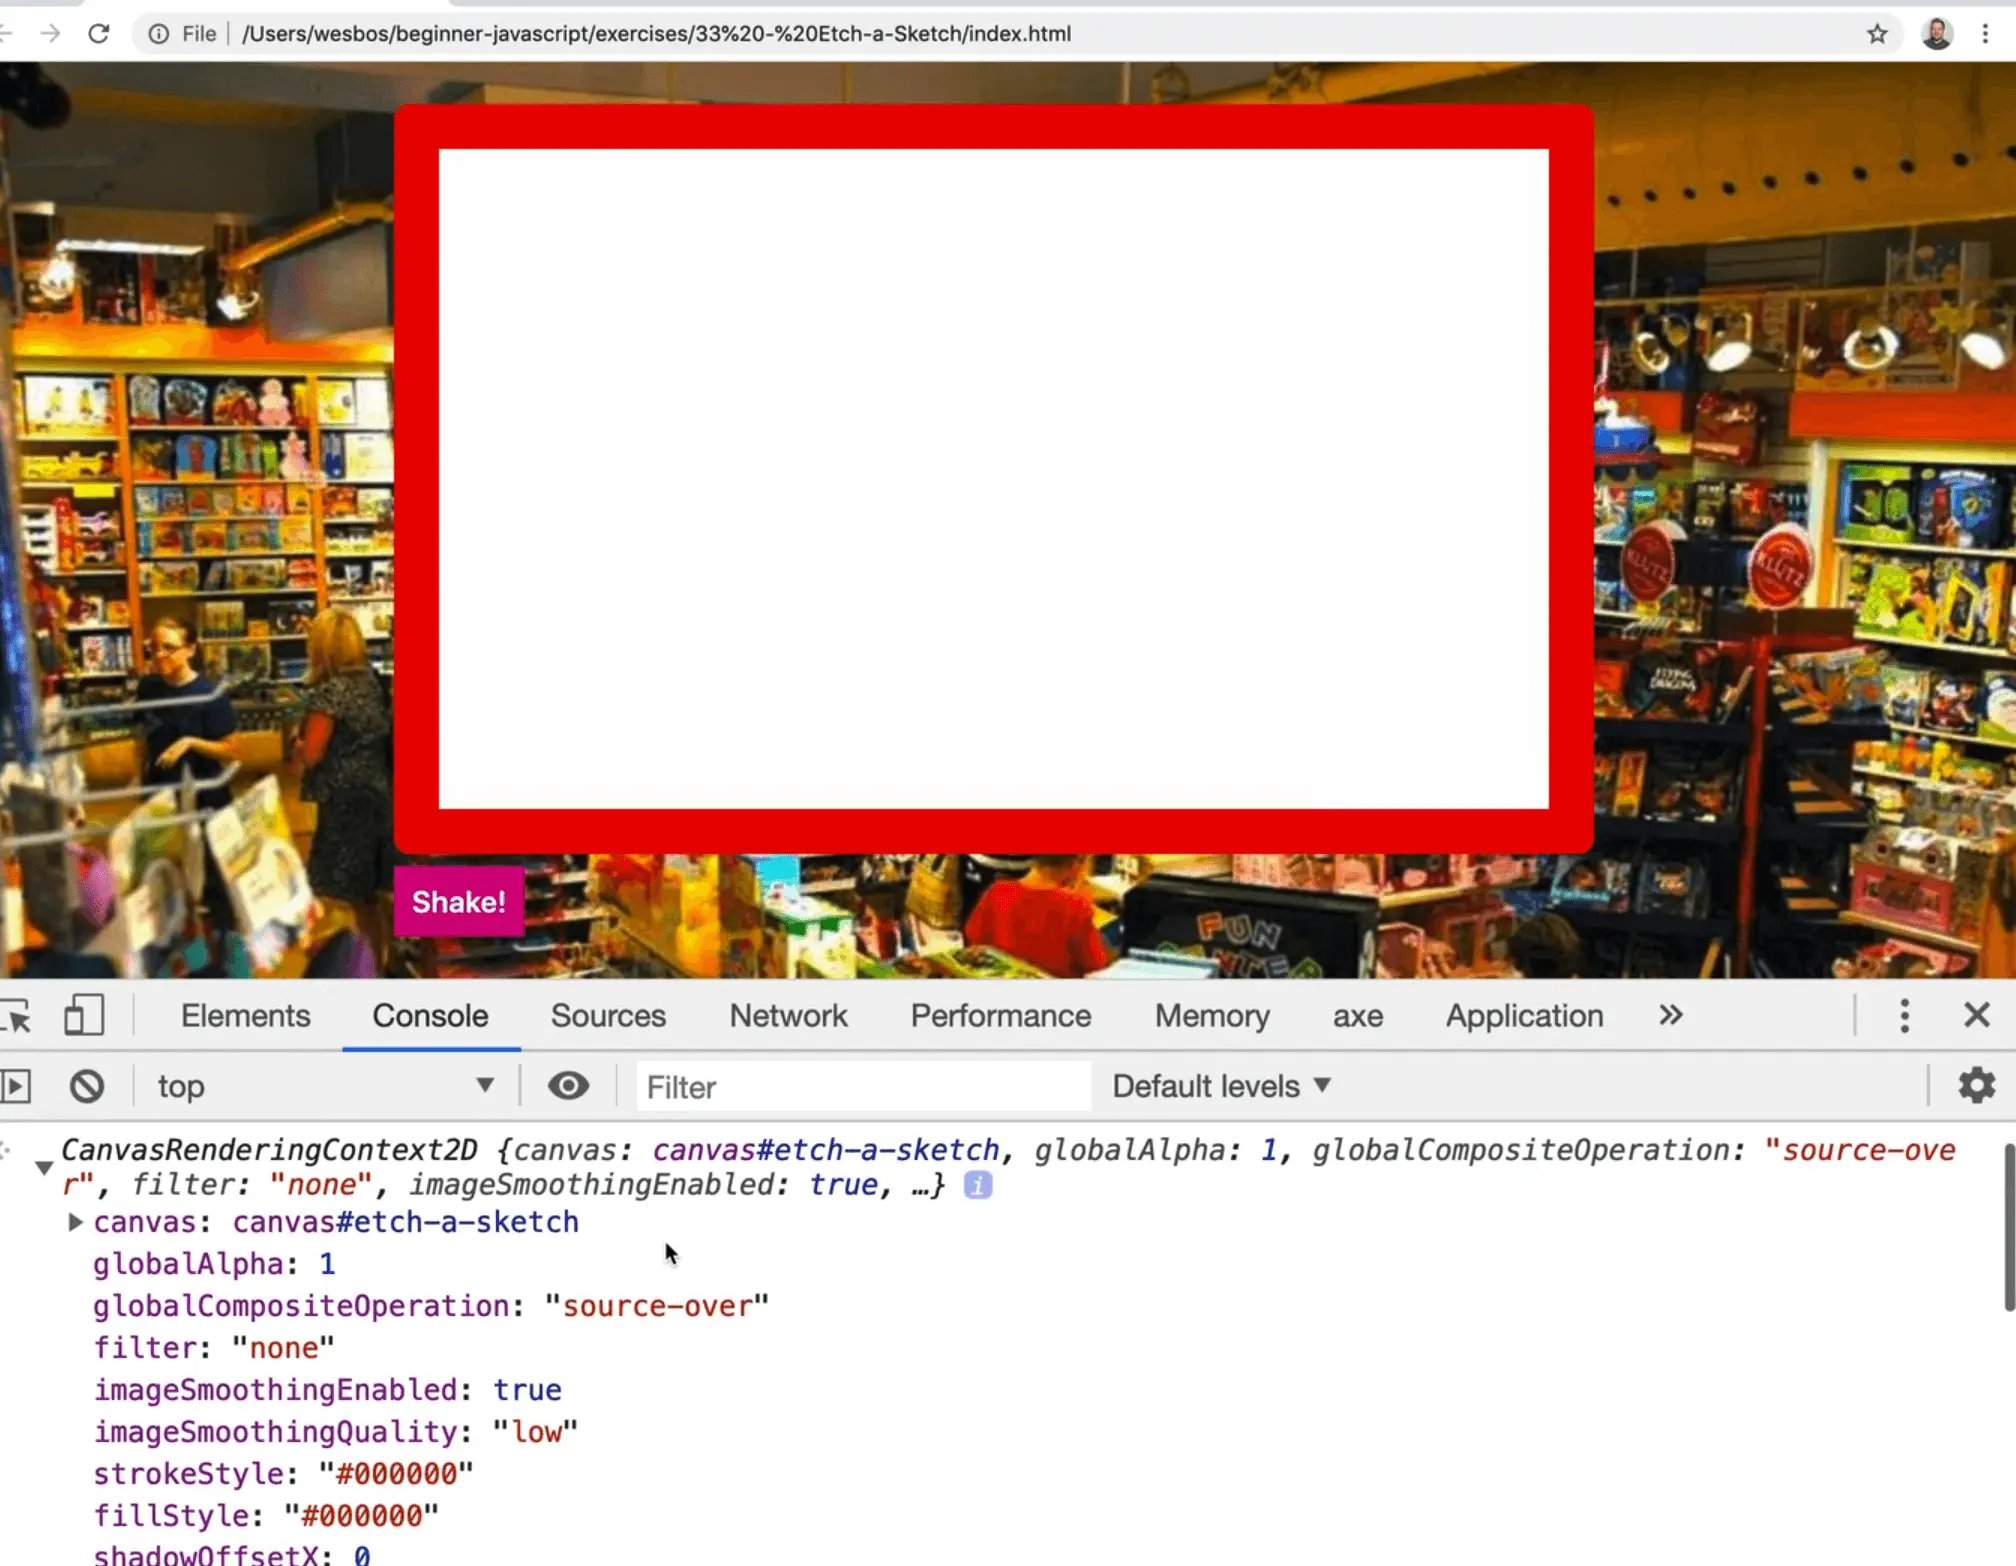
This is our context object.
Inside are all these different properties that you can set or get from them, including what color the fill will be, the stroke will be, etc.
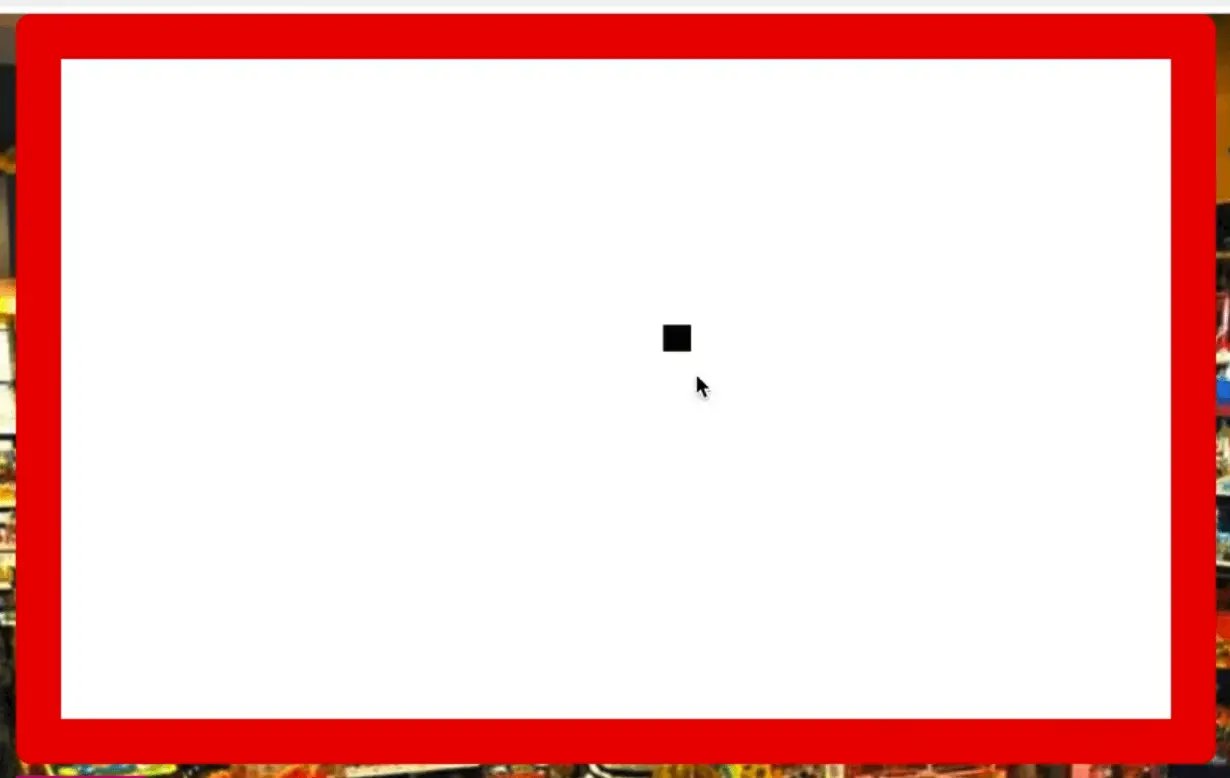
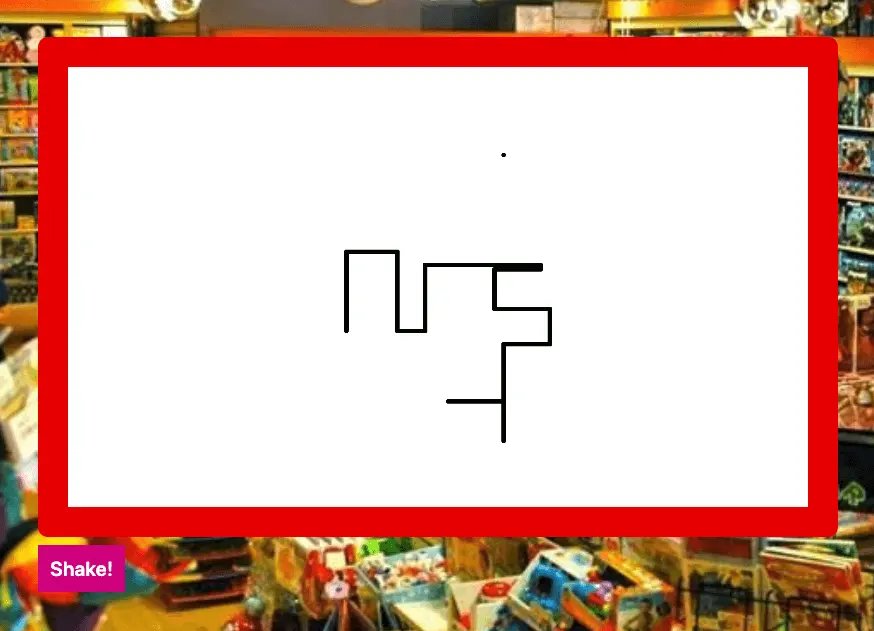
Next you have to put the drawer somewhere, meaning you have to put the dot somewhere because that will be the starting point of hte etch-a sketch.
If you load the finished project in an HTML page and refresh the page, each time it loads, you will see that the dot is randomly places.
First let's work on placing the dot, and then we will randomize it.
Take the ctx and run something called, beginPath() which will start the drawing.
TO describe what beginPath does is you can think drawing with a marker. You have to start by placing the marker somewhere on the page, which is the equivalent of beginPath.
Next move the context.
ctx.moveTo(200,200);
That will place the dot 200 pixels from the left and 200 pixels from the top.
Then run the following. 👇
ctx.lineTo(200, 200)
ctx.stroke();
ctx.stroke(); will draw a line between where you started and where you drew your line to. That will sort of make an invisible line and that will stroke it.
Now if you refresh the page, you will see a dot 200 pixels over and 200 pixels down.
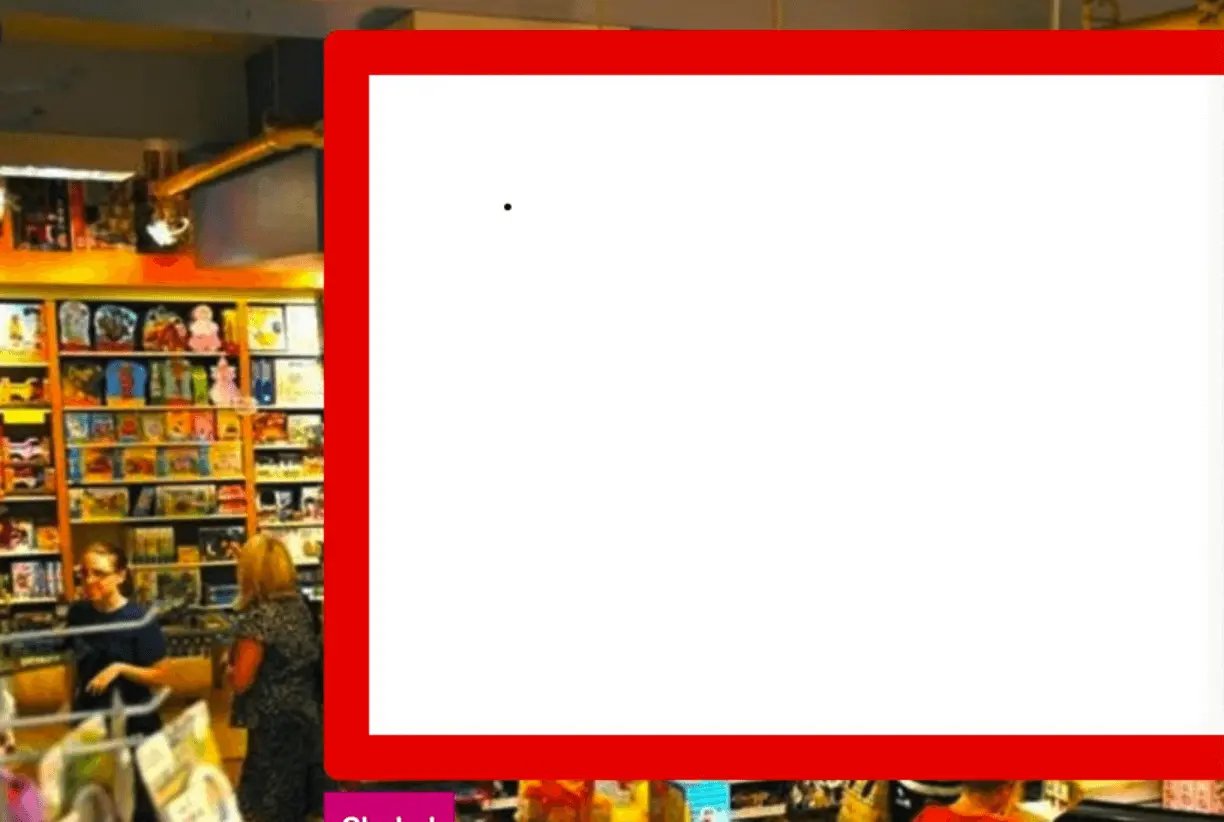
What is cool about an Etch-a-Sketch is that it can start in a random spot.
How can you pick a random spot in this Etch-a-Sketch?
You could take the width, and the height and then generate a random number between zero and the width and then zero and the height.
const width = canvas.width;
const height = canvas.height;
console.log(width, height);
If you log the width and the height, what will you get get?
You will get 600 and 1000 which are the actual height and weight of the canvas, not the display width.
You might notice that when you save the JavaScript file, Prettier modifies the variable declarations for width and height like so 👇
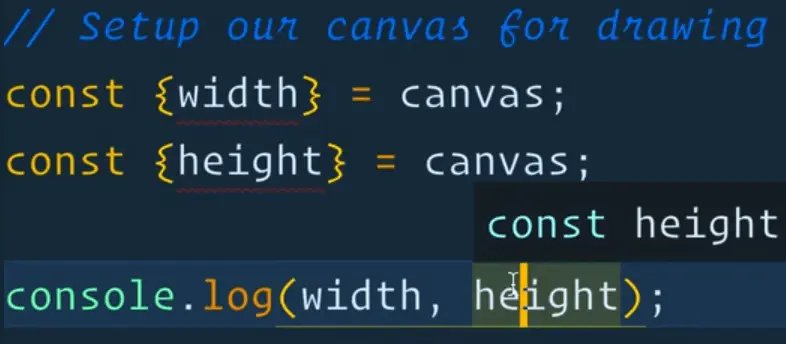
Prettier is doing destructing for us.
If you are simply making variables from a property on an object, you can short form this.
Instead of the following 👇
const width = canvas.width;
const height = canvas.height;
You can do this shortform 👇
const { width, height } = canvas;
That is called destructuring.
Meaning that you take the width property and put it into a variable width, and take the height property and put it into the variable height.
That is a nice short way to do that.
We will do a lot more destructuring in this course, this is just our first time encountering it.
Why are you grabbing the width and height variables?
Wes likes to have top level variables. He finds it easier to use when doing math. It's much easier than writing canvas.width every time.
Now we want to create a random x and y starting points on the canvas.
So how do you create random values in JavaScript?
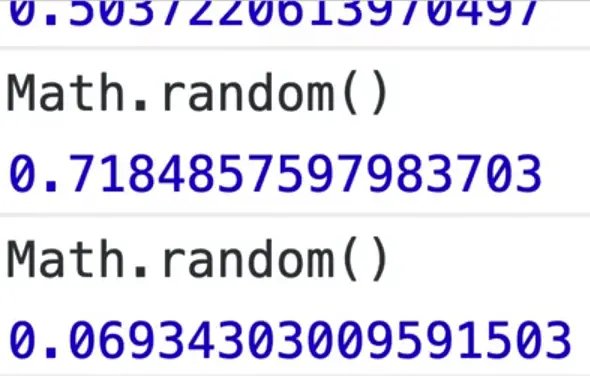
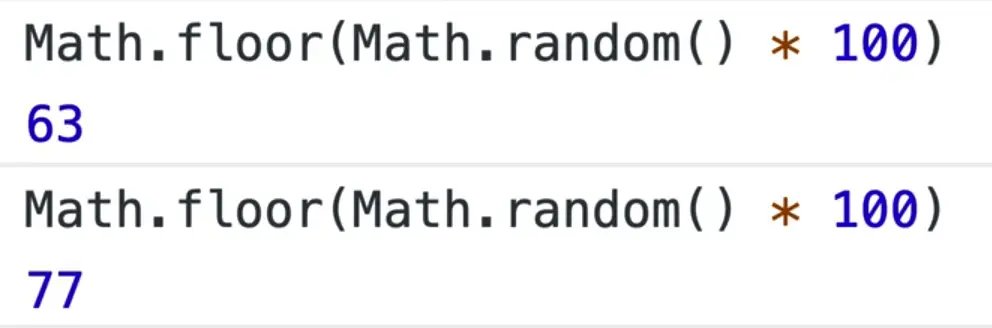
You may have seen that we have Math.random().
If you type that into the console, you will see that it gives us a random number that seems to always be underneath one.
Can we just pass a random number?
Could we do something like Math.random(100)? No, that doesn't do anything.
Let's look at the docs!
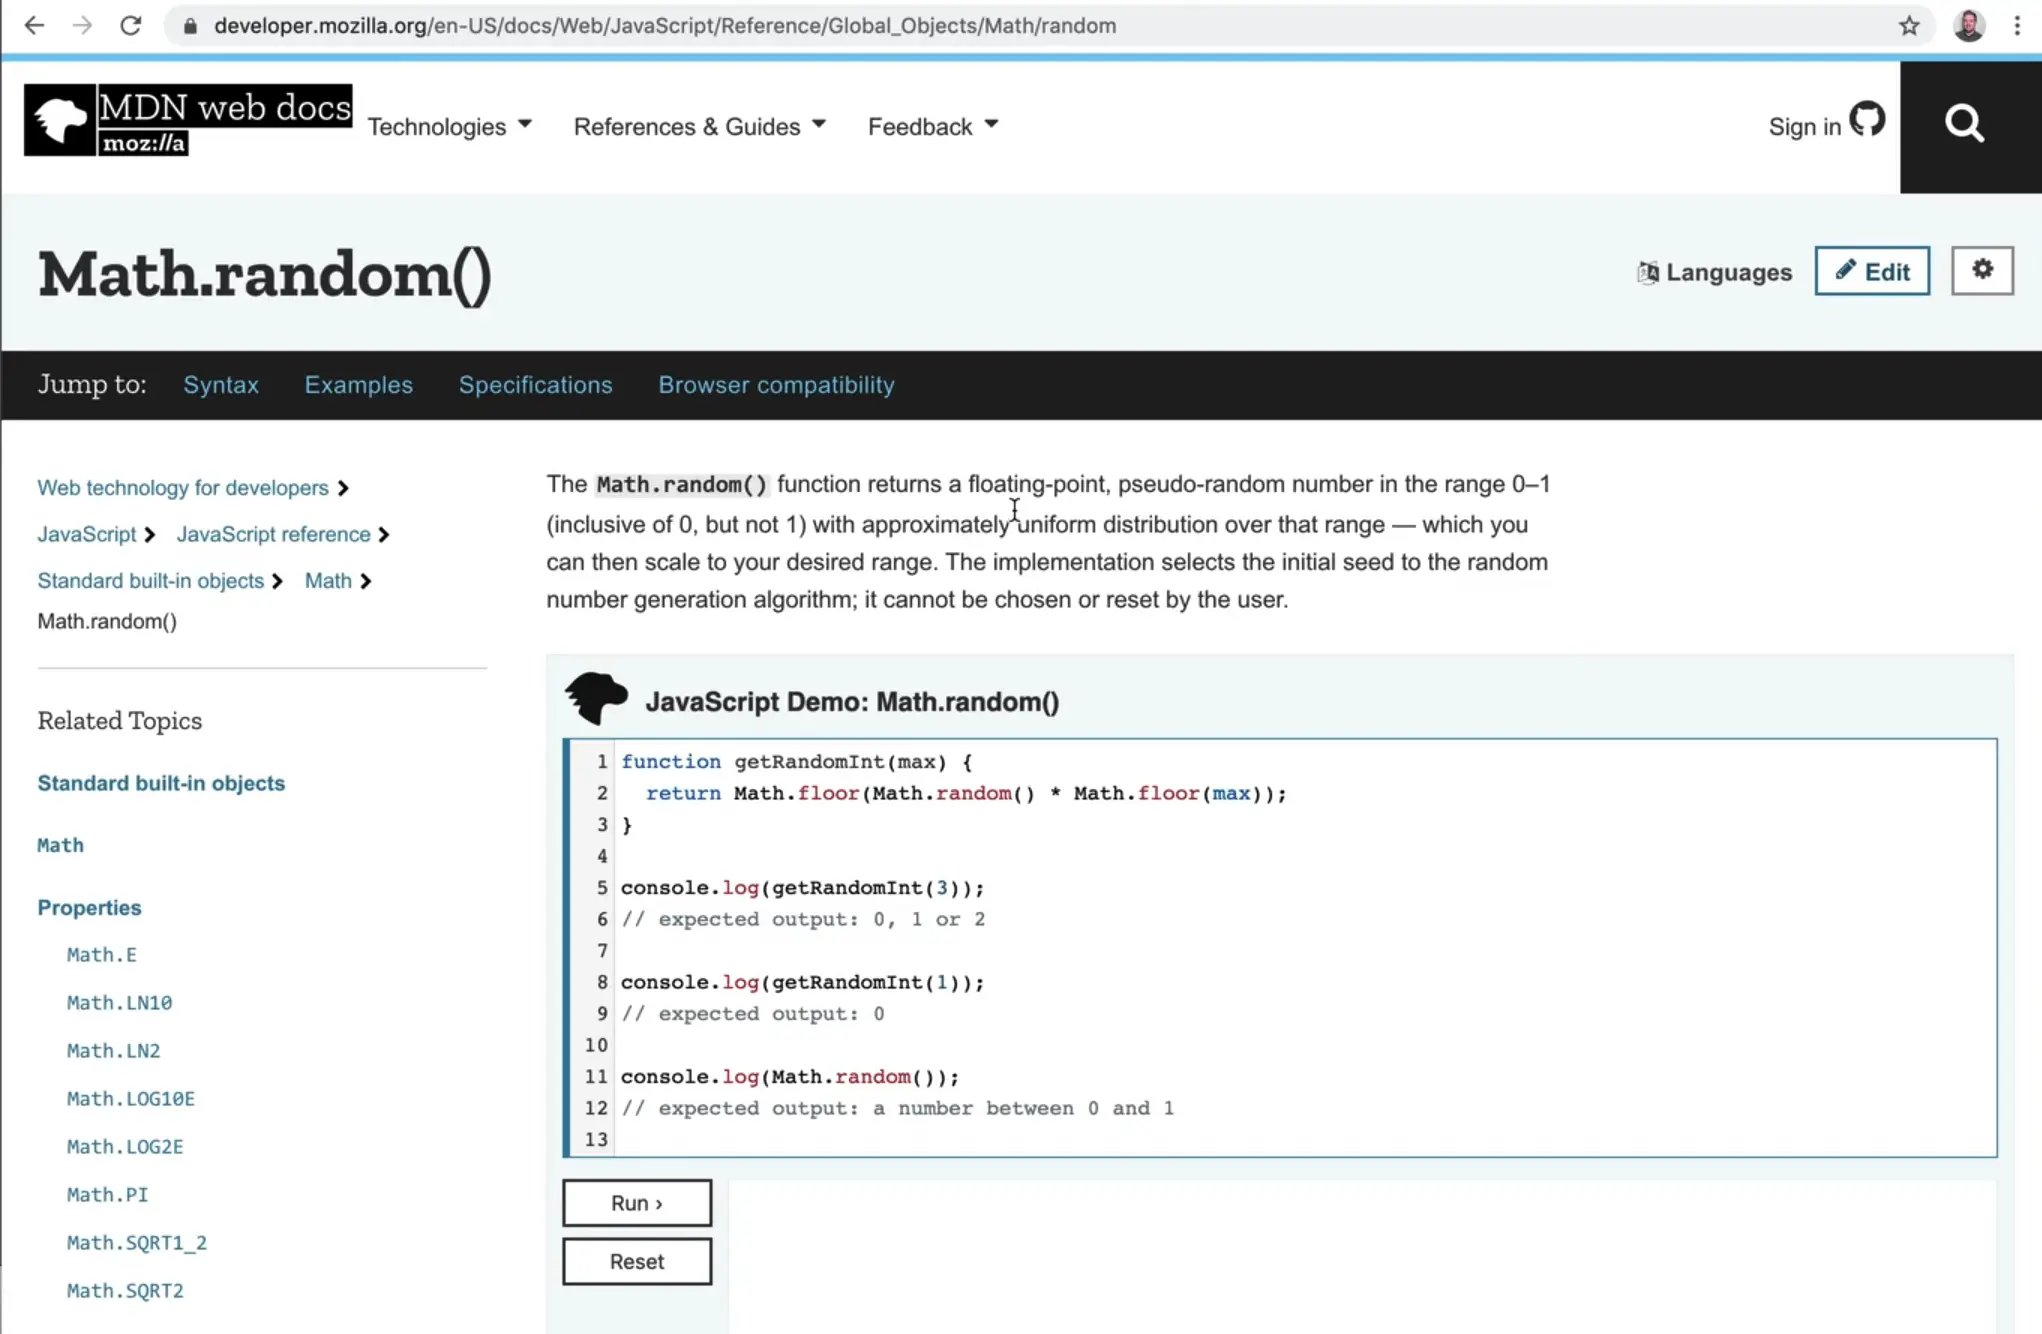
Math.random returns a floating-point (that means it contains decimals), pseudo-random number in the range of 0 to 1, inclusive of 0 but not 1.
That means there is a possibility that you will get zero, but you will never get one.
It doesn't take any arguments or anything like that.
What you can do is take the Math.random value that it gives you and multiply it by 100, you are going to get a random number between zero and 99.99999.
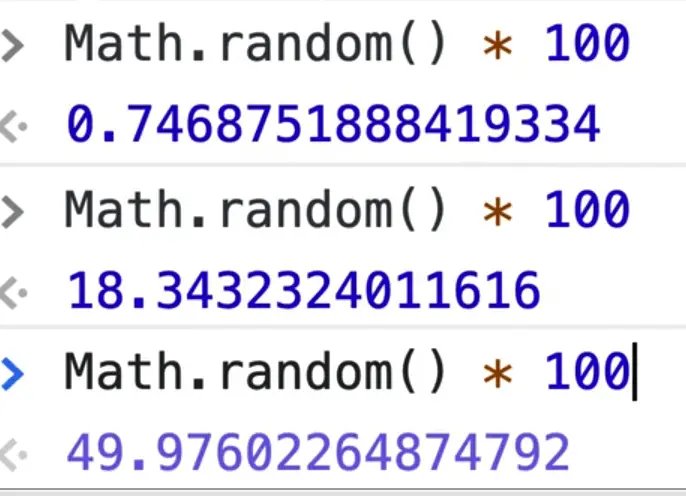
Then what you can do is run Math.floor(Math.random() * 100)), which should give us a number between 0 and 99.
So that is exactly what we are going to use.
Modify the code like so 👇
const { width, height } = canvas;
let x = Math.floor(Math.random() * width);
Replace the hard coded x value was passed to ctx.moveTo and ctx.lineTo with the variable x.
ctx.beginPath();
ctx.moveTo(x, 200);
ctx.lineTo(x, 200);
ctx.stroke();
Now when you refresh the page, you should see that we are randomly getting an x value.
Now do the same for the y value.
let y = Math.floor(Math.random() * height);
ctx.moveTo(x,y);
ctx.lineTo(x,y);
We might need to come back and modify that so it moves a little bit quicker but we can leave it there for now.
For now, whenever you refresh the page you get a random x and y value that moves the dot around the page.
If you change ctx.lineCap="round"; to ctx.lineCap = "square"; it looks like this 👇
But switch it back to round because we want to use round.
Now that we have the basis of our canvas working.
Write the handler for working with the arrow keys. You need to know whether to move the line up or down or left or right.
Make a function called handleKey.
Listen for the arrow keys using a keydown event listener.
You can listen for a keydown event on anything, we already did it on text inputs, but if you want to listen to it site wide, you listen to it on the window.
Listen for a keydown event and when it occurs, run handleKey.
function handleKey(){
  console.log("HANDLING KEY");
}

window.addEventListener('keydown', handleKey);
Refresh the index.html page and open the console.
Click on the HTML page and try pressing the arrow keys (up, down, left, right) and you should see the console logging "HANDLING KEY" every time you press a key.
You might notice that when you hit the arrow keys, the page is also scrolling.
That is because it's a default. You probably don't want to turn off the scroll default unless you were accounting for the page being loaded on a very small window but if you did want to, you could just pass the event to the handleKey function like so handleKey(e) and call e.preventDefault(); on it.
If you refresh the HTML page, and then hit COMMAND + R on your keyboard, that should refresh the page.
However, when you try it, you will notice that it does not refresh the page.
That is because you called preventDefault() on every keydown event.
Comment out the e.preventDefault() line of code within the handleKey() function and then manually refresh the HTML page.
function handleKey(e) {
  // e.preventDefault();
  console.log(e.key);
  console.log("HANDLING KEY");
}
Now, if you were to press any key, you would see it logged in the console.
We only really care about the arrow keys so what we can is check whether the key value has the word arrow in it.

Add an if statement, which we haven't learned about before, but if conditions check if something is true (whether it evaluates to boolean true or false), and then runs a block of code based on that condition.
Check whether the key includes the word arrow, and if it does, move the logic to log to the console within the if block as well as the preventDefault() call, like so 👇
if (e.key.includes("Arrow")) {
  e.preventDefault();
  console.log(e.key);
  console.log("HANDLING KEY");
}
Now, if you refresh the HTML page, if you use any of the arrow keys, you will see it logged in the console, but if you press any other key, it won't.
You should now be able to press command + R to refresh your html page using the keyboard shortcut.
That was just the handler. Now you need to hand off the key to the draw function.
Let's create a function called draw that takes in an argument.
Instead of just having a key passed as the first argument, it will take in an options object.
That options object will contain everything that you wish to pass to the draw function.
This is useful when you have a function that needs a lot of things passed to it.
It's too long to pass in that many variables such as 👇
function(one, two, three, four five)
You need to pass them in the specific order and if some of them are optional, it gets even trickier.
So instead of passing each argument, we will pass in the option object which will contain different properties that contain the data we need.
function draw(options) {
  console.log(options.key);
}
Although we haven't learned objects yet, in the handler, you will be passing in an object that has a key property whose value is e.key like so 👇
functionHandleKey(e) {
  if(e.key.includes('Arrow')) {
    e.preventDefault();
    draw({ key: e.key });
    console.log(e.key);
    console.log('HANDLING KEY');
  }
}
Now, within the draw function, log the options argument.
At this point you have the following:
- event listener, which listens for keydown and runs
handleKey handleKeychecks if the key is an arrow if it is, passes that along to thedrawfunction.drawhas an object and inside of that there is one propertykeywhich tell us the key is arrow up.
Another thing Wes likes to use, similar to how we used destructing in an earlier example, is using destructuring in function declarations.
So instead of doing the following 👇
function draw(options) {
  console.log(options.key);
}
We could destructure the options object directly into a key variable like so 👇
function draw({ key }) {
  console.log(key);
}
This gives us a top level variable called key that you can use directly.
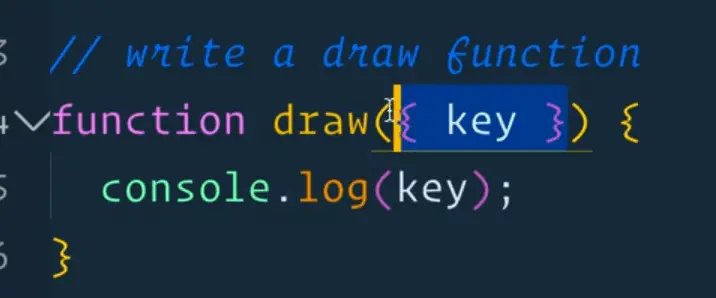
So this curly bracket above 👆 is called object destructuring, where you can take properties and rename them into proper variables and it allows you to have shorter variable names.
Get rid of the logs within the handlers.
That should leave one log of the key within the draw function.
If you refresh the HTML page and press the arrow keys, you will see they are being logged.
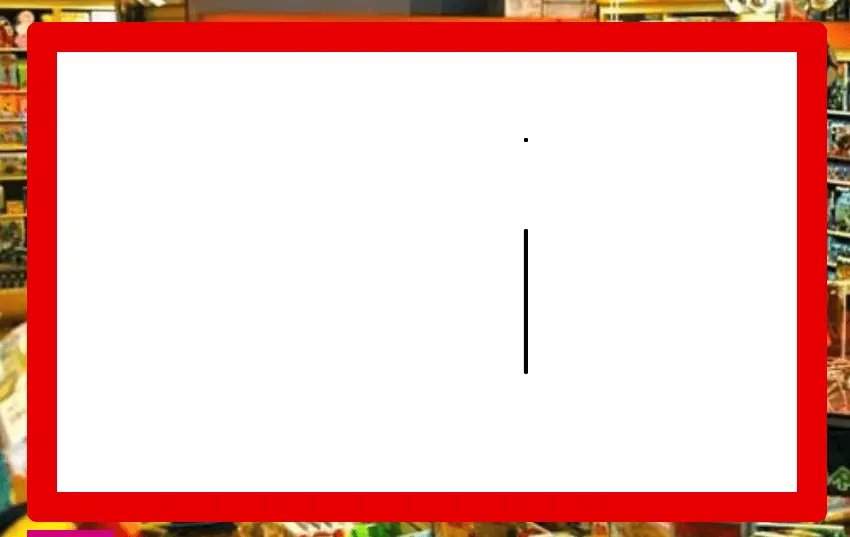
Now, when someone goes ahead and uses their keys, you can start to draw directly onto the canvas.
Just like you have created ctx.beginPath earlier in the JavaScript file, call call beginPath on the context within the draw function.
function draw({ key }) {
  console.log(key);
  // start the path
  ctx.beginPath();
}
Similarly like you called ctx.moveTo(x, y) earlier, call moveTo().
You want to move the context to where it was so add the following 👇
ctx.moveTo(x, y);
Next you need to move the x and y depending on what the user did.
Add the following:
// move our x and y values depending on what the user did
x = x - 10;
y = y - 10;
ctx.lineto(x, y);
ctx.stroke();
So what you did there was change the x and y values and then you created a line to our new x and y values, and then called .stroke().
You may notice that Prettier/ESLint is complaining that x and y are const values, which cannot be updated.
Previously, ESLint or Prettier noticed that our x and y values which we had saved as let variables were never updated, so ESLint updated them to const.
However, now that you want to change those values, you need to switch them back to lets.
You also may notice that when you save your JavaScript file, it reformats from x = x - 10; to x -= 10; which is a short form way to say the same thing.
Now if you refresh the page and press an arrow key, you will see an error in the console that says something like this:
Uncaught TypeError: ctx.lineto is not a function at draw (etch-a-sketch.js:31) at handleKey (etch-a-sketch.js:42)
That is because it should be ctx.lineTo(x, y).
Make that change in your code.
Now if you refresh the page and hit an arrow key, you should see a line being drawn on the etch-a-sketch!
What is happening there is anytime an arrow key is pressed we are removing 10 pixels from the x and 10 from the y, and then we paint.
That's obviously not what we want but this is just to demonstrate that it is responding to our key pressed.
One thing Wes doesn't like doing is hard coding the values like x = x - 10;.
Instead, setup a variable amount and set that at the top of the file and reference it to change the value whenever we want.
Add the following towards the top of the file 👇
const MOVE_AMOUNT = 10;
You may be wondering why did Wes use all capitals for that variable name?
It's not a "best practice" but it is something that some developers do and Wes has picked it up himself.
When it is a true constant, meaning that value will never change, we tend to make it uppercase and use underscores.
Now, go through our etch-a-sketch.js file and everywhere that you have used 10, and replace it with MOVE_AMOUNT.
Now you have used one variable to reference the width everywhere we go.
Now you don't want to just go up and to the left whenever someone presses an arrow key.
You need to go back into our draw function and write a bit more code that depending on which arrow key the person has done, you can do react.
We haven't really learned about flow control yet (if statements and such), but this is a perfect case to learn for something called a switch statement.
Wes doesn't use switch statements all that often, but it is perfect use case.
A switch statement is essentially saying, take in a variable like the key, and depending on all of the different cases (it might go up, down, left or right).
There are four possible cases in this example. Each of those cases has a different outcome.
A switch statement allows us to say "based on these four different outcomes, do the following".
Within the draw function remove these two lines of code 👇
x -= MOVE_AMOUNT;
y -= MOVE_AMOUNT;
Instead run a switch statement.
Pass the switch statement the variable you want to run it against (the key in this case), and then the cases are the possible values that key might be.
Note: a switch statement could also be written as an if statement such as 👇
if (key == 'ArrowUp') {

} else if (key == 'OtherValue') {

}
However a switch statement is a lot more readable.
Add a case for 'ArrowUp'.
If key equals 'ArrowUp', we will move the y 10 pixels like so y = y - MOVE_AMOUNT;.
switch(key) {
  case 'ArrowUp':
    y = y - MOVE_AMOUNT;
}
You might notice if you save the code, VS Code will throw an error complaining that the switch statement expects a default case.
A switch statement should always have a default case which specifies the behaviour to execute if none of the other cases match (if key does not equal ArrowUp, ArrowDown, ArrowLeft or ArrowRight in our example).
Hopefully that should never happen but it's always best practice to give your cases a default.
Make the default just break, like so 👇
  switch (key) {
    case "ArrowUp":
      y -= MOVE_AMOUNT;
    default:
      break;
  }
Actually in a switch statement after every single case, you have to write the break keyword which will actually stop the switch from running, and skip over the rest of it.
Here is what you have so far:
switch (key) {
  case "ArrowUp":
    y -= MOVE_AMOUNT;
    break;
  default:
    break;
}
You have only implemented the case for ArrowUp.
If you refresh the page and hit the arrow up key, you should see a line being drawn!
Now, let's add the rest.
Duplicate that case three more times.
For ArrowRight, you will increment the x value.
For ArrowDown the y value will be incremented.
For ArrowLeft, the x value will be decremented.
switch (key) {
  case "ArrowUp":
    y -= MOVE_AMOUNT;
    break;
  case "ArrowRight":
    x += MOVE_AMOUNT;
    break;
  case "ArrowDown":
    y += MOVE_AMOUNT;
    break;
  case "ArrowLeft":
    x -= MOVE_AMOUNT;
    break;
  default:
    break;
}
Note: if you get an error about the x being a const, that is likely the result of prettier changing it if it doesn't see it being updated anywhere in your code. You need to change it back to a let variable.
Now refresh the page and let's try it!
Now what you want to do is modify the code so the colour of the line changes as you go along.
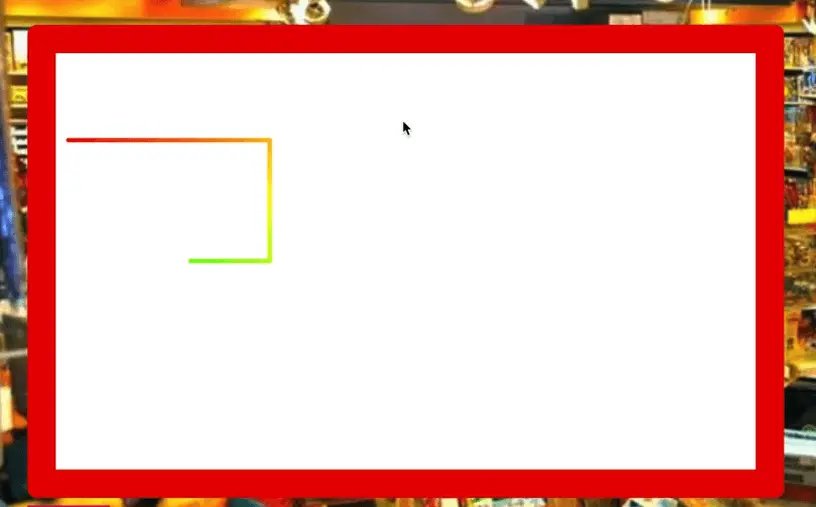
That is actually very simple to do, you just have to change the HSL values.
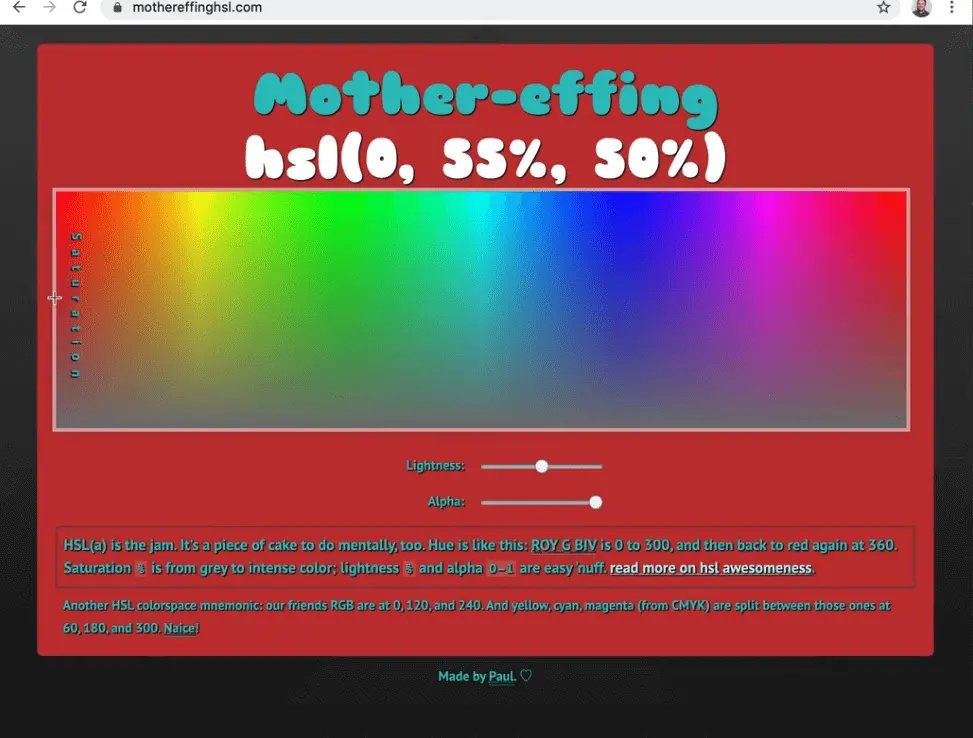
If you have never seen Mothereffing HSL, we would recommend going to https://mothereffinghsl.com.
HSL is a way to declare color in a browser.
It is similar to Hex Codes and RGB, but HSL is a cool way to do it.
If you just hover over the gradient, you will see the H value goes from zero to 359-360. Once you pas that, it will just go from the start and give you a rainbow.
Tou can use that value, every time you move the cursor, increment the H value (hue) by 1.
Above the draw() function, make a new variable called hue and set it to 0.
Next update the stroke color to start at a bright green like so 👇
const hue = 0;
ctx.strokeStyle = `hsl(100, 100%, 50%)`;
Now instead of hard coding the first argument to hsl, interpolate it to pass in the hue variable like so 👇
ctx.strokeStyle = `hsl(${hue}, 100%, 50%)`;
The line will always be red, but what you will do is every time that you use the draw function, increment hue by one and update the stroke style.
Add the following code 👇
// write a draw function
function draw({ key }) {
  // increment the hue
  hue += 1;
  ctx.strokeStyle = `hsl(${hue}, 100%, 50%)`;
You need call strokeStyle again, even though you set it on page load to be a variable.
That is done once the page loads, it's not like a live variable that will update itself.
You have to explicitly update the strokeStyle by 1.
If you try it now, you will see that it works.
If you want to change the colors more quickly, you can instead add + 10 when incrementing the hue.
You can also try to play around with it and do something like this 👇
ctx.strokeStyle = `hsl(${Math.random() * 360}, 100%, 50%);
That will give you cool effects like these 👇
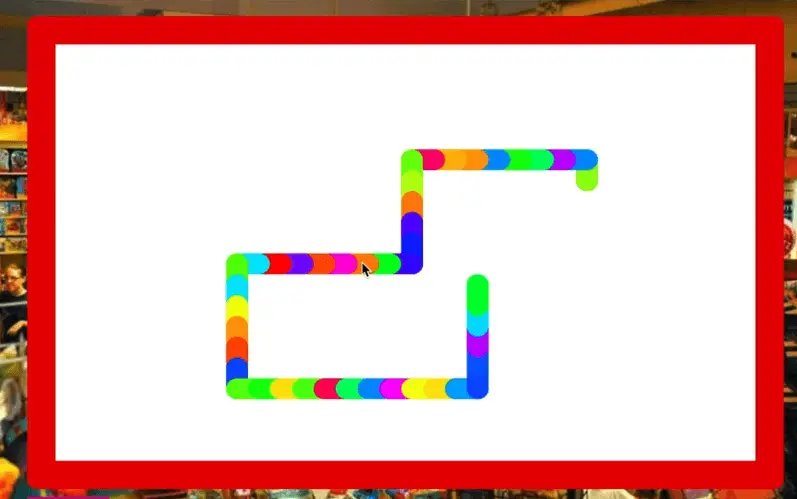
You can have a lot of fun with HSL.
Shaking / Clearing the Canvas
Now you need to work on the shake / clear canvas function!
The idea for this effect is to be similar to what you do to clear a real etch-a-sketch, you shake it!
We will have a shake button that is responsible for triggering this.
Add the following code 👇
// clear or shake function
function clearCanvas() {
  canvas.classList.add('shake');
}
Now, when you refresh the HTML page and run clearCanvas() in the console, you should notice the etch-a-sketch doing a little shake animation.
That is because the class of shake is applied to it. Wes has written some CSS to create that effect in this code 👇
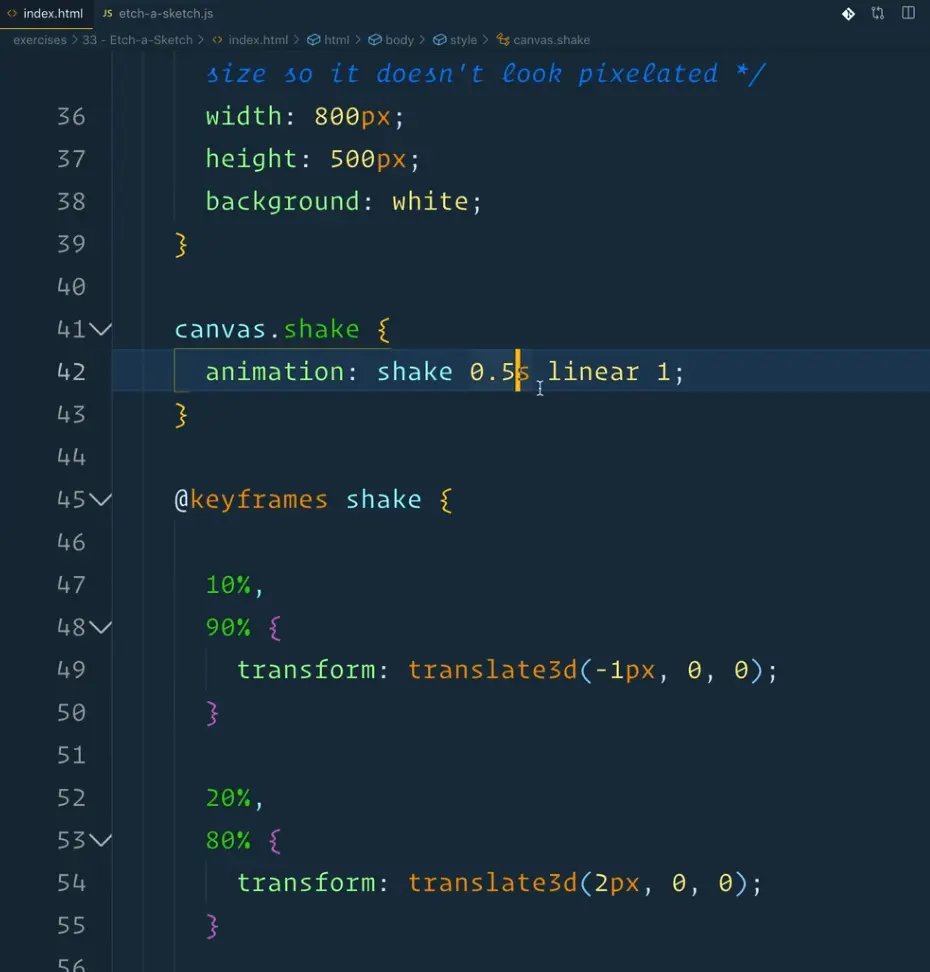
canvas.shake {
  animation: shake 0.5s linear 1;
}
What we are saying there is when the canvas has a class of shake, run the shake over 0.5 seconds, run it linearly and only run it once.
You could run the animation 10 times if you wanted by pass in the 10 instead of 1.
There are a couple of problems here.
If you were to run clearCanvas() again in the console, you will notice nothing happens because the canvas already has a class of shake.
However if you were to manually remove that class of shake and then call clearCanvas(), it would work.
You might be thinking what if the solution is wait .5 seconds and then remove the shake class?
However, trying to lineup timers that are set in your CSS with your JavaScript, it is okay but tends to get you in a world of hurt.
What you can do is listen for the animation to finish and then programmatically remove the class from it.
Just like we can listen to a click, we can listen to this event called animationend.
Within the clearCanvas() function, add an event listener that listens for the animationend event and when that event happens, run a function that will remove the class of shake for the canvas. 👇
// clear or shake function
function clearCanvas() {
  canvas.classList.add("shake");
  canvas.addEventListener("animationend", function() {
    console.log("done the shake!");
    canvas.classList.remove("shake");
  });
}
Now if you refresh the page and run clearCanvas(), you should see the console log and the canvas should shake again.
However if you run it again and again from the console, you will notice that "done the shake" is being called many times 👇
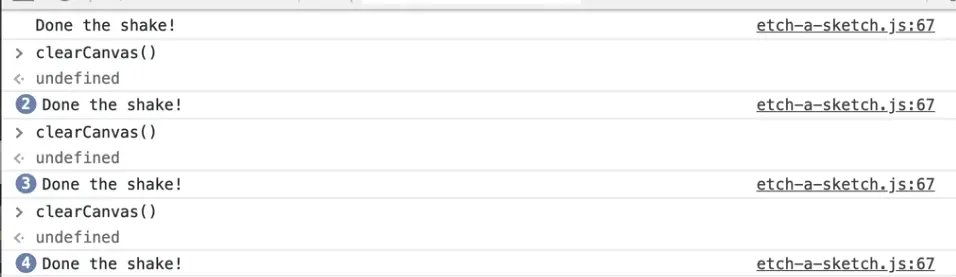
You may be wondering what is going on.
This is a common problem, what you are doing is when you run clearCanvas(), you add the class, listen for that animation to be over, and then we remove it.
But what is happening is the canvas still has the event listener of animationend added to it.
Every time you clear the canvas, you are adding a new event listener to it over and over again.
The number of times you ran clearCanvas() in the console was the number of event listeners that were being added for the same thing.
If you click on the canvas element in the dev tools and then select the "Event Listeners" tab 👇
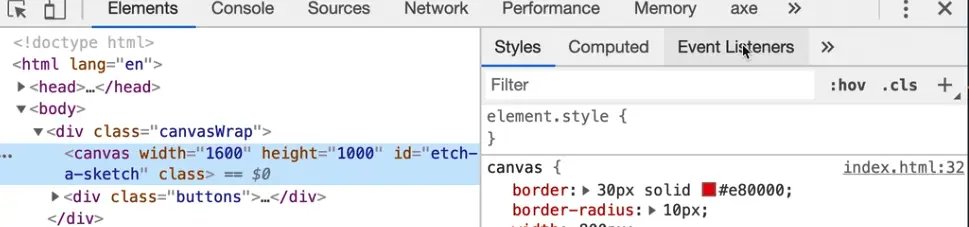
You will see that you are listening for the animationend event every time we run it 👇
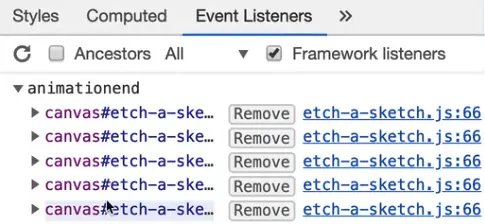
That is obviously not what you want.
Wes mentioned earlier that there is another argument to addEventListener.
The first two arguments specify what event the listener should listen on, and what to do when the event occurs.
There is a third arguments object for addEventLIstener, and we have only so far used the capture option.
Event listener "once" option
Now you are going to use the option once, which you will set to true.
This causes addEventListener to unbind itself. It will call removeEventListener for you, without having to write any code.
// clear or shake function
function clearCanvas() {
  canvas.classList.add("shake");
  canvas.addEventListener("animationend", function() {
      console.log("done the shake!");
      canvas.classList.remove("shake");
    },
    { once: true }
  );
}
If you didn't have that option, you would have to call canvas.removeEventListener('animationend' and reference the function within which you are calling removeEventListener, which is a bit of a pain.
Thankfully you don't have to do that and can use the options argument to set once to true, which will automatically remove the event listener when the animation is done.
Now if you refresh the page and call clearCanvas() from the console, you will notice that you don't keep attaching event listeners.
Instead the event listener is being added and removed, added and removed as needed.
Next you need to hook up the clearCanvas() function to the shake button click.
Add an event listener on the button for a click event.
shakebutton.addEventListener("click", clearCanvas);
If you refresh the page and use the arrows to draw something on the etch-a-sketch and click shake, you might notice the animation happens but the content is not removed from the etch-a-sketch.
That is because we forgot to do an entire part, which is clearing the canvas (which is actually very simple).
Modify the clearCanvas() function to add some more code. Right after you add the shake class, and before tiy add the animationend event listener, call clearRect on the canvas context.
What that does is clear part of or all of the canvas.
Tell it to start at 0,0 which is the top left hand corner of the canvas and go for 500 & 500 pixels. Add the following code 👇
ctx.clearRect(0, 0, 500, 500);
Now refresh the page and draw across the canvas.
Now click the Shake! button.
You should notice only a rectangle that is 500 by 500 pixels from the top left corner is cleared.
Instead of hard coding the 500x500 pixel value, we will replace those with the variables that we created at the very top of the file, width and height.
ctx.clearRect(0, 0, width, height);
Now if you refresh, it should all be cleared.
That is all!
That is our first exercise.
We went a little over the stuff we have learned, and that is Wes' intention for these exercise videos.
He is going to push us in these exercises by introducing some new concepts, destructuring, canvas, right in the exercise.
This is so you can get an idea of how it works when you are in the headspace of building real world things.
Find an issue with this post? Think you could clarify, update or add something?
All my posts are available to edit on Github. Any fix, little or small, is appreciated!
